Dreamweaver tutorial: Absolute versus relative positioning in Dreamweaver
What you’ll learn in this Dreamweaver Tutorial:
|
This tutorial provides you with a foundation for working with Adobe Dreamweaver positioning. It is the fifth lesson in the Adobe Dreamweaver CS5 Digital Classroom book. For more Adobe Dreamweaver training options, visit AGI’s Dreamweaver Classes. |
Adobe Dreamweaver Tutorial: Absolute versus relative positioning in Dreamweaver
Absolute positioning: An element that is set to absolute strictly follows the positioning values given to it, relative only to its containing element. The containing element can be another div or the page itself. Absolutely positioned elements are pulled out of the normal flow of HTML content, and regardless of what surrounds them (for example, text content or neighboring divs), they always appear at the exact coordinates assigned to them.
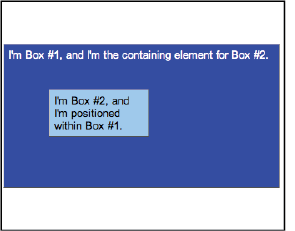
Here is an example of a div absolutely positioned within another div. The larger div (Box #1) is the containing element, and so any positioning values assigned to Box #2 are relative to the element boundaries of Box #1.
|
Box #2 is contained, or nested, within Box #1. |
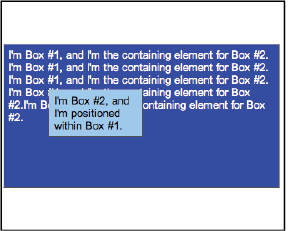
Adding additional content to the containing box (#1) has no effect on the nested div. It remains positioned outside the flow of HTML.
|
Box #2 remains in position even with added content in Box #1. |
Relative positioning: A relatively positioned element accepts values for position properties such as top and left, but it also takes the normal flow of neighboring HTML content into account. Here are the boxes and values shown in the preceding two figures; the only difference here is that the position property for Box #2 has been set to relative instead of absolute.
|
Box #2 is still offset, just as before, but it’s being |
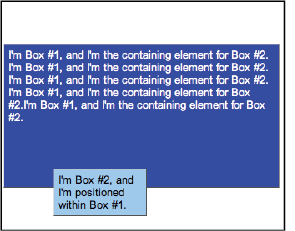
Although it appears that the top and left values have changed, they haven’t. Unlike absolutely positioned elements, relatively positioned elements stay within the normal flow of HTML content, which means that they can be displaced by the elements (in this case, the text) surrounding them. In this example, Box #2 is still 50 pixels from the top and 50 pixels from the left, but its point of reference is the end of the preceding text content, not Box #1.
Positioning items relatively is useful when you want an item to flow with the items surrounding it. The following image shows five divs nested inside a larger div to create a menu.
|
All menu items are positioned relative to one another, and |

The same example is shown in the figure below, with the position set to absolute for all menu items. The result is a collapse of the menu—all the menu items are trying to occupy the same place at the same time, without regard for their neighbors.
|
When set to absolute, the menu items stack on top of one another, because they |
The files used for these examples are located in the dw05lessons folder, and are named absolute_relative.html and relative_menu.html. Open them in Dreamweaver and explore the code to further your knowledge. |
Any element, or, in this case, any box, can have the position property applied, and one of five possible values can be set: absolute, fixed, relative, static, or inherit. The two most commonly used are absolute and relative, and although both can accept positioning properties such as top and left, they are rendered differently, even with identical positioning values.
Positioning content with AP Divs in Dreamweaver
Now that your container is centered on the page, you’ll need to add boxes to hold content within the container. The easiest and most visual way to place boxes in Dreamweaver is with the Draw AP Div button. An AP or Absolute Positioned Div is placed exactly where you draw it, using the page as its point of reference by default.
For this exercise, you’ll want your AP Divs to be positioned using the container as their point of reference. To change the default behavior of AP Divs as you draw them, an additional step is required. This step will ensure that your AP Divs are nested inside the container div.
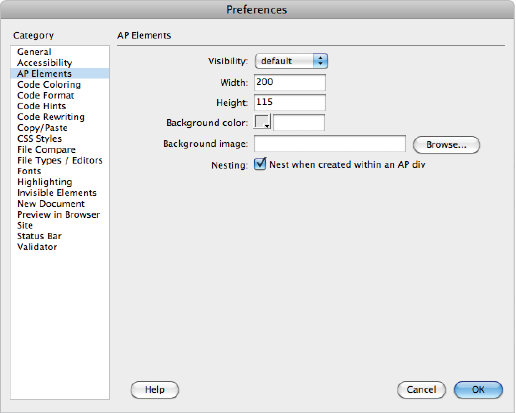
1 Choose Edit > Preferences (Windows) or Dreamweaver > Preferences (Mac OS) and then choose the AP Elements category. Click the checkbox labeled Nesting. This ensures that the new boxes you create will be nested inside the container. Click OK.
|
Set your Preferences so that new AP Elements automatically nest when inside your containter. |
Creating a header section with the Draw AP Div in Dreamweaver
Now that you’ve created a container that is centered within your page, you’ll add the other layout elements, with the header. The Draw AP Div tool allows you to add boxes within your pages manually. Once a box is added, you can style it with CSS (change the width and height, add background color and more) and you can also add content such as text or images.
1 In the Insert panel, click on the drop-down menu and choose Layout.
|
The Layout section of the Insert panel |
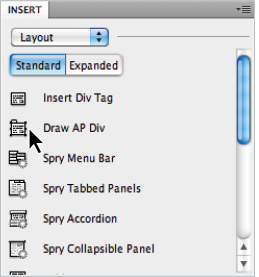
2 In the Insert panel, click the Draw AP Div button ( ). Move back over the page; your cursor is now a crosshair signifying that you can begin to draw.
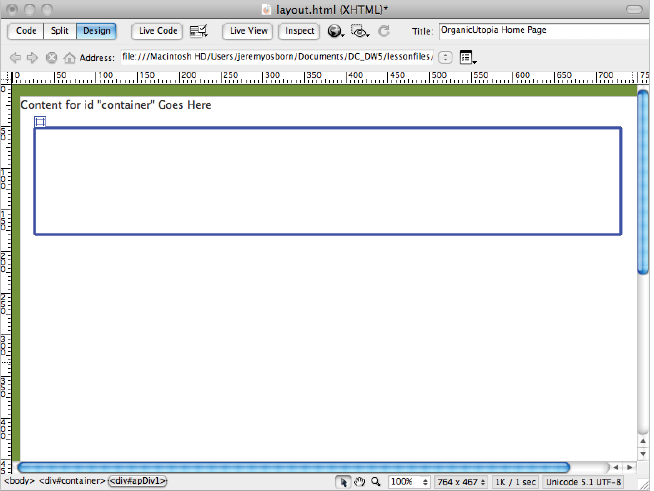
3 Place your cursor below the placeholder text in the top left corner of the container and then click and drag down and to the right to draw a box. Stop approximately 25% of the way down the screen. The box appears with a handle in the top left corner.
|
The newly created AP Div has a handle in its top left corner. |
4 Click on the selection handle in the top-left corner of the AP Div and click and drag the box around the screen to see how you can position the box manually. Notice in the Property Inspector that the properties for your box are displayed and dynamically change as you move it; currently just the Left and Top position (L and T) will change. Your settings will likely be different than those in the figure.
Click inside the Bg color text field and type #9fcc41 which is a yellow-green color.
|
The Property Inspector displays the properties of the AP Div and allows you to set its background color. |

You will now position this box to become your header.
5 In the bottom-left corner of the Property Inspector, locate the CSS-P Element text field. It is currently named apDiv1. Select the text within this text field and type header.
When Dreamweaver creates new AP Divs, it gives them the default names of apDiv1, apDiv2, and so on. You can, and most often should, rename these, simply because the default name is non-descriptive and unhelpful. Keep in mind that functionally, this is exactly the same step as the previous exercise when you named the div container. In both cases you are creating a CSS ID behind the scenes.
6 Select the placeholder text Content for id “container” Goes Here and delete it. You are about to create your header at the top of the page and you don’t need this content.
7 If you currently do not have rulers visible, choose View > Rulers > Show. Click the edge of the header div again, and pay careful attention to the L (Left) and the T (Top) values.
You will now position the header to the top left corner of the container using the Property Inspector.
8 In the Property Inspector, type 0px into the L (Left) text field and press Enter (Windows) or Return (Mac OS). The box moves and the left side of the box is positioned horizontally at 0 pixels. Type 0px into the T (Top) text field and the top of the box is positioned vertically at 0 pixels.
Be sure to type the number and the px value (i.e. 100px) together in order for position to be valid.
|
With Top and Left values both set to 0px the header is aligned to the top-left corner of the container. |

9 You also need to set the width of this header. Again, you could do this manually by dragging the edges of the header box, but this is not precise. Better to use number values and match the width of the header to the width of the container.
In the Property Inspector, type 770px for the W value and 80px for the H value.
10 You can add content to the box by simply typing in it. Click inside the box on the workspace and type Organic Utopia. You’ll be replacing this with the logo a bit later, for now this will serve as a placeholder.
11 Choose File > Save to save your work, and then preview your page by choosing File > Preview in Browser > [Default Browser] or by pressing the Preview/Debug in browser button () at the top of the document window. Close the browser when finished.
Continue to the next Dreamweaver Tutorial: Adding an introduction section to your page in Dreamweaver >