Dreamweaver tutorial: Advanced text formatting with CSS in Dreamweaver
What you’ll learn in this Dreamweaver Tutorial:
|
This tutorial provides you with a foundation for working with Adobe Dreamweaver text formatting. It is the fourth lesson in the Adobe Dreamweaver CS5 Digital Classroom book. For more Adobe Dreamweaver training options, visit AGI’s Dreamweaver Classes. |
Adobe Dreamweaver Tutorial: Advanced text formatting with CSS in Dreamweaver
Text on the web is necessarily limited due to the fact that designers cannot assume that fonts they choose in Dreamweaver will be available to the user. There is a small set of fonts that designers can use that are essentially guaranteed to be on all users’ systems. Given this limitation, you can use some of the properties in CSS to give your text a distinctive look. In this exercise, you will work with the line spacing of your paragraphs and lists, and the letter spacing of your headings.
1 In the CSS panel, double-click on the rule for p (paragraph) to open the CSS Rule definition dialog box. You will now override the default line-height for your paragraphs. If you have a print background, you may be familiar with leading, which is the amount of space between the lines in a paragraph. Line-height is the same thing as leading.
2 In the Line-height field, type 20; the value is automatically set for pixels. Press Apply, and you will see the space between your paragraph lines increase. Extra line-height can often make your text more readable, so it is great that you have this option in CSS. However, a problem may arise if you change the font-size. For example, setting the fixed value of 20 pixels looks good with 14-pixel type, but what if you were to later change the font-size of your paragraph? The 20-pixel line-height would look strange. A more flexible way to assign line-height is to use a percentage.
3 From Line-height drop-down menu to the right of the text field, choose percent (%). Change the value from 20 to 120, and press Apply, you won’t actually see a dramatic difference because the end result is similar, but by assigning line-height to 120 percent, your initial font-size isn’t as important. There will always be the height of the line plus 20 percent extra, no matter what the font-size is. Press OK.
|
Changing the line-height value of a paragraph to a percentage is more flexible than using pixels. |

Notice that the list under Spring Events did not change. This is because the line-height property applies solely to paragraphs, not lists. If you want to make this list appear the same, you could always apply the same value of line-height. However, you will add extra space between the lines to make the list stand out from the rest of the page.
4 In the CSS Styles panel, double-click on the ul rule. The CSS Rule definition dialog box appears. In the field for line-height, type 150; then from the drop-down menu to the right, select percentage. Press OK, and you now have extra space between your list items. Now you’ll style your Heading 2 element.
5 In the CSS Styles panel, double-click the h2 rule. In the Text-transform section, click on the menu, and from the list, choose uppercase. Press Apply, and you will see your two headings, Spring Events and Rent Our Facility!, transform to uppercase. This helps your headings stand out and is a lot faster than retyping these headings by hand. Now you’ll add some space between all the letters.
Transforming your text to uppercase is just a style; in the HTML, your original text still has the standard formatting. One of the few times this might be an issue is if your web page is being viewed without a style sheet; many cell phones and PDAs do not fully support style sheets (or use them at all), and so your text would appear lowercase as it is in the HTML. |
6 Select the Block category in the CSS Rule definition dialog box. Block styles generally control the way text is displayed in the browser. In the field for Letter-spacing, type 5; then choose px from the drop-down menu to the right. Press Apply, and the two headings are extended. Each letter pair has 5 pixels of space between them. Press OK. When used well, letter-spacing can make your headings more readable and unique.
|
Adding letter-spacing and uppercasing to your |

Fine-tuning page appearance with contextual and pseudo-class selectors in Dreamweaver
Earlier in the lesson, you learned that you need more control over your CSS. For example, you will now look at a solution for the following problem. Look at the Spring Events list on your page: lines 1 and 4 both begin with the word Free. Let’s say you wanted to emphasize this word slightly to attract your user’s attention. You could simply bold the word, but what if you not only wanted to bold it, but change the color as well. It would be possible to create a class to do this, but there is another option that has some useful benefits, with the daunting name of contextual selectors.
To make things even more difficult, Dreamweaver actually refers to contextual selectors, which is the official CSS term for them, as compound selectors. Despite the terminology, they are very powerful and important to understand.
Contextual selectors apply formatting to tags and classes when they appear in a specific combination. For instance, you usually have rules for the <p> (paragraph) and <strong> (strong) tag, but then you might have another set of rules for <strong> tags inside <p> tags. For instance, you can designate that any text inside a <strong> tag must be red, unless it is used within a <p> tag, in which case it should be blue. This breathes new life into your tag styles by multiplying the number of times you can use them in conjunction with each other.
1 In the first line of the Spring Events list, select the word Free. Click on the HTML button in the Property Inspector, then press the Bold button. Using the example from above, let’s say that simply bolding this wasn’t enough and you wanted to add some color.
2 Press on the CSS button in the Property Inspector; then click on the menu for Targeted Rule and choose <New CSS Rule>. You must do this; otherwise, when you choose a color, you will target the whole list, which is not what you want.
3 Click on the color swatch in the Property Inspector and choose the dark green swatch in the top row, #030. The New CSS Rule dialog box appears.
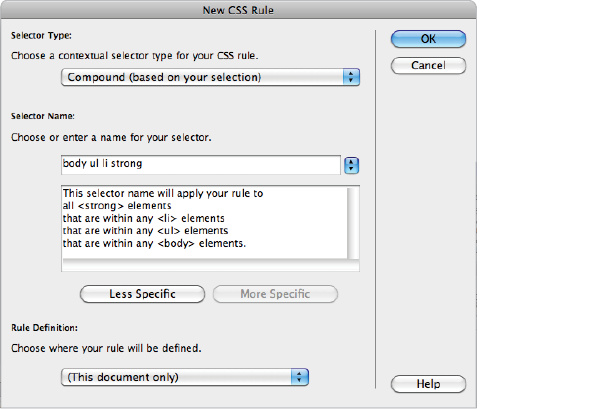
4 From the Choose a contextual selector type for your CSS rule drop-down menu, choose Compound (based on your selection). In the Selector Name field, the text, body ul li strong, appears. This may look strange at first, but it’s actually very logical if you read it from left to right. The body tag is the ancestor, or parent, of the ul tag, which is the parent of the li tag, which is the parent of the strong tag. In other words, your style will only apply to strong tags, which are nested in a list item (which is nested in the unordered list, and so on).
|
Set the Selector Type to Compound to create a contextual selector. |
In the official specification of CSS, the concept of ancestor and parent elements is an important one. In fact, the concept is taken even further, in the example above, where the ul tag is referred to as the child of the body element because it is the direct descendant of the body element. There are even sibling elements! |
In many ways, including the body element in this rule is overkill. Technically speaking, body is the ancestor of all tags in a document, as it nests virtually everything else, and so you can actually remove it and make your code a little easier to read.
5 Below the Selector Name section, click on the Less Specific button, and the list of rules is shortened to ul li strong; this has no effect on the behavior of the rule. Press OK. The word Free is now bolded and dark green. Deselect the text to see the final result. The rule is in place, and anything that is bolded inside a list will have this appearance. You can see this now by bolding the word Free in the fourth line of the list.
6 Press the HTML button in the Property Inspector. Select the word Free in the fourth line and then press the Bold button in the Property Inspector. The word takes on the same appearance. Bolding anything else in the list causes it to have the same appearance, while bolding anything not in a list has only the default effect.
Styling hyperlinks in Dreamweaver
You’re slowly beginning to pull together a page with a color theme to it, even if there is no layout per se. A frequently asked question when people are learning to create web pages is how to style the hyperlinks on a page. This can be accomplished with CSS, although there are some precautions. Since the early days of CSS, the default style for unvisited hyperlinks has been a bright blue with an underline for unvisited hyperlinks and a purple color with an underline for visited hyperlinks. An argument is sometimes made that users might be confused by hyperlinks that do not fit this mold. On the other hand, many designers like being able to color their hyperlinks to match the rest of their page. Regardless of the debate, it’s important to understand how to do this.
Technically speaking, hyperlinks live in a category called pseudo-class. A pseudo-class selector affects a part or state of a selected tag or class. A state often refers to an item’s appearance in response to something happening, such as the mouse pointer rolling over it. One of the most common pseudo-class selectors is applied to the <a> tag, which is used to create hyperlinks. You’ll now create a pseudo-class selector to affect the appearance of hyperlinks on the events.html page in different states:
1 Choose New from the CSS Styles panel menu to create a new rule. The New CSS Rule dialog box appears.
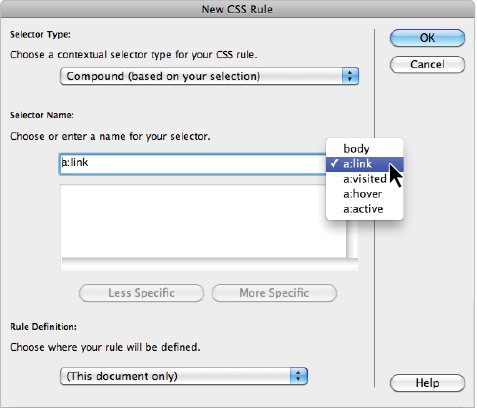
2 From the Choose a contextual selector type for your CSS rule drop-down menu, choose Compound. In the Selector Name section, click to open the drop-down menu to the right of the selector field. You may have different selectors appearing at the top of your menu; this is because Dreamweaver is attempting to create a compound rule, but in fact you are only interested in the last four options, which are a:link, a:visited, a:hover, and a:active. Choose a:link, which affects the appearance of a hyperlink when it hasn’t yet been visited. Press OK.
|
Set the Selector type to Compound and choose a:link from the Selector menu. |
3 The CSS Rule definition dialog box appears. Under the Type category, click the color swatch next to Color and choose the green shade you used in the previous exercise (#030). Press OK, and the products link in the first paragraph as well as the two links at the bottom of the page are now green instead of blue. Now you’ll set the style for hover links, or a:hover.
4 Once again, choose New from the CSS Styles panel menu and the New CSS Rule dialog box opens. You will leave the state for the visited link alone for now. In this case, the default purple is fine. You will now change the state for a:hover, which defines the color of a hyperlink when a user places their cursor over it.
5 From the Choose a contextual selector type for your CSS rule drop-down menu, choose Compound. In the Selector Name section, choose a:hover from the drop-down menu, then press OK.
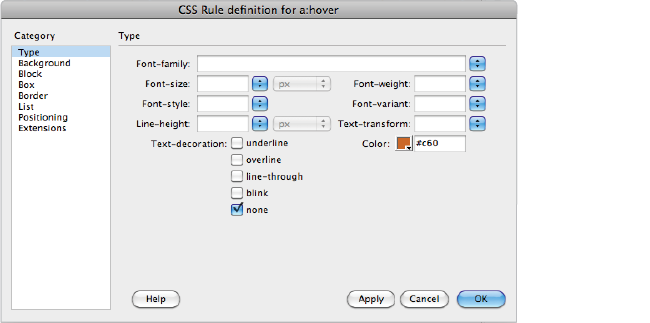
6 From the Type category, click the color swatch next to Color and select the bright orange approximately in the center of the Swatches panel (#C60). In the Text-decoration section, mark the last checkbox labeled none. This removes the underline from the hyperlink for the hover state only. Press OK.
|
Set properties for a:hover, or the appearance of hyperlinks when the mouse pointer rolls over them. |
You can preview the appearance of the hyperlinks by clicking on the Live View button in the Application bar or opening your page in a browser.
7 Choose File > Save; then choose File > Preview in Browser and choose a browser from the list to launch it. Place your cursor over the products link, but don’t click it. This is the hover link. Click on the products link to bring you to the products page, and then click back to the events page by clicking the Events link at the bottom of the page. The products link is now purple because the browser understands you have visited it.
You will leave off styling the a:active link for now. Setting the a:active property defines the way a link appears when it is being clicked on by a user. Close the web browser.
Continue to the next Dreamweaver Tutorial: Div tags and CSS IDs in Dreamweaver >