Photoshop Elements Tutorial: Correcting color in Full Edit in Photoshop Elements
What you’ll learn in this Photoshop Elements Tutorial:
|
This tutorial provides you with a foundation for working with correcting color in Adobe Photoshop Elements. It is the fifth lesson in the Adobe Photoshop Elements 10 Digital Classroom book. |
Photoshop Elements Tutorial: Correcting color in Full Edit in Photoshop Elements
Sometimes adjusting the tonal range brings out a color cast in an image. A color cast is an undesired color shift in a photo. For example, a photo taken indoors with a flash might contain more blue than it should.
In Lesson 3, “Fixing Common Photographic Problems,” you removed a color cast automatically. In this exercise, you’ll have more control over the process as you remove a slight blue cast from your image in Full Edit.
Correcting color casts using Color Variations
You can make color and tonal adjustments in the Color Variations dialog box by comparing and choosing different thumbnail variations of the photo.
 | You can’t use the Color Variations command with images in Indexed Color mode. |
1 Choose Enhance > Adjust Color > Color Variations. The two preview images show the original image (Before) and the adjusted image after you’ve made changes (After).
2 Select Midtones in section 1 to choose the area of the image you want to adjust.
3 Drag the Adjust Color Intensity slider in section 2 to control the intensity of the adjustment that you’ll make when clicking a button in section 3. Dragging the slider to the left decreases the amount of adjustment, and dragging to the right increases the amount of adjustment to be applied. Drag the slider slightly to the left.
4 Click the Increase Red button in section 3 to warm the image and remove the slight blue color cast. Each time you click a button, the After thumbnail is updated.
|
Use Color Variations to compare and choose adjustment options. |
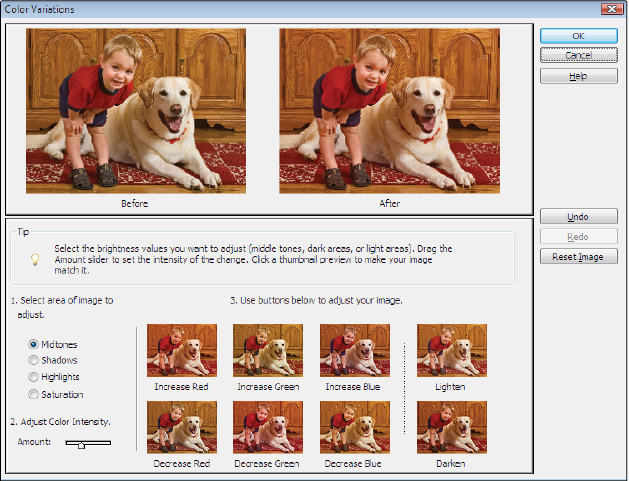
5 When you’re satisfied with the results, press OK to apply the adjustments to your image.
6 Choose File > Save. Keep the image open as you will use it again in the next exercise.
Removing a color cast using Levels
As you become more comfortable with color correction and the RGB color model, you might want to try selectively editing channels using Levels.
1 Choose Enhance > Adjust Lighting > Levels.
2 Choose a color channel to adjust from the Channel pop-up menu. In this exercise, you’ll choose Green to remove green from (and add magenta to) the image.
|
The Levels dialog box allows you to remove a color cast by adjusting individual color channels. |
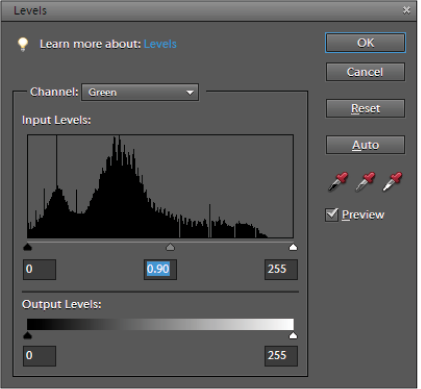
3 Drag the middle input slider to the right until it reads 0.90. Some of the coldness of the image is removed as green is removed and magenta is added. Press OK. (Your histogram may differ from the screen shot in the book.)
Adjusting color curves in an image
The Adjust Color Curves command adjusts highlights, midtones, and shadows in each color channel of an image. You can also compare and choose different tonal presets by selecting from the list of styles in the Select a Style box.
1 In the Editor workspace, confirm that Bobby and Elvis_work is still open and visible.
2 To adjust a specific image area or layer, select it with one of the selection tools. If no selection is made, the adjustment applies to the entire image. (See “Making Selections” later in this lesson.)
3 Choose Enhance > Adjust Color > Adjust Color Curves.
4 In the Select a Style box, choose Default as the type of adjustment to apply.
5 Experiment by dragging the Adjust Highlights, Midtone Brightness, Midtone Contrast, and Shadows sliders. Note the changes in the tone curve to the right of the sliders.
|
Adjust Color Curves automatically adjusts tonal range in each color channel of an image. |

6 When you’re satisfied with the adjustment, apply the adjustment by pressing OK.
7 Choose File > Save.
Adjusting color saturation and hue
You can use the Hue/Saturation command to adjust the hue (color), saturation (purity), and/or lightness of an entire image or of individual colors in an image.
The Hue slider can be used to change the range of colors in a portion of an image. You can use the Saturation slider to make colors more vivid or more muted.
|
Use Hue/Saturation to adjust color, purity, and lightness of an image. |
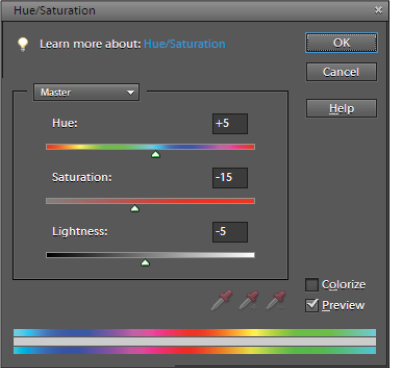
Changing color saturation or hue
1 With the Elvis and Bobby_working.psd file still open Choose Enhance > Adjust Color > Adjust Hue/Saturation.
The two color bars in the dialog box represent the colors in their order on the color wheel. The upper bar shows the color before the adjustment; the lower bar shows how the adjustment affects all hues at full saturation.
2 In the Edit drop-down menu, choose Master to adjust all colors at once.
3 For Hue, enter a value of, or drag the slider to, +5 to remove red from your photo.
The slider values reflect the number of degrees of rotation (from -180 to +180) around the color wheel. A positive value indicates clockwise rotation, and a negative value indicates counterclockwise rotation.
4 For Saturation, enter a value of, or drag the slider to, -15 to decrease the color saturation in your photo.
5 For Lightness, enter a value of, or drag the slider to, -5 to decrease the lightness in your photo. Press OK.
Adjusting saturation in specific areas
Scrubbing with the Sponge tool changes the color saturation of an area. You’ll use it to restore saturation to a specific area of your photo.
Increasing saturation by scrubbing with the Sponge tool
1 Select the Sponge tool ( ) from the Toolbox
2 In the Options bar, click on the brush presets icon and choose the Soft Round 27 pixels option by double-clicking on it.
3 Set the Mode to Saturate. This mode boosts the color’s saturation.
4 Set the Flow to 5 percent. This sets the rate of saturation change.
|
The Sponge tool settings in the Options bar. |

5 Drag with the sponge over the boy’s face, and note the return of some warmth to this area of the photo. Each time you overlap an area that you painted with the sponge, that area is saturated by another 5 percent. This is the reason for setting flow percentages at lower numbers, so you can layer your painting in order to avoid too harsh a result.
Continue to the next Photoshop Elements Tutorial: Making selections in Photoshop Elements >