Photoshop Elements Tutorial: Organizing Your Photos in Photoshop Elements
What you’ll learn in this Photoshop Elements Tutorial:
|
This tutorial provides you with a foundation for working with Adobe Photoshop Elements photo organization. It is the second lesson in the Adobe Photoshop Elements 10 Digital Classroom book. |
Photoshop Elements Tutorial: Organizing Your Photos in Photoshop Elements
Photoshop Elements offers an intuitive way to label and catalog your pictures for quick and easy access when you need them.
Starting up
You will work with several files from the Lessons folder in this lesson. Make sure that you have downloaded the Lessons folder onto your hard-drive. In order to access these files, you need to import them. See “Adding files and folders to the Organizer” located in Lesson 1. Additionally, if you want Photoshop Elements to automatically detect when images are added to your library folder, you need to set it as a Watch Folder. See “Setting a Watch Folder” located in Lesson 1. To make selecting files a little easier, you can limit the display to only images used in each lesson. In the Keywords panel, select specific keyword(s) from the imported keywords submenu.
Understanding the Organizer workspace
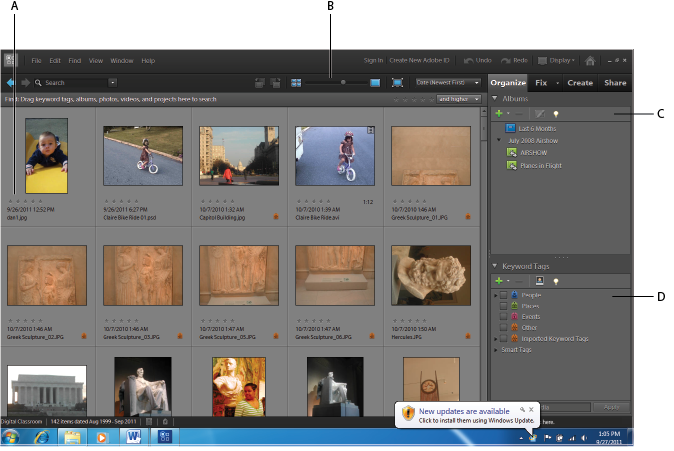
The Organizer is the heart of Adobe Photoshop Elements. You can use the Organizer to find, organize, and share your photos and media files. The Organizer’s Media Browser allows you to view thumbnails of any photo, video, or .pdf file that you have imported. To gain even more control over the images that you view, you can use the Timeline to view and sort by date, or the Keyword Tags panel to view photos by keyword, and the Albums panel to view photos categorically by event or subject based on albums that you’ve created. The Properties panel and the Options bar allow you to view pertinent information and make basic changes to your photos quickly and easily. The Elements Organizer is divided into several different areas.
|
A. Media Browser. B. Options bar. C. Albums panel. D. Keyword Tags panel. |
Media Browser
The Media Browser is the main work area of the Organizer. Use the Media Browser to view and locate thumbnails of the photos, video clips, and audio files in your catalogs. You can select items in the Media Browser to attach tags to them, add them to projects, or edit them.
|
The Media Browser is the hub for all work done in the Organizer. |
Options Bar
The Options bar provides efficient ways to view your photos in the Photo Browser. The Text Search box offers a way to search for photos by filename, keyword, caption and other criteria. The Rotate Left ( ) and Rotate Right (
 ) icons allow you to rotate images into their proper orientation. The thumbnail slider controls the size of the image thumbnails that are being viewed. The View, Edit, and Organize in Full Screen button (
 ) allows you to add keywords and make edits to your photos in full screen mode. The Media Browser Arrangement drop-down menu on the right side of the Options bar controls how photos are sorted by date, either newest first or oldest first.
|
The Options bar allows you to easily organize and search for your images in the Photo Browser. |

Timeline
Photoshop Elements automatically organizes all your photos in the Media Browser Timeline, even if the photos are not tagged. The Timeline is divided into months and years, and you can view images from a particular month or year by clicking that month or year in the Timeline. Choose Window > Timeline to turn this feature on or off.
|
The Timeline allows you to view the images in the Media Browser chronologically. |

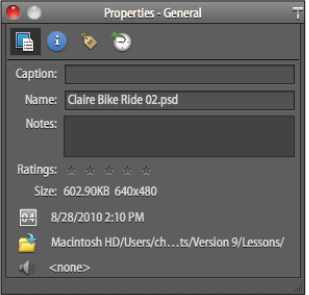
Properties
The Properties panel, also located under the Window menu, is used to add and view additional information about your photos that is not available in the Photo Browser. Dimensions, captions, notes, file size, and location can all be viewed here.
|
The Properties panel adds information to the image that can include details and descriptions. |
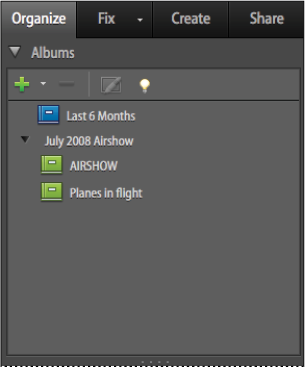
Albums
The Albums panel shows all the different photo albums that you have created to organize your photos. The default album shows all images that have been created in the last six months. Albums allow you to organize your photos in a variety of different ways. Think of the traditional photo albums that you may have created using photographic prints. You can create albums that group photos of a specific event together. For example, you might create an album to organize all the pictures you took at a friend’s wedding, at a child’s birthday party, or in a specific timeframe.
|
As with traditional photo albums, Photoshop Elements albums are used to organize photos so that you can group similar subjects together. |
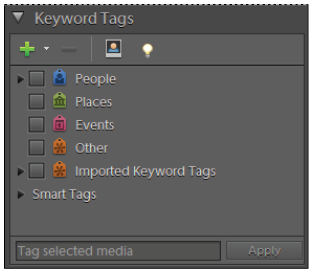
Keyword Tags
The Keyword Tags panel allows you to add keyword tags to your photos. Once applied to an image, keywords allow you to quickly sort through a wide range of images to display only what you wish to view.
|
Keyword Tags are an organizational tool that makes finding images you are looking for much easier. |
Analyzing photos in the Organizer
After importing photos into the Organizer using one of a variety of methods covered in Lesson 1, “Importing Your Photos into Adobe Photoshop Elements,” the next step is to analyze the photos that you’ve shot with your digital camera.
Rotating photos
During the process of taking pictures with your digital camera, you may have rotated your camera. When you import these photos into Photoshop Elements and view them in the Organizer, they may appear rotated. This makes it difficult to view the images. You may find yourself tilting your head to the side to get a better view, which is just not an ergonomic way to view the photo! Fortunately, Photoshop Elements makes it easy to fix this problem.
1 In the Organizer, type Utah in the Search text field in the Options bar at the top of the workspace. This filters the images to those that contain Utah in the name of the file.
2 Notice that all these images have been composed in a portrait orientation but they appear rotated within the Organizer. Select the first photo, then press the Rotate Left button ( ) in the Options bar. This rotates the selected photo counter-clockwise in the Organizer.
|
Press the Rotate Left button in the Options bar to rotate the image counter-clockwise. |
3 Select the second photo and Shift+click the last photo to select the remaining photos, then press the Rotate Left button in the Options bar. Alternatively, you can press Ctrl+Left arrow/Right arrow (Windows) or Command+Left arrow/Right arrow (Mac OS) to rotate images to the left or right respectively using keyboard shortcuts.
Now that the images are being displayed in the proper orientation, you can continue reviewing your photos.
4 Press the Show All button at the top of the Photo browser to view the entire catalog in your Organizer.
Hiding photos
Not every photo you take will be a good photo. Photography is a process that involves many variables that can cause a photo to not make the cut. Whether it’s an overexposed or underexposed image, your nephew ran in front of the camera just as you hit the shutter release, or your finger was partially covering the lens when you snapped the shot; any number of things can cause a photo to be inferior. Your job is to weed out the bad ones and leave the good ones. Let’s see how Photoshop Elements can make this process a snap!
1 In the Organizer, type sunset in the Search text field at the top of the workspace. Eight sunset images are displayed in the Photo Browser because the word sunset is contained in the names of these files.
2 Double-click on the first image, sunset-1, to display it in single photo view. This gives you a more accurate view of the quality of the photo. This image has a mailbox post and a street sign in the foreground which are undesirable. Although you could fix this using the tools provided in Photoshop Elements, it’s not the best photo and you may not want to keep it.
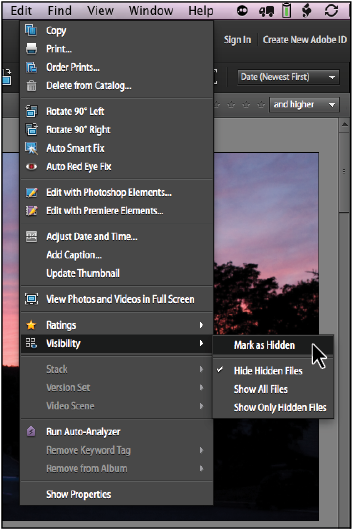
3 Choose Edit > Visibility > Mark as Hidden. The sunset-1 photo disappears from view in the Photo Browser, and the next photo is displayed.
 | It’s important to understand that when you hide a photo from view, the photo is exactly that, hidden. You haven’t deleted anything at this point. You’ve simply decided that you may not want that photo and have hidden it for review at a later time. At that point, you may decide to delete the photo. |
4 This photo, Sunset-2.jpg, suffers from the same problem. There’s a big mailbox in the foreground that really stands out and detracts from the image. This time, right click on the image (Ctrl+click if you don’t have a two button mouse) and choose Visibility > Mark as Hidden. Photoshop Elements hides the photo from view. Use the down arrow on your keyboard to continue navigating through the images that are displayed in the Media Browser.
|
Marking an image as hidden to hide it from the Media Browser. |
5 Mark Sunset-3 and Sunset-4 as hidden, as well, because, these images also have objects in the foreground that are distracting. The rest of the images don’t look too bad, and so they remain visible. Remember, the file names appear in the lower-left corner of the Media Browser.
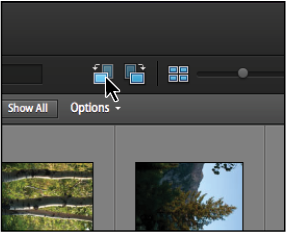
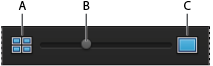
6 Press the Small Thumbnail Size button ( ) in the Options bar to view the images as thumbnails. You can drag the slider to the right of the Small Thumbnail Size button to resize the thumbnails for easier viewing.
|
A. Small Thumbnail Size button. B. Thumbnail slider. C. Single Photo View button. |
Reviewing and removing hidden photos
After you mark photos as hidden, you may want to go back and review those photos. You may decide that they’re not so bad after all, or you may confirm that they aren’t good shots and decide to delete them.
1 Choose Edit > Visibility > Show Only Hidden Files. This displays all the images that are currently hidden in the Organizer. Each photo that has been marked as hidden is displayed with a Hidden icon ( ).
).
|
Each photo that has been marked as hidden displays with a Hidden icon in the lower-left corner of the image. |
2 Double-click on the first thumbnail to display the photo in Single Photo view. The first two images are definitely bad. Use your down arrow key to navigate to the Sunset-3 photo. This image contains characteristics that you like and can probably be recovered. Choose Edit > Visibility > Mark as Visible to put the image back into the visible category. Repeat this process for the Sunset-4 image.
3 Press the Small Thumbnail Size button to display the hidden photos as thumbnails. These images are definitely not keepers, and so there’s no point in allowing them to occupy hard drive space on your computer.
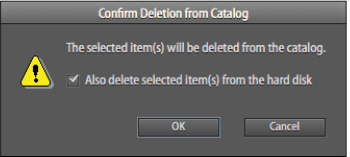
4 Select the first thumbnail, then Shift+click the second thumbnail to select it as well. Choose Edit > Delete Selected Items from Catalog or press the Delete key on your keyboard. The Confirm Deletion from Catalog dialog box appears. This dialog box is telling you that these photos will be removed from the catalog and will no longer be managed by Photoshop Elements. Make sure that you click the Also delete selected item(s) from the hard disk checkbox; otherwise, the photo files will still occupy storage space on your hard drive.
5 Press OK.
|
Make sure to check the box to Also delete selected item(s) from the hard disk so that the deleted photos no longer occupy space on your hard drive. |
6 The Organizer is currently not displaying any images because in step 1, you set Photoshop Elements to only display the hidden files. Choose Edit > Visibility > Hide Hidden Files to display the photos that are visible and match the search criteria for sunset.
Renaming photos
Digital cameras are notorious for using obscure file-naming conventions to name photos. It’s not uncommon to see a naming format like IMG_01234.jpg. This tells you nothing about the photo, and although the use of keyword tags (covered later in this lesson) can help to more clearly identify images, it’s often helpful to rename the image to something more relevant, such as the event or subject.
1 Make sure you are still viewing the sunset images by typing sunset in the Search text field, and press the Small Thumbnail Size button ( ) in the Options bar at the top of the workspace in the Organizer. If you are no longer able to see the filename for the images, simply drag the Adjust size of thumbnail icon to the right until the filename appears.
2 Select the first thumbnail, then Shift+click the last thumbnail to select all the images currently being displayed.
Although the filenames for these photos describe the sunset in the photo, you’ll rename them to be even more descriptive. Photoshop Elements makes this easy and can batch renamed files instead of having to rename photos individually.
3 Choose File > Rename. The Rename dialog box appears.
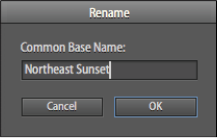
4 Because there are multiple photos selected, the Rename dialog box displays a Common Base Name text field to use as the base text for every photo. Type Northeast Sunset in the Common Base Name text field.
|
With multiple photos selected, the Rename dialog box asks for a base name, then appends a number to each image automatically. |
5 Press OK. Notice that every image has been renamed to Northeast Sunset but is appended with a consecutive number to differentiate each photo.
| If you do not see the file names for the images, first check under the View menu and make sure there is a check mark next to Show File Names and Details. If these options are checked and you still do not see the file names, then drag the Adjust size of thumbnail slider to the right until the file names appear. |
If you prefer renaming photos individually, the process is the same. However, the Rename dialog box asks you for a name for only the photo that is selected instead of a range of images.
Moving photos
Photoshop Elements manages photos that reside on your computer’s hard drive. Even when you import images from a camera, card reader, or scanner, the files are copied from the device to a specific location on the hard drive of your choosing. To simplify file management, it’s often useful for all your photos to reside in one common location. However, sometimes you may have imported photos from a folder on your desktop or another location. In these cases, you may want to move those images to the common location on your hard drive. Photoshop Elements simplifies this process by moving the files for you when directed. If you were to move the files using the Windows Explorer, or the Finder in Mac OS, Photoshop Elements would lose track of the files and display them as missing because it could no longer locate the source file. Let’s see how easy it is to move files in Photoshop Elements.
1 Press the Show All button at the top of the Photo Browser to display all the images in the current catalog.
2 Locate and select two photos, called redeye and redeye-just the faces. A quick search for redeye in the Search text field will display these photos. Select the images by clicking on one image and then Ctrl+clicking (Windows) or Command+clicking (Mac OS) on another image. All the images in the Media Browser currently reside in the Lessons folder that you imported in the Startup section of this lesson. You’ll now move these two redeye photos to a different location on your computer.
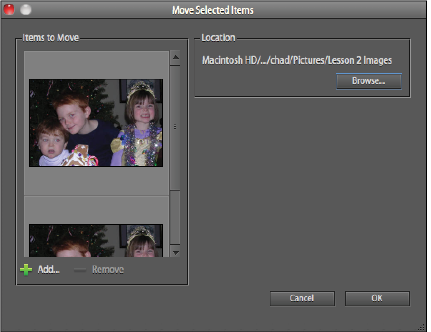
3 Choose File > Move. The Move Selected Items dialog box appears. This dialog box shows the selected images that it is about to move, as well as their current location on your computer.
|
The Move Selected Items dialog box allows you to specify where to move the photos. |
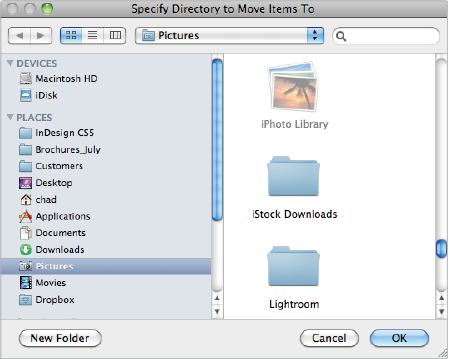
4 Press the Browse button, then navigate to and select your Pictures folder. Click the Pictures folder to make that folder active.
|
Select the Pictures folder. |
| In some versions of Windows, this folder is called My Pictures. |
5 Press the New Folder button in the bottom-left corner and name it Lesson 2 Images. Press OK Create, and then in the Specifiy Directory to Move Items To dialog box.
6 Press OK in the Move Selected dialog box. The images are moved to the new location on your hard drive.
7 To confirm the new location of the images, select one of the redeye images, right-click it, then choose Show Properties. The folder path at the bottom of the Properties dialog box reflects the new location that you chose in step 5. Close the Properties dialog box.
You can see how easy Photoshop Elements makes the process of managing your images. It’s important to remember that moving your files manually using Windows or the Mac OS causes Photoshop Elements to lose the connection to your images and to display a missing image warning, forcing you to re-link the images. Using the Photoshop Elements interface is much more seamless and robust.
Continue to the next Photoshop Elements Tutorial: Reviewing photos in Photoshop Elements >