Photoshop Basics Skills
What you’ll learn in this Photoshop Basic Skills Tutorial:
|
This tutorial provides you with a foundation for learning basic Adobe Photoshop skills. It is the fourth lesson in the Adobe Photoshop Digital Classroom book. For more Adobe Photoshop training options, visit AGI’s Photoshop Classes. |
Photoshop Tutorial: Basic Photoshop Skills
In this lesson, you’ll learn basic Photoshop skills which include how to combine images, knowing about image resolution and understanding file sizes. You’ll also learn about file formats and options for saving your files for use on the Web or in print.
Starting up
Before starting, make sure that your tools and panels are consistent by resetting your preferences. See “Resetting Adobe Photoshop CS6 preferences” in the Starting up section of this book.
You will work with several files from the ps04lessons folder in this lesson. Make sure that you have loaded the pslessons folder onto your hard drive from the supplied DVD. See “Loading lesson files” in the Starting up section of this book.
In this lesson, you’ll use multiple images to create a composite image that you will then save for both print and online use. While this lesson covers some basic information about working with files for online distribution, you can learn even more about saving files for the web in Lesson 12, “Creating Images for Web and Video.”
A look at the basic Photoshop skills tutorial finished project
In this lesson, you will develop a composite using several images, while addressing issues such as resolution, resizing, and choosing the right file format.
To see the finished document:
1 Choose File > Browse in Bridge to bring Adobe Bridge forward. Using Adobe Bridge, navigate to the pslessons folder on your hard drive and open the ps04lessons folder.
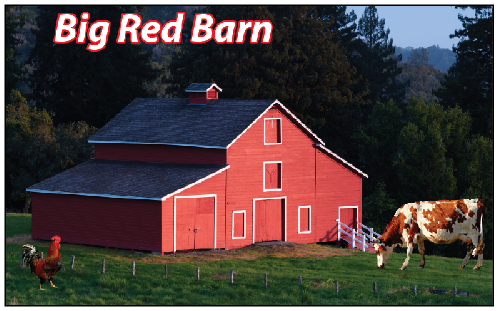
2 Double-click on the ps04_done.psd file, and the completed image is displayed in Photoshop.
|
The completed lesson file. |
3 Make sure that the Layers panel is active by choosing Window > Layers.
4 Click on the visibility icon ( ) to the left of the cow layer to hide the layer. Click the box where the visibility icon used to be to make the layer visible again.
Layers allow you to combine different elements into a single file while retaining the ability to move and modify each layer independently of the others. In this chapter, you’ll be creating multiple layers in Photoshop just like the ones in this finished file.
5 You can keep this file open for reference, or choose File > Close to close the file. If a Photoshop warning box appears, choose Don’t Save.
Opening a Photoshop file
Now you will assemble all the images that are part of the final combined image.
1 Return to Adobe Bridge by choosing File > Browse in Bridge.
2 Navigate to the pslessons folder you copied onto your system, and open the ps04lessons folder.
3 From the ps04lessons folder, select the file named ps0401.psd. Hold down the Ctrl key (Windows) or Command key (Mac OS), and also select the ps0402.psd and ps0403.psd files. Choose File > Open or double-click any one of the selected files. All the selected images open in Adobe Photoshop.
If you receive an Embedded Profile Mismatch warning when opening the images, you may have forgotten to reset your preferences using the instructions on page 3. If you receive the warning, choose the Use Embedded Profile option, and then click OK. |
Understanding Photoshop document settings
In this section, you will move images from one file to another to create your mock-up. Before you combine the images, you need to be familiar with each document’s unique attributes, such as size, resolution, and color mode. Moving layers between documents that have different resolutions may create unexpected results, such as causing the images to appear out of proportion.
Viewing an image’s size and resolution in Photoshop
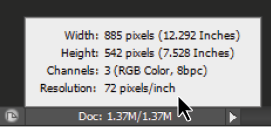
1 Click on the tab of the image of the barn, ps0401.psd, to make it active. Press Alt (Windows) or Option (Mac OS) and click the file information area in the status bar, located in the lower-left corner of the document window. The dimensions of the barn image is displayed as 885 pixels wide by 542 pixels tall and the Resolution is 72 pixels/inch.
|
Image size and resolution information. |
2 If the picture of the rooster, ps0402.psd, is not visible, choose Window > ps0402.psd or click on the tab for that image at the top of the screen to make it the active window. After confirming that this is the active document, select Image > Image Size to open the Image Size dialog box.
The Image Size dialog box appears.
|
Image size plays an important role when combining images. |
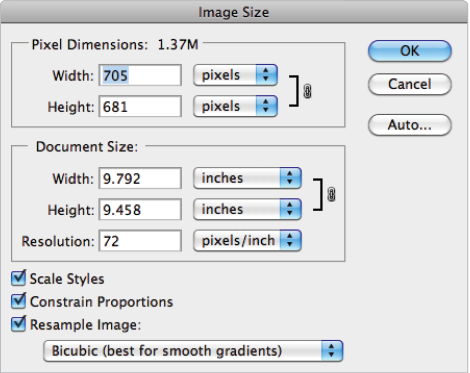
The Image Size dialog box is divided into two main areas: Pixel Dimensions and Document Size. Pixel Dimensions shows the number of pixels that make up the image. For web graphics, the pixel dimensions are more relevant than the document’s actual printing size. Document Size shows the resolution information, as well as the actual physical size of the image.
The most important factors for size and resolution of web images are the pixel dimensions and the pixels per inch (ppi). If you are designing content for the Web, you should reference the top (Pixel Dimensions) section of the Image Size dialog box. As a print designer, you should reference the bottom (Document Size) section of the Image Size dialog box. |
3 The image size of the rooster is 705 pixels by 681 pixels. At this size, the rooster is taller than the barn, which would be apparent when you combine the two files. While this might work for an Attack of the Roosters horror movie, you’re interested in making the rooster smaller.
4 Make sure that the Resample Image and Constrain Proportions checkboxes are both selected. In the Image Size dialog box, type 200 pixels for height in the Pixel Dimensions portion at the top half of the dialog box. Press OK to apply the transformation and close the Image Size dialog box.
5 The rooster is now an appropriate size to combine with the barn image.
Combining images in Photoshop
For this project, you’ll use several methods to combine the images.
Continue to the next Photoshop Tutorial: Using Copy and Paste in Photoshop >