Photoshop Tutorial: Using the new brush tips in Photoshop CS6
What you’ll learn in this Photoshop Tutorial:
|
This tutorial provides you with a foundation for working with Adobe Photoshop brushes. It is the first lesson in the Adobe Photoshop CS6 Digital Classroom book. For more Adobe Photoshop training options, visit AGI’s Photoshop Classes. |
Photoshop Tutorial: Using the new brush tips in Photoshop CS6
The Erodible and Airbrush tips were added to Photoshop CS6. The Erodible tip allows you to scribble, draw, and wear out your brush tip much like a pencil or piece of chalk. The Airbrush tip offers extra controls and settings that allow the brush to act more like a real airbrush. In this example, you will use one of the new Airbrush tips to make snow blow off the skier. Airbrushing is a painting technique that uses a stream of air to apply the paint to a surface.
1 Select Background in the Layers panel, press and hold the Alt (Windows) or Option (Mac OS) key, and click the Create a new layer button at the bottom of the Layers panel. This opens the New Layer dialog box so that you can immediately name the layer.
2 Type Strokes in the Name text field, and then click OK.
3 Select the Brush tool ( ), and then select Window > Brush; the Brush panel appears.
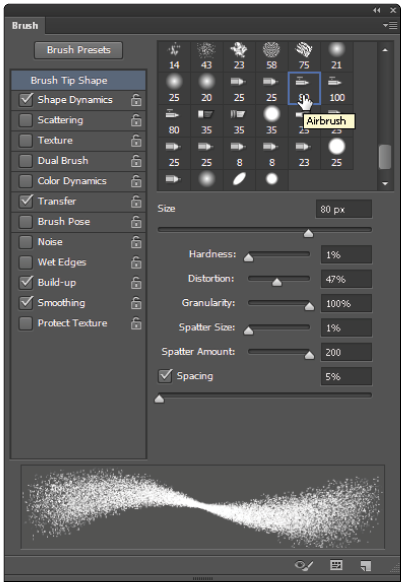
4 Scroll down in the Brushes panel to select the Airbrush tip labeled 80. Once the brush is selected, you see that options specific to the selected brush tip appear at the bottom of the Brushes panel. You can experiment with the settings and see a preview of your brush stroke.
Hardness: Use it to set the Airbrush tip hardness.
Distortion: Use it to set the distortion of the airbrush.
Granularity: Use it to set the granularity (particles) of the brush tip.
Spatter Size: Use it to set the airbrush spatter size.
Spatter Amount: Use it to set the spatter amount.
Spacing: Use it to adjust the space between brush applications. Spacing set at 100% will give you even spaces between applications.
|
Select the 80 Airbrush tip and experiment with its settings. |
5 Change settings and paint the image area. You can use any color. Experiment with different settings to see how the changes affect the brush stroke in the image area.
6 Once you are finished experimenting, choose Select > All, and then press the Delete key. You can repeat this step any time you want to paint again.
7 Reset your 80 Airbrush to the default settings by clicking the brush again in the Brush panel.
8 Enter these settings:
Hardness: 5%
Distortion: 0%
Granularity: 45%
Spatter Size: 15%
Spatter Amount: 50%
Spacing Amount: 25%
9 With the Brush tool still selected, change the following in the Options bar:
Change the Flow to 25%. Changing this setting lessens the flow of “paint” when painting.
Click the Enable airbrush-style build-up effects. If you hold the mouse button on one place, this feature spreads the paint much like an actual airbrush.
|
Set flow and build-up options in the Options bar. |

10 If your Foreground color is not white, press the letter D to return to the Default colors of a Black Foreground and a White Background.
11 Press X to swap the Foreground and Background color so that White is forward.
12 Confirm that you still have the blank Strokes layer in the Layers panel selected, and start painting snow flying behind the skier. If you want to start over again, choose Select > All and press Delete.
Saving the new Brush
You can save your own customized brushes by following these steps.
1 To save the Brush, click the New icon ( ) located in the bottom-right of the Brush panel. The Brush Name dialog box appears.
2 Type MyBrush in the Name text field, and then click OK.
3 If you want to use your brush in the future, you can find it by selecting Window > Brush Presets and scrolling to the bottom of the list. Your saved brush appears there.
4 Choose File > Save to save this file. Keep it open for the next part of this lesson. If a Photoshop options dialog box appears, click OK.
Adding strokes to vector images
In this next section, you will add a set of vector shapes and then add strokes to the shapes.
1 Select the Rectangle 1 layer.
2 Select the Custom Shape tool ( ) from the Tools panel.
3 Click the Shape drop-down menu, on the right side of the Options bar and select Snowflake 3.
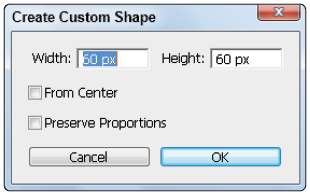
4 Click the image area once. By clicking the image area, you can enter the size of the shape without first creating it. The Create Custom Shape dialog box appears.
5 Enter 60 into the width and height text fields, and click OK.
|
Put in exact values for your new custom shape. |
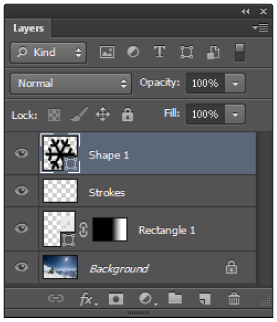
The shape is created and a new Vector layer called Shape 1 has been added in the Layers panel.
|
A new vector layer is added. |
6 With the Custom Shape tool still selected, click Fill in the Options bar and select the No Color icon.
|
Change the Fill to No Color. |
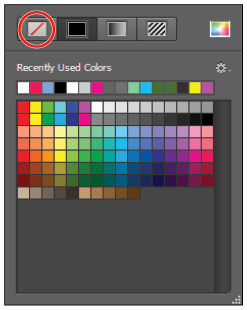
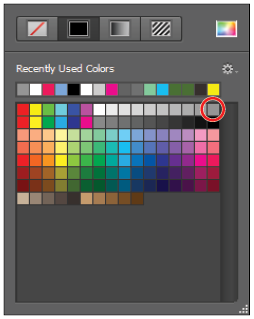
7 Click Stroke and select the 50% Grey color swatch.
8 In the Options bar, change the stroke size from 3 pt to 2 pt.
|
Select 50% gray for the stroke color, |
9 Hide the path selection by choosing View > Show > Target Path, or use the keyboard shortcut Ctrl+Shift+H (Windows) or Command+Shift+H (Mac OS).
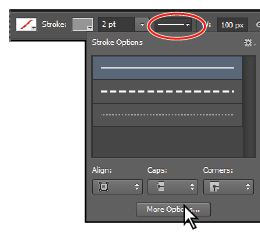
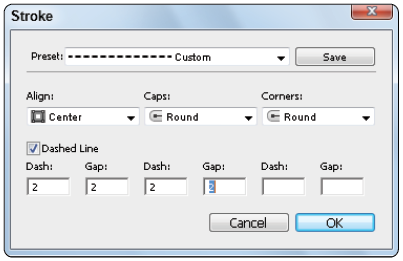
10 Select Set shape stroke type in the Options bar, and then click More Options; the Stroke dialog box appears.
|
Selecting a shape stroke type using the Stroke dialog box. |
Change the following:
Select Center from the Align drop-down menu.
Make sure Round is selected for both the Caps and Corners.
Make sure the Dashed Line checkbox is checked and enter the first four values at 2.
11 Click Save to save your custom stroke, and then click OK; your new stroke is added to the Stroke Options drop-down menu.
|
Change the stroke options and save it as a preset. |
12 Choose File > Save to save this file. Keep it open for the next part of this lesson.
Cloning your new snowflake
In this section, you will clone the snowflake several times and then merge all the new snowflake vector layers into one layer.
1 Select the Move tool ( ). Position your cursor over the snowflake that you just created, and then press and hold the Alt key (Windows) or Option key (Mac OS). Notice that a double cursor appears (
 ).
).
2 While pressing and holding the Alt/Option key, click and drag a copy of the snowflake to another location in the image area. No exact location is necessary.
|
Press and hold the Alt/Option key and drag to |
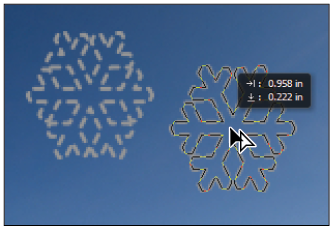
3 Position your cursor over the newly-cloned snowflake, press and hold the Alt/Option key, and duplicate that snowflake as well.
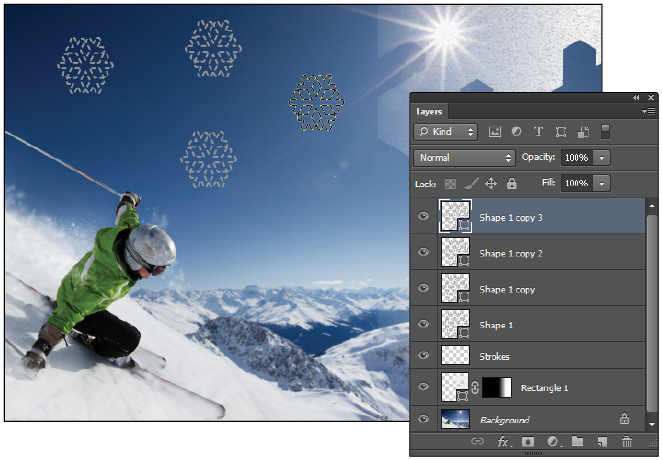
4 Repeat step 3 so that you have a total of four snowflakes on the image and you have created an additional four layers in your Layers panel.
|
The image with the four cloned snowflakes. |
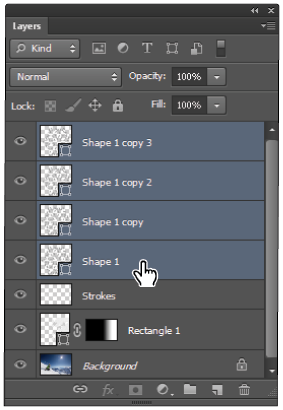
5 In the Layers panel, click the topmost layer, called Shape 1 copy 3, and then Shift+click the layer called Shape 1. This selects all four layers. Notice that your layers might have slightly different names.
|
Select all the new layers. |
6 Press Ctrl+E (Windows) or Command+E (Mac OS) to merge the layers. You can also select Layers > Merge Shapes .
7 Select the Path Selection tool ( ) that is located directly beneath the Type tool in the Tools panel, and click and drag any of the snowflake shapes to reposition it. Notice that the shapes remain independent even though you have merged the layers to vector.
8 Select one snowflake and press Ctrl+T or Command+T (Mac OS); a bounding box appears. Grab a corner point to resize the snowflake down in size; no specific size is necessary. Press the Enter (Windows), or the Return (Mac OS) key when you are finished resizing to commit the change.
9 Using the Path Selection tool, select and resize several other snowflakes to random sizes.
Continue to the next Photoshop Tutorial: Adding Text layers from another document in Photoshop CS6 >