Premiere Pro tutorial: Understanding Digital Video in Premiere Pro
What you’ll learn in this Premiere Pro Tutorial:
|
This tutorial provides you with a foundation for working with video in Adobe Premiere Pro. It is the first lesson in the Adobe Premiere Pro CS5 Digital Classroom book. For more Adobe Premiere Pro training options, visit AGI’s Premiere Pro Classes. |
Adobe Premiere Pro Tutorial: Understanding Digital Video in Premiere Pro
Before you begin editing in Premiere Pro it is beneficial to become familiar with some of the concepts and principles that define the art and craft of video editing.
Starting up
You will not need any files for this lesson.
Understanding digital Non-Linear Editing
Premiere Pro is a digital NLE (Non-Linear Editor) that gives you direct and immediate access to any frame in a digital video clip at any time. In an NLE process, you use computer data instead of a physical linear medium, such as film or tape, and you can jump back and forth along your timeline at any point in the editing process. Unlike traditional graphic image processes, this is a non-destructive process because the original source footage is never lost or altered. The media links that you import or capture in Premiere Pro are only references to the original footage stored on your hard drive.
The video and audio footage that you edit in Premiere Pro can be digitized from an analog source, such as a VHS or cassette tape, or recorded directly to a digital format, as is the case with modern video cameras as well as other hard drive and compact flash-based recording devices.
Understanding video settings
In Premiere Pro, you generally work by building sequences to match the standards of the media you are going to work with instead of the intended output. There are many types of video files you can work with in Premiere Pro. The various formats, aspects ratios, codecs, and other settings used to describe video files will be explained in this book. The following terms will help you:
Dimensions: specifies the pixel dimensions of a video file; in other words, the number of pixels horizontally and vertically that compose an image or video frame. This value is usually written as a pair of numbers separated by an X, where the first number is the horizontal value and the second represents the vertical; for example, 720 × 480. Pixel is a conjunction of the words “picture” and “element” and is the smallest individual component in a digital image.
Frame rate: specifies the number of individual images that compose each second of video. Frame rate is displayed as a value of fps (frames per second).
Pixel Aspect Ratio: specifies the shape of the pixels that compose an image. Pixels are the smallest part of a digital image and different display devices (televisions, computer monitors, etc.) have pixels with different horizontal and vertical proportions.
Editing vs. delivery formats
While working through the many lessons presented in this text you are going to encounter many new concepts and terms, especially when you are dealing with video footage. When working with video in Premiere Pro you will encounter many different video formats and the codecs (compressor/decompressor) used to compress them while editing the video files throughout the lessons in this book and when working on your own. Most computer users are familiar with the term “format” used to describe files, for example, jpeg and tiff formats for images, or doc and ppt formats for Word and PowerPoint files. However, for video files, formats such as Quicktime and AVI are only containers that hold video information; much like a file folder holds paper. You can describe the relationship between formats and codecs this way: formats are the containers; codecs are the language the contents are written in.
Codec is a conjunction made from the words “compressor” and “decompressor.” Codecs are mathematical algorithms used to shrink audio and video files to manageable sizes. Video files are very large; for example, 20 minutes of NTSC DV video (from a standard definition miniDV camcorder) is over 4 GB in size, which is the capacity of one single-layer DVD. Without video codecs, you could not easily save and store archived video footage; video would also never be small enough to watch online, by e-mail, or on a mobile device. To view an audio or video file, you must have a player compatible with the format and have on your computer the codec used to compress the video file, so you can decompress it.
Traditionally, the codecs used to capture and edit footage were uncompressed or offered very little compression, while the codecs used to deliver the final files to the viewers were far more compressed. With the use of high-definition video equipment this has changed: many cameras now use MPEG-2 or MPEG-4 codecs to reduce files to manageable sizes for storage and editing.
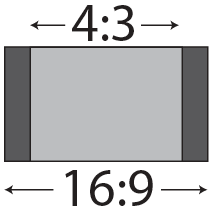
High definition vs. standard definition
Standard definition footage adheres to the NTSC (National Television Standards Committee) or PAL (Phase Alternating Line) standards, which are the standards for video used in the United States of America and Europe, respectively. Standard definition footage has an aspect ratio of 4:3; in other words, there are four horizontal units for every three vertical units of measure. Prior to the invention of high-definition television, NTSC was the only standard for broadcast video in the United States. NTSC included settings for both 4:3 and 16:9 aspect ratios. In the age of Digital Television broadcasts, the NTSC has been replaced by the ATSC (Advanced Television Systems Committee) standards; however, the term NTSC is still used by most video cameras, editing, and graphics applications to refer to standard definition broadcast quality video.
|
There are other aspect ratios used in video, |
NTSC & NTSC Widescreen: The NTSC presets include settings for standard (4:3) and widescreen (16:9) aspect ratios. The dimensions for both are 720 x 480, but the pixel aspect ratio is different, which accounts for the difference in shape. Pixel aspect ratio (PAR) is the ratio or shape of the pixels that compose each part of a single video frame. Both versions of the NTSC standard use a frame rate of 30 fps.
PAL & PAL Widescreen: PAL is the standard for broadcast television used throughout Europe and much of the rest of the world. PAL differs from NTSC in several key ways; such as dimensions and frame rate. It uses a frame rate of 25 fps, which is closer to the 24fps used in film and according to some video professional produces more realistic imagery. Similar to NTSC, PAL has standard (4:3) and widescreen (16:9) settings. A frame size of 720 × 576 is shared by both, and the pixel aspect ratio gives each their unique frame shape.
High Definition: High Definition (HD) television technology has existed for decades, but it was during the early 21st century that it became popular with average American television viewers. The term HD describes video with a higher resolution than traditional television systems, now called SD or standard definition. There are two main high definition standards for broadcast television: 720P and 1080i; many televisions and Blu-ray disk players support a third standard: 1080P.
720P: the 720P format has a resolution of 1280 pixels wide by 720 pixels high and supports a variety of frame rates, from the 24 fps used by film and the 30 fps that was part of the old NTSC standard, to 60 fps.
1080P & 1080I: the 1080 formats exist in Interlaced and Progressive versions; as with other modern digital standards, these formats support a variety of frame rates between 24 fps to 30 fps.
Progressive vs. interlaced
The two methods of displaying images on a video screen are Progressive display and Interlacing. In the United States, and before changing to a digital broadcasting system, televised images were sent as interlaced signals in which every frame of video was made by combining two half-images called fields.
Before the advent of high-definition LCD and Plasma screens, televisions were made by wrapping a plastic or wooden frame around a large glass device called a Cathode Ray Tube (CRT). These CRT television screens were composed of a series of even and odd numbered lines called scan lines, and each frame of video was displayed by illuminating these lines starting at the top of the screen. Interlacing was created to display video signals on this type of TV set and worked by illuminating one set of lines first (even or odd numbered), and then moving back to the top of the display to illuminate the other set. In this way, the display would show the second set of lines when the first set of began to fade; the result was a complete picture for the viewer. This process occurred 60 times a second with NTSC broadcast television. Unlike Interlacing, Progressive display illuminates the scan lines sequentially from top to bottom.
Most modern televisions can display in interlaced and progressive mode, and the ATSC includes broadcast standards for both, while all computer monitors use progressive display only. The difference between the two display methods occurs in video camera formats as well; older NTSC or PAL cameras can only shoot interlaced video, but many newer cameras let you choose between interlaced and progressive shooting modes, for example, 50i (25 fps), 60i (30 fps), 30p (30 fps), and 24p (24 fps). When working in Premiere Pro, we highly recommend that you use the sequence settings that match the settings of the footage you are working with.
Premiere Pro presets
Adobe Premiere Pro includes pre-built settings for video sequences called presets. With the recent proliferation of high-definition video equipment and non-tape based recording media (cameras that store video on hard drives or flash drives instead of traditional tape) you can use a wide variety of formats and specifications. Tapeless camcorders, also known as file-based devices, usually record to hard-disks, optical media, or flash memory media, instead of to videotape, and save video and audio files using formats and codecs often specific to each device. Tapeless formats supported by Premiere Pro include Panasonic P2 camcorders, Sony XDCAM HD and XDCAM EX camcorders, Sony CF-based HDV camcorders, and AVCHD camcorders.
In this section, you will learn about some of the common standards as they apply to working in Premiere Pro.
DV NTSC, DV PAL, DV 24P
The DV (Digital Video) standard comes in three varieties: NTSC, PAL, and 24P, all of which should be used in conjunction with IEEE1394 (FireWire/i.LINK) DV equipment. All three varieties of video come in standard (4:3) and widescreen (16:9) aspect ratios and have variations to support two standard rates for audio sampling: 32 and 48 kHz.
AVCHD
AVCHD is an acronym for Advanced Video Coding High Definition, a video format developed for the recording and playback of high-definition digital video. This tapeless format was created primarily for use in consumer and prosumer level camcorders, but it has also been adopted for use in some professional level equipment. The AVCHD presets in Premiere Pro support 720p, 1080i, and 1080p video footage, each at a variety of frame rates.
DVCPRO & DVCPROHD
Panasonic developed DVCPRO as a variation of the standard DV format. This tape-based format was developed to improve the standard definition DV format by increasing its robustness and feature set, and is an alternative to the DVCAM format developed by Sony. DVCPROHD was created as an enhanced version of the preceding DVCPRO format. The DVCPRO50 presets in Premiere Pro can create sequences compatible with 480i (NTSC) and 576i (PAL) video formats; the DVCPROHD presets can create sequences for footage recorded at 720p, 1080i, or 1080p in a range of frame rates from 24fps to 60fps.
HDV
HDV is high-definition digital video. The format can store up to 1 hour of high-definition video on a standard mini-DV tape by compressing the video using the MPEG-2 codec, which is the same type of compression used to create DVDs. The HDV presets in Premiere Pro can create sequences for footage recorded at 720p, 1080i, or 1080p.
XDCAM, XDCAM HD, XDCAM EX, XDCAM HD422
The XDCAM format was introduced by Sony as a tapeless solution for professional level video recording and storage. The XDCAM family of products differs in everything to other formats, from recording media, frame size, and codec. The presets in Premiere Pro contain support for the range of XDCAM formats: you can work with standard definition projects using the DV NTSC sequence presets, while XDCAM HD, XDCAM EX, and XDCAM HD422 have their own presets. The XDCAM EX and XDCAM HD422 presets include support for 720p, 1080i, or 1080p footage; the XDCAM HD presets support 1080i and 1080p in a range of frame rates from 24fps to 60fps.
Overview of the post production workflow
Once a video project has been recorded, the work of the post-production professionals (editors, graphic designers, composers) begins. Large studio or production companies hire different individuals or outside contractors for post-production work. Smaller post-production teams share multiple positions or have one person perform the post-production work. A general post-production workflow is shown in the following figure.
|
Specific post-production workflows vary depending on the production company and project. |

Media acquisition
During media acquisition, you can add footage to the Premiere Pro project, which can come from a single source, or a variety of tape-based or tapeless sources. Footage that comes from an analog source, such as a VHS or Beta tape, must be digitized; digital tape-based sources, such as DV footage, are captured; tapeless formats are ingested. An important aspect of the media acquisition phase is the storage and organization of media assets. Video files use a lot of hard drive space and can be better stored on external devices, which allows you to become modular, thus easily transporting footage and project files from one computer to another. At the same time, we recommend you develop an intuitive and easy-to-navigate folder structure to store your footage and help you locate specific footage items when needed in the latter stages of post-production.
Editorial development
Editorial development is the phase when a project is assembled. The diagram portrays this phase as a single block of time and effort, but it is a multi-stage process where you can go through the initial editing steps to develop a rough cut, submit it for client or collaborator feedback, and then refine it in a sequential process of edits and revisions that lead into the finishing phase. Often each successive revision (called a cut) refines the pacing, tone, and theme or narrative of the work leading into the next phase. During this phase, stand-in graphics and audio are added into the edit while the finished products are developed.
Graphics development
The graphics development phase is often concurrent with editorial development. Titles, effects shots, and compositing are elements included in this portion of the workflow. This phase does not involve just one step, but a sequence of successive revisions that begin with initial concepts and rough art work and end with the development of the final graphics and effects added to the finished project.
Audio development
The third concurrent phase represented here is audio development. As is the case with graphics and editorial, this phase involves a sequence of successive revisions leading to the creation of finished audio tracks added into the edit. This phase can include audio refinement to clean up noise and the creation of Foley sound effects and background music beds.
Finishing
The finishing phase is where stand-in graphics and audio are replaced with the finished elements, and any final edits and transitions are added in Premiere Pro to create a final cut.
Mastering
The mastering phase involves compiling all the elements that the client needs, and assembling them into a single bundle for handoff. Depending on the required deliverables, this may be as simple as adding multiple individual sequences into a single master sequence for output to a tape or file. It could also include preparing a variety of different projects with different titles, graphics, or audio for delivery to different regions or markets.
Output and delivery
Output and Delivery is the process of creating the final, playable media for handoff to the client or audience. Depending on the scope of the project, this phase can take different forms. It may involve outputting your master sequence to a tape-based format for handoff to a broadcast television station, authoring a DVD or multimedia playback component, or compressing your source footage for streaming delivery on the web.