Illustrator Tutorial: Adding Color
What you’ll learn in this Illustrator Tutorial:
|
This tutorial provides you with a foundation for working with Adobe Illustrator colors. It is the first lesson in the Adobe Illustrator CS6 Digital Classroom book. For more Adobe Illustrator training options, visit AGI’s Illustrator Classes. |
Adobe Illustrator Tutorial: Adding Color
Adobe Illustrator CS6 provides a number of methods to help add color to your artwork. In this lesson, you’ll discover how to enhance your artwork with color.
Starting up
Before starting, make sure that your tools and panels are consistent by resetting your workspace. See “Resetting Adobe Illustrator CS6 Preferences” in the Starting up section of this book.
You will work with several files from the ai02lessons folder in this lesson. Make sure that you have loaded the CS6lessons folder onto your hard drive fromwww.digitalclassroombooks.com/epub/cs6. See “Loading lesson files” in the Starting up section of this book.
Basics of the Appearance panel
The Appearance panel in Illustrator allows you to adjust an object’s fill and stroke, in addition to keeping track of any effects that have been applied to the object. The Appearance panel is also an indispensable tool for determining the structure of an object. Fills and strokes are shown in the order that they are applied to an object, the same way that other effects are ordered chronologically. As your Illustrator artwork increases in complexity, the Appearance panel becomes more important, as it makes the process of editing your illustration much easier. In this section, you have the opportunity to explore the Appearance panel by creating a simple illustration from scratch.
1 Launch Adobe Illustrator CS6 and choose File > New. The New Document dialog box appears.
2 In the Name text field, enter Appearance. Choose Print from the New Document Profile drop-down menu. Leave all other items the same and press OK. The new artboard appears.
To help you understand how powerful the Appearance panel is, you will create a simple shape and apply attributes to it.
3 Click on the Rectangle tool and choose the Star tool.
4 To make sure that you have the default color settings of a white fill and black stroke, press the letter D.
5 Click and drag out on the artboard anywhere to create a new star shape. Any size is fine for this exercise.
6 If the Appearance panel is not visible, choose Window > Appearance now.
The Appearance panel offers you the ability to track or make changes to the properties that have been applied to a selected object.
Image 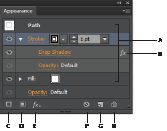 |
A. Path with stroke, fill, and drop shadow. B. Indicates path has effect applied. C. Add New Stroke. D. Add New Fill. E. Add New Effect. F. Clear Appearance. G. Duplicate Selected Item. H. Delete Selected Item. |
Click on the tab of the Appearance panel and drag it out of the docking area. This ensures that the Appearance panel does not go away when you select other panels.
Image 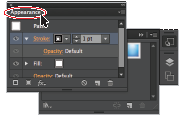 |
Click and drag the Appearance panel out of the panel group. |
The Appearance panel indicates that this shape has a Stroke of 1 pt and it is black, and a Fill of white. The Opacity is also noted as being the default (100%).
Changing colors
When you have a shape active in Adobe Illustrator, you can change the colors using multiple methods, including using the Appearance panel.
1 Click on the color box to the right of Stroke in the Appearance panel, then click on the arrow; this makes the Swatches panel accessible from within the Appearance panel.
2 With the Swatches panel open, choose CMYK Red. The stroke is changed to red.
Image 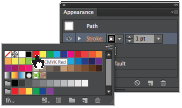 |
Change colors right in the Appearance panel. |
3 Now click on the fill color box to the right of Fill, and click on the arrow. Choose CMYK Yellow from the Swatches panel.
Adding Effects
In this next section, you will discover how you can apply effects and then update them using the Appearance panel.
Keep in mind that, by using the Appearance panel, you can independently apply effects, such as drop shadows, outer glows, scribble effects and more, to strokes and fills. For example, you can apply the drop shadow effect to the stroke, but not to the fill.
1 Select the Stroke in the Appearance panel, then press the Add New Effect () button at the bottom. From the list that appears, choose Stylize > Drop Shadow; the Drop Shadow dialog box appears. Leave the default settings and press OK. A drop shadow appears on the stroke, and Drop Shadow is listed as a property applied to the Stroke in the Appearance panel. Note that you can click to expand the arrow to the left of Stroke or Fill to see individual properties associated with them.
Image 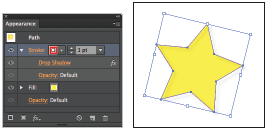 |
The Property is listed in the Appearance panel. The star with a drop shadow effect. |
2 Double-click on the Drop Shadow property listed under Stroke, the Drop Shadow dialog box appears. Use this method to make changes to any effects that are applied to your object, otherwise you may end up applying an additional effect.
3 In the Drop Shadow dialog box change the following settings:
Opacity: Change to 100% by either entering 100 into the Opacity text field, or clicking on the arrow buttons to the left of the field.
X Offset: Use the down-arrow to change the offset to a value of 3.
Y Offset: Use the down-arrow to change the offset to a value of 3.
Blur: Change to 1 pt by either entering 1 into the Blur text field, or clicking on the arrow buttons to the left of the field.
4 Change the color of the drop shadow by clicking on the color box; this displays the Color Picker. The Color Picker provides a color spectrum from which you can visually select colors, or enter color values into the text boxes to manually define colors.
5 Click and drag the slider down toward red on the color spectrum, then click on a red color in the Color Field. Click OK.
Image 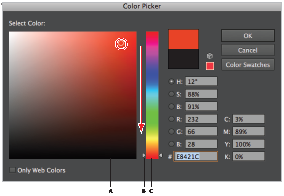 |
A. Color Field. B. Color slider. C. Color spectrum. |
6 Click OK in the Drop Shadow dialog box. The drop shadow has been changed.
Image 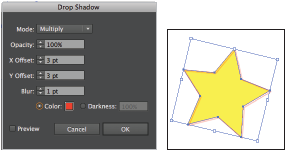 |
Make changes to the drop shadow. The result. |
7 You will not be saving this file, choose File > Close, and choose No (Windows), or Don’t Save (Mac OS) when the Adobe Illustrator warning dialog box appears.
Throughout this lesson, you will be using alternate methods from which you can select color. But, keep in mind the power and ease of use the Appearance panel provides.
Creating a colorful illustration
In this next exercise, you create a colorful illustration. While creating this illustration, you have the opportunity to use features that will speed up your production time, and also offer you creative solutions for color.
1 To begin, you will open the finished file. Choose File > Browse in Bridge and click on the Favorites tab (in the upper-left corner). Click on Desktop and open the ai02lessons folder that you dragged on to the desktop.
2 Locate the file named ai0402_done.ai inside the ai02lessons folder, and double-click on it to open it in Illustrator CS6. An illustration of a retro bus appears.
You are looking at the final illustration that you will create. In this lesson, you will have the opportunity to experiment with fills, strokes, patterns, Live Paint and gradients.
3 You can either choose File > Close, to close this file, or keep it open as a reference.
Continue to the next Illustrator Tutorial: Using Live Paint >