Photoshop tutorial: New Features in Photoshop CC
What you’ll learn in this Photoshop Tutorial:
|
This tutorial provides you with a foundation for working with Adobe Photoshop hidden tools. It is the fourteenth lesson in the Adobe Photoshop CC Digital Classroom book. For more Adobe Photoshop training options, visit AGI’s Photoshop Classes. |
Adobe Photoshop Tutorial: New Features in Photoshop CC
Photoshop has added many exciting new features in this version, such as the Shake Reduction filter, the ability to more easily isolate layers, use Camera Raw as a filter, edit your shape layers, and more. In this lesson, you get a quick review of what’s new in Photoshop CC.
Starting up
If you are a new user, calling out the new Photoshop features may not be important to you, but this lesson is still helpful for you to review. If you have been using Photoshop for years, you will want to investigate the new features covered in this lesson to see if there are new, better ways for you to work in Photoshop.
In this lesson, you have the opportunity to try some of the new features in mini-exercises. This lesson covers some of the many new features, but keep in mind that each lesson in this book has also incorporated additional new features in the lessons as they apply to the task at hand. This lesson does not include questions and answers at the end.
Before starting, make sure your tools and panels are consistent by resetting your preferences. For more information, see “Resetting Adobe Photoshop CC preferences” in the Starting up section of this book.
You will work with several files from the ps14lessons folder in this lesson. Make sure that you have loaded the pslessons folder onto your hard drive. You can access them online if you purchased the ebook, or on the DVD that comes with the printed book. For more information, see “Loading lesson files” in the Starting up section of this book.
In this lesson, we will start with an image that was taken without the use of a tripod, so it is a little shaky. In addition to the shaky detail, it has a strong cast produced by the incandescent lighting that was used. In this first part of the lesson, you will select and isolate the layer that needs to be addressed, use the Camera Raw filter to correct it, and then use the new Shake Reduction filter in Photoshop CC (you’ll find a new Sharpen Filter to address shake problems). You will then complete a composite image by masking your updated image.
Viewing the finished file
Before starting, you will look at the project in its finished form.
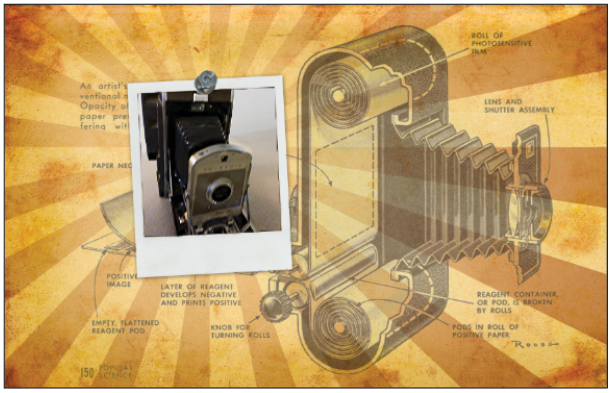
1 From Photoshop CC, choose File > Browse in Bridge and navigate to the ps14lessons folder. Select the image named ps1401_done and double-click it to open. An image of an old Land camera appears in a composited illustrative file.
|
The completed lesson file. |
2 You can leave this finished file open for reference, or you can close it by selecting File > Close.
3 Now you will open up the file that you will start with. Choose File > Browse in Bridge, locate the file named ps1401.psd and double-click it to open it in Photoshop. You see the start file that contains four layers.
4 Choose File > Save As; in the File name text field type ps1401_work. Make sure that you are saving into the ps14lessons folder, and then choose Save, leaving all other options the same. Keep this file open for the next part of this lesson.
Easier methods to manage your layers
By isolating a layer, you can focus on the active layer without sorting through all the other layers to make sure you are on the correct one. In Photoshop CC, you can now isolate a layer or group of layers using the Select menu. This isolate layer feature is essentially an extension of the Layer filter feature that was introduced in Photoshop CS6, and allows users to organize and find layers more easily.
1 Make sure that the layer named Camera is selected in the Layers panel, and then choose Select > Isolate Layers. Note that the other three layers disappear from the Layers panel.
2 To show the other layers, choose Select > Isolate layers again, since it is a toggle control.
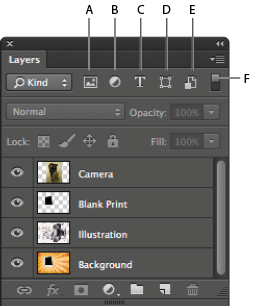
In the Layers panel, you’ll find a drop-down menu with the default of Selected.
3 Select Kind from the Pick a filter type drop-down menu. This filter allows you to choose the type of layer you want to isolate in the Layers panel. From the filters on the right, you can choose the following types of layers: Pixel layers, Adjustment layers, Type layers, Shape layers, and Smart Objects.
4 Make sure that you have the ability to turn on the layer filtering by verifying the Turn layer filtering toggle is turned on. The switch is in the up position when this filtering is turned on.
|
You can filter layers in the Layers panel. |
5 You will now filter using the layer name. From the Pick a filter type drop-down menu in the layers panel, select Name; a text field appears to the right of the drop-down menu.
|
Select Name from the Pick a filter type |
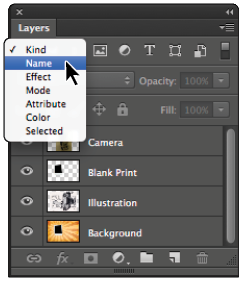
6 Type Print to see that the layer with the name Blank Print appears.
7 Select Kind from the Pick a filter type drop-down menu to see all the layers again.
8 Keep this file open for the next part of this lesson.
You can also right-click (Windows) or Ctrl+click (Mac OS) when on the Move tool ( Also, if you choose to isolate a collapsed layer group, you will not see the children in the Layers panel in the isolation mode. If you expand the layer group to show the children, and then choose Select > Isolate, you will see the children layers in the isolation mode. |

Continue to the next Photoshop Tutorial: Using Camera Raw as a filter in Photoshop >