Photoshop Tutorial: Understanding the stacking order of layers in Photoshop CS6
What you’ll learn in this Photoshop Tutorial:
|
This tutorial provides you with a foundation for working with Adobe Photoshop layers. It is the fourth lesson in the Adobe Photoshop CS6 Digital Classroom book. For more Adobe Photoshop training options, visit AGI’s Photoshop Classes. |
Photoshop Tutorial: Understanding the stacking order of layers in Photoshop CS6
Layers are much like pieces of clear film that you could place on a table. The layers themselves are clear, but anything placed on one of the layers will be positioned on top of the layers that are located beneath it.
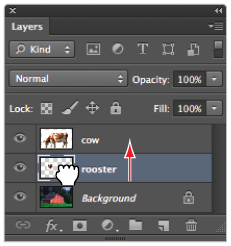
1 Confirm that the rooster layer remains selected. Click to select the Move tool ( ) from the Tools panel.
2 Position the Move tool over the rooster image in the document window, and drag the rooster so your cursor is positioned over the head of the cow. Notice that the rooster image is positioned under the cow. This is because the cow layer above the rooster layer in the Layers panel.
3 In the Layers panel, click and hold the rooster layer. Drag the layer up so it is positioned on top of the cow layer. Notice in the document window how the stacking order of the layers affects the stacking order of the objects in the image.
|
Click and drag the rooster layer up to place it on top of the cow layer. |
4 Using the Move tool, click and drag the rooster to position it in the lower-left corner of the image, in front of the fence and along the side of the barn. If your image seems to jump when you are trying to position the image, choose View > Snap to prevent the edge of the image from snapping to the edge of the document.
5 Click to activate the cow layer, and then, continuing to use the Move tool, click and drag the cow to position it in the lower-right corner of the image. Position the cow so it appears to be grazing on the grass without hanging outside the image area.
6 Choose File > Save. Keep the file open for the next part of this lesson.
Refining the edges of copied images
When the images were copied, they maintained very hard edges, making it very clear where the picture of the cow or rooster stops and the original image starts. This hard edge makes the images look contrived. You will blend the images so they look more natural together.
1 Click to select the cow layer in the Layers panel. Choose the Zoom tool ( ) from the Tools panel.
2 If necessary, uncheck Scrubby Zoom from the options panel, and then click and drag to create a zoom area around the entire cow. The cow is magnified to fill the entire display area.
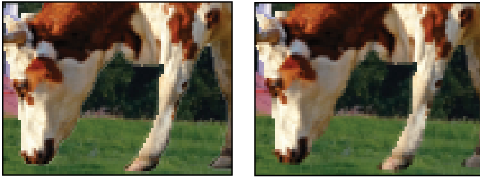
3 Choose Layer > Matting > Defringe. The Defringe dialog box opens.
4 In the Defringe dialog box, maintain the default setting of 1 pixel, then click OK. The Defringe command blends the edges of the layer into the background, making it appear more natural.
|
The cow before it is defringed. The cow after it is defringed. |
5 Press H on the keyboard to choose the Hand tool (). Using the Hand tool, click and drag the window to the right to reveal the content positioned on the left side of the image. Stop dragging when the rooster is visible.
6 In the Layers panel, click to activate the rooster layer, then choose Layer > Matting > Defringe. The Defringe dialog box opens.
7 In the Defringe dialog box, once again maintain the default setting of 1 pixel, and then click OK. The Defringe command affects only the selected layer.
Notice that both the rooster and the cow now look more naturally blended into the background.
8 Press Ctrl+Z (Windows) or Command+Z (Mac OS) to undo the application of the Defringe command. Notice the hard edge around the perimeter of the rooster. Press Ctrl+Z or Command+Z again to re-apply the Defringe command.
9 Double-click the Hand tool in the Tools panel to fit the entire image in the document window. This can be easier than choosing View > Fit on Screen, yet it achieves the same result.
10 Choose File > Save.
Adding text
You will now add text to the image.
1 With the ps0401_work file still open, click to select the rooster layer in the Layers panel.
2 In the Tools panel, click to select the Type tool () and click in the upper-left corner of the image, just above the roof of the barn. Notice that a layer appears on top of the rooster layer in the Layers panel.
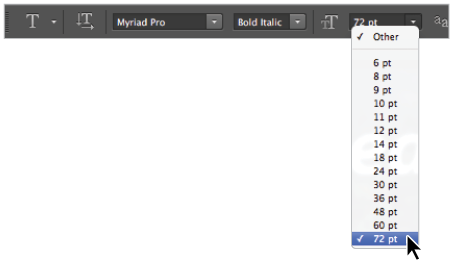
3 In the Options bar, select the following:
- From the font family drop-down menu, choose Myriad Pro. If you do not have this font, you can choose another.
- From the font style drop-down menu, choose Bold Italic.
- From the font size drop-down menu, choose 72.
|
Choose font attributes in the Options bar. |
4 Click once on the Set the text color swatch ( ) in the Options bar. The text Color Picker appears. Click on white or any light color that appears in the upper-left corner of the color pane, then press OK to close the Color Picker window.
5 Type Big Red Barn; the text appears above the roof of the barn. When you are finished typing, click on the Commit checkbox () in the Options bar to confirm the text.
6 With the text layer still active, click the Add a Layer Style button ( ) at the bottom of the Layers panel, and choose Stroke. The Layer Style dialog box opens, with the Stroke options visible; click on the color box and choose a red color. Press OK to accept the color, and then click OK again to apply the stroke. A stroke is added to the border of the text.
7 Choose File > Save. Keep the file open for the next part of this lesson.
Continue to the next Photoshop Tutorial: Saving files in Photoshop CS6 >