Dreamweaver tutorial: Creating and modifying styles in Dreamweaver
What you’ll learn in this Dreamweaver Tutorial:
|
This tutorial provides you with a foundation for working with Adobe Dreamweaver styles. It is the fourth lesson in the Adobe Dreamweaver CS5 Digital Classroom book. For more Adobe Dreamweaver training options, visit AGI’s Dreamweaver Classes. |
Adobe Dreamweaver Tutorial: Creating and modifying styles in Dreamweaver
You will now get a chance to begin working more deeply with CSS. In this exercise, you’ll be picking up where you left off in the last lesson with the events page for the OrganicUtopia web site. In that lesson you covered the creation of new CSS rules; however, you essentially worked with just one category of CSS rules, the element or tag-based rules. In all instances from the last lesson, you defined the properties for a tag, such as <h1>, <p>, and <ul> (unordered lists). You will now explore how to create classes and IDs. First, a brief review of the styles you used in the last lesson tag styles.
A tag style assigns rules directly to a specific HTML tag to alter its appearance. You can attach tag styles to any tag from the <body> tag down; as a matter of fact, when you modify page properties (Modify > Page Properties) to change default text formatting and background color, you are using a tag style assigned to the <body> tag.
The most basic tag styles are very straightforward. For instance, when you create a rule definition for the <p> (paragraph) tag, all paragraphs appear the same. The limitations begin when you want to customize one specific paragraph to appear different from the others. You will explore some solutions to this dilemma; for now, keep in mind that tag styles are a great way to ensure consistency across multiple elements and pages where specific tags are used, such as lists, tables, and paragraphs.
1 Double-click the events.html file in the Files panel to open it. This page has already had its Heading 1, paragraph, and list styled. You will now style the Heading 2.
2 In the Design view, click inside the heading Spring Events. This is already formatted as a Heading 2 for you.
3 Click on the CSS button in the left side of the Property Inspector; this allows you to define the properties of the Heading.
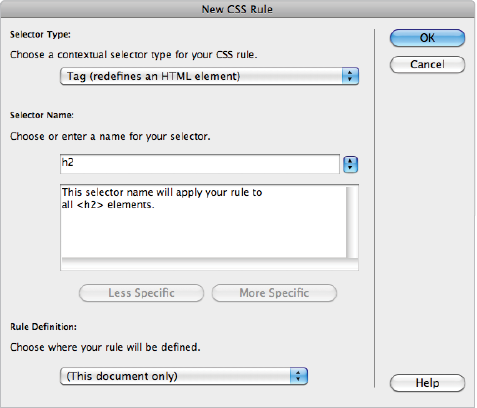
4 Choose 18 from the Size drop-down menu on the Property Inspector, and the New CSS Rule dialog box appears. From the Choose a contextual selector type for your CSS rule drop-down menu, choose Tag. In the second field marked Selector Name, the selector h2 has been chosen for you. Dreamweaver does this because you placed your cursor inside the text formatted as h2. Press OK. Now you can add additional properties, and Dreamweaver adds them to the definition of the h2 tag.
|
Defining a Heading 2 for the first time causes the New CSS Rule dialog box to appear. |
5 In the Property Inspector, click on the color swatch to choose a color for your text from the Swatches panel that appears. Select a dark green. The color #390, located in the top row, is used in this example. Your heading now changes to green. You have just styled the font-size and color of the <h2> tag. At this point, all text formatted as h2 appears this way. You will now format the last heading in the page in order to see this.
6 Click inside the text, Rent our facility. In the Property Inspector, click on the HTML button. You need to toggle into this view because you now want to change the HTML formatting, not the CSS.
7 In the Property Inspector, note that the Format for this text is currently set to None. From the Format drop-down menu, choose Heading 2 to see your text change.
|
Formatting text as a Heading 2 assumes the properties of the CSS rule. |

What you have seen in this exercise is an example of HTML and CSS working together with a tag style. In this case, all text tagged in the HTML as a Heading 2 or <h2> is defined by the CSS rule as green and 18 pixels. At this point you may be itching to create more complex layouts; if you understand the fundamentals of styling tags, it will pay off as you move to the next level of CSS.
Creating a class style with the Property Inspector in Dreamweaver
In the last exercise, you created a new CSS rule by defining the properties of the <h2> tag. Now you will create another CSS rule, this time using a class. In CSS, class styles have unique names and are not associated with any specific HTML tag. A CSS class can have a specific style that can be applied to one or more elements in your web site. So you might create a class called holidayText, for example, and the properties of this class might just be a single rule defining the font-color. Once the class is created, this text could then be applied to a table, paragraph, heading, or form element simultaneously. So on Halloween, if you change the property of the font-color to orange, all text that is defined by the holidayText class is orange, and on Valentine’s Day, if you change the property of the font-color to red, it all changes to red.
In this exercise, you will create a class using the Property Inspector for the copyright text at the bottom of the page in order to distinguish it from the rest of the page.
1 Click at the end of the paragraph reading Occasionally we gather personal information at our events and drag all the way down to the bottom of the page to select the copyright paragraph. Press the CSS button in the Property Inspector if necessary; note that this text has a size of 14 pixels and a dark grey color. This is because these are paragraphs and the CSS rules for paragraphs have these properties. You will now format all this text with a different size and font, and then add a background color.
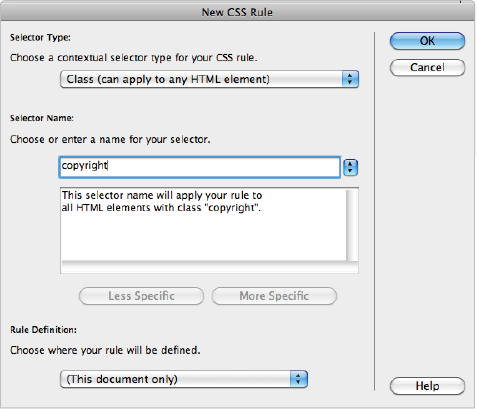
2 In the Property Inspector, click on the drop-down menu for Size and change the size from 14 pixels to 10 pixels. The New CSS Rule dialog box appears. The default choice for Selector Type is Class, which is what you would like to use. Classes, unlike the Tag styles you have been using, must be named; additionally, you must name the class, as Dreamweaver does not do it for you.
Older versions of Dreamweaver automatically assigned generic names to new classes, such as .style1, .style2, and so on. In addition to the New CSS Rule dialog box, this is perhaps one of the most substantial changes in Dreamweaver CS5 (as well as CS4) when it comes to styles: users are now required to name CSS classes. Although this may seem to be an extra step, it is a good one. By being forced to assign names to styles, users are more aware of the code they are generating and make their web pages easier to maintain. |
3 In the Selector Name field, type copyright. As you type, notice that Dreamweaver adds the text, This selector name will apply your rule to all HTML elements with class “copyright.” This is Dreamweaver’s way of helping you understand how your new class can be applied.
|
Set the rules for the new copyright class. |
4 Press OK. You now see the text formatted at 10 pixels. Once the class is created, you can add other properties.
5 Click once in the first line of the copyright text. Notice in the Property Inspector that in the Targeted Rule section, the menu is set for .copyright. This is important, as it confirms that you are modifying the class, not the paragraph. In the Property Inspector, choose Verdana, Geneva, sans-serif from the Font menu to add this property to the copyright class. Now you’ll add a new line of text and apply the copyright class to it.
6 Place your cursor at the end of the last line of the paragraph and press Enter (Windows) or Return (Mac OS) to add a new line. Type the following text: All images on this website are the copyright of Bob Underwood. Notice that the text is using the paragraph style; you need to instruct Dreamweaver to use the copyright class for this line.
7 From the Targeted Rule drop-down menu of the Property Inspector, choose copyright in the Apply Class section, The copyright class is now applied to this paragraph as well.
|
Use the Targeted Rule menu in the Property Inspector to apply an existing class to an element. |

Creating and modifying styles in the CSS Styles panel in Dreamweaver
Using the Property Inspector is a quick-and-easy way to create and apply styles and make some basic formatting choices; however, the number of style choices in the Property Inspector is very limited. To take advantage of the full power of CSS, you will begin to dive into the CSS Styles panel. In this exercise, you’ll explore some of the powerful options that CSS has at its disposal. The first thing you’ll do is change the background color of your page by adding a new style to the body tag.
1 At the top of the CSS Styles panel, make sure the All tab is active, and locate <style> underneath; if it is not currently expanded, click on the arrow to see the list of current rules in your document. You will now add a new rule for the body tag in order to change the background color.
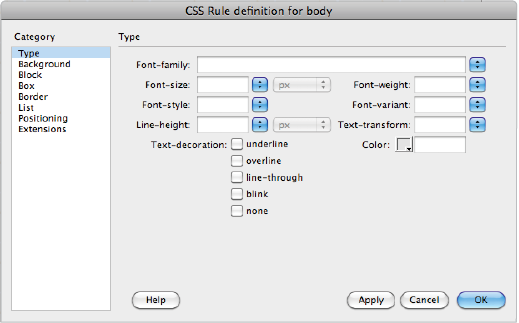
2 Click on the New CSS Rule icon ( ) at the bottom of the CSS Styles panel. This displays the same dialog box you are accustomed to working with, just accessed from a different location. From the Choose a contextual selector type for your CSS rule drop-down menu, choose Tag. Previously, you have accepted the automatic choices in the Selector Name section, but in this case, you need to instruct Dreamweaver that you would like to create a new rule for the body tag.
3 From the Choose or enter a name for your selector drop-down menu, select body. Press OK. The CSS Rule definition dialog box appears. This dialog box gives you access to the numerous styling options available in CSS.
|
Creating a new rule for the body tag launches the CSS Rule definition dialog box. |
4 In the left Category column, select Background to access the Background properties. In the field for Background-color, type in the following hexadecimal number: #E0F0E4. The background color does not apply automatically. Press the Apply button in the bottom-right corner to preview the new background color.
5 Press OK to confirm the background color. You will now change the background color for the copyright class at the bottom of the page.
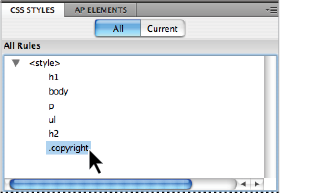
6 In the list of rules in the CSS Styles panel, double-click the .copyright class to edit these properties.
|
Double-clicking a style in the style window |
7 In the CSS Rule definition dialog box that appears, click on the Background Category, click on the Background-color swatch, and choose white (#FFF) from the list. Press OK. The two copyright paragraphs at the bottom of the page are styled with white backgrounds. The gap between the two paragraphs reveals the background color because these are separate paragraphs, and are both block elements. The gap is somewhat visually unappealing and is something you will be fixing a bit later in the lesson.
Continue to the next Dreamweaver Tutorial: Advanced test formatting with CSS in Dreamweaver >