Dreamweaver tutorial: Creating Lists in Dreamweaver
What you’ll learn in this Dreamweaver Tutorial:
|
This tutorial provides you with a foundation for working with the Adobe Dreamweaver workspace. It is the third lesson in the Adobe Dreamweaver CC Digital Classroom book. For more Adobe Dreamweaver training options, visit AGI’s Dreamweaver Classes. |
Adobe Dreamweaver Tutorial: Creating lists in Dreamweaver
Bulleted lists might be familiar to you if you have worked with word processing or desktop publishing applications. Lists are a helpful way to present information to a reader without the formal constraints of a paragraph. They are especially important on the Web. Studies indicate that people typically skim web pages instead of reading them from beginning to end. Creating lists will make it easier for your visitors to get the most from your website without sifting through several paragraphs of text.
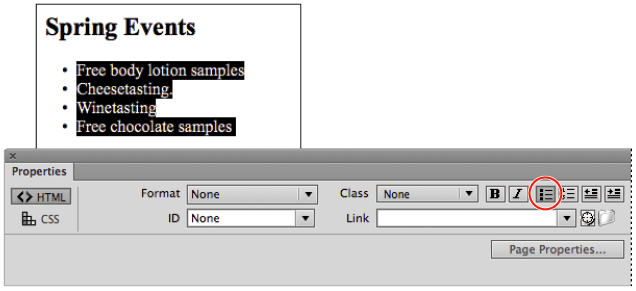
1 On the events.html page, click and drag to highlight the four lines below Spring Events.
2 Make sure you have the HTML button selected in the Property Inspector at the bottom of your page, and click the Unordered List button. The highlighted text becomes indented, and a bullet point is placed at the beginning of each line.
|
Use the Unordered List button in the Property Inspector to create a bulleted list. |
3 Click the Ordered List button to the right of the Unordered List button. The bullets change to sequential numbers.
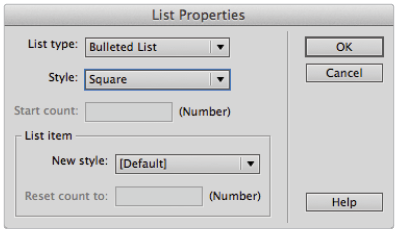
4 Choose Format > List > Properties to open the List Properties dialog box. Choose Bulleted List from the List type drop-down menu to return to your first style of list. The Numbered List and Bulleted List options in the List type drop-down menu also allow you to switch between ordered and unordered lists.
5 From the Style drop-down menu, choose Square. This changes the default circular bullets to square bullets. Click OK to exit the List Properties dialog box.
|
Change the bullet style to square in the List Properties dialog box. |
You might have noticed that the four lines of text in your list have lost their style. They are slightly larger than your paragraphs and they are black, not dark gray. This is because a style has been defined for paragraphs, but not an unordered list. You will now create a new CSS rule for the appearance of all unordered lists in the document. After you define the properties, all text formatted as an unordered list will appear the same.
6 With all four lines still highlighted, click <style> in the Sources menu of the CSS Designer panel.
7 Click the Add Selector button in the Selectors menu to create a new CSS style for the ul element.
8 In this case, Dreamweaver has recognized that you have selected text in an unordered list within the body tag of your page so it prefills the text box with body ul li; ul is the tag for unordered list. Replace this text by typing ul to create a selector for our unordered list. Then press Enter (Windows) or Return (Mac OS).
9 Locate the font-size property in the Properties pane of the CSS Designer panel and click medium to the right of the property label. Select px from the menu and enter the number 14 in the text box that appears. Press Enter (Windows) or Return (Mac OS) to apply the change.
Now you need to change the color of the unordered list to match the color of your paragraph.
10 Locate the color property in the Properties pane of the CSS Designer panel and click the Set Color button to the right of the label color. When the Swatches panel appears, locate the same dark gray swatch, hexadecimal color #666. Click the swatch to apply the color.
11 Choose File > Save. Leave this file open for the next part of this lesson.
Using the Text Insert panel
There are a number of ways to format text in Dreamweaver. One method you haven’t explored yet is the Text Insert panel. Because most of the options available in the Text Insert panel are also available in the Property Inspector, you might find it more convenient to use the Property Inspector for common tasks. However, you should be aware of the Characters menu located in the Text Insert panel. One of the most common items in the Characters menu used on the Web is the copyright symbol, ©. You will now insert a copyright notification at the bottom of your Events page.
1 Click to the left of the sentence This page was created with Adobe Dreamweaver and type 2013 and then add a space.
2 Click before the text 2013 to insert your cursor.
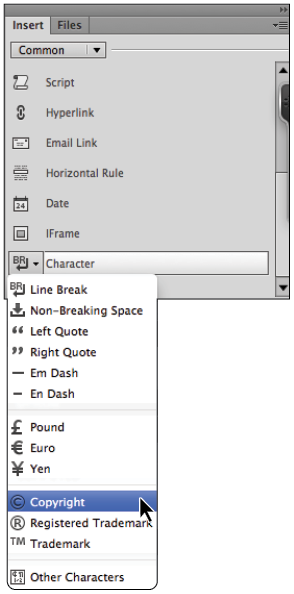
3 Click the menu at the top of the Insert panel on the right side of your page and choose Common. Scroll all the way to the bottom of the resulting list and choose Copyright from the Character menu to insert the Copyright symbol to the beginning of the line.
|
The copyright symbol can be inserted from |
4 Highlight the last two lines on your page, beginning with the newly inserted copyright symbol and ending with Dreamweaver classes. You are going to set these two lines apart from the rest of the page by italicizing them. Layout considerations such as headers and footers will be discussed throughout the following lessons in this book, but for now you can use the Property Inspector to italicize these two lines.
5 Click the Italic button in the Property Inspector to apply an inline italic style to your text.
Additionally, you could have selected the text and chosen Insert > HTML > Text Objects to accomplish the same thing. |
6 Choose File > Save.
Continue to the next Dreamweaver Tutorial: Inserting Images in Dreamweaver >