Dreamweaver tutorial: Defining Page Properties in Dreamweaver
What you’ll learn in this Dreamweaver Tutorial:
|
This tutorial provides you with a foundation for working with Adobe Dreamweaver page properties. It is the second lesson in the Adobe Dreamweaver CC Digital Classroom book. For more Adobe Dreamweaver training options, visit AGI’s Dreamweaver Classes. |
Adobe Dreamweaver Tutorial: Defining Page Properties in Dreamweaver
Now that you’ve created a page in Dreamweaver, you’ll use the Page Properties dialog box to specify its layout and formatting properties. For example, you can set page titles, background colors and images, text and link colors, as well as other basic properties of every web page. You use this dialog box to define page properties for each new page you create, and to modify the settings for pages you’ve already created.
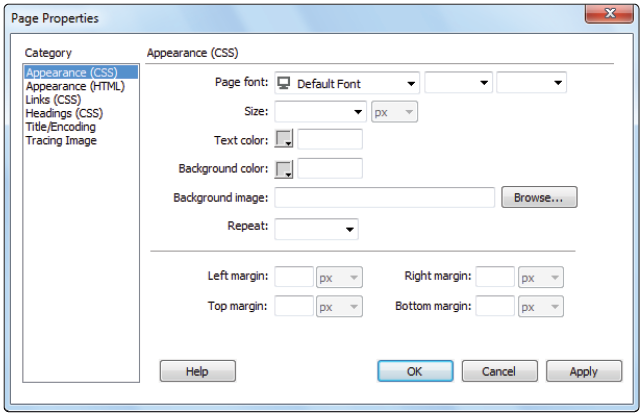
1 To access the Page Properties dialog box, choose Modify > Page Properties, or use the keyboard shortcut Ctrl+J (Windows) or Command+J (Mac OS). The Page Properties dialog box appears with the Appearance (CSS) category selected by default.
|
The Page Properties dialog box. |
Settings found in the Appearance (CSS) category will automatically create a Cascading Style Sheet that defines the appearance of your page. Using a CSS file to define these page properties adds flexibility to your design, as styling can be changed more easily and more universally than if your defaults are defined using HTML code.
2 The Page Font and Size fields define the default appearance of text on your page. For now, leave these settings at their defaults. You’ll be styling type with CSS in later lessons in this book.
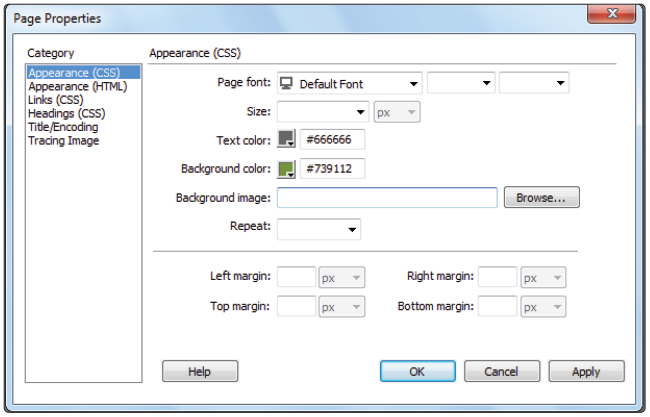
3 The Text color option allows you to set a default color in which to render type. To set a text color, click the color swatch next to Text and the Swatches panel appears. You can choose your default text color by clicking the appropriate swatch from the Swatches panel. Try this by clicking any color swatch, then clicking Apply to apply your desired default text color.
You can also type the hexadecimal notation for your desired color into the text field. Type the hex code #666666 in the text field to specify a dark gray as the default text color.
You’ll see the effects of this change later in this lesson, when you add text to your page using the Files panel. |
4 Use the Background color option to choose a background color for your page. Click the color swatch next to the Background text field and the Swatches panel appears. You can choose your background color by clicking the appropriate swatch from the Swatches panel. Try this by clicking any color swatch, then clicking Apply to see the results.
You can also choose the background color by typing the hexadecimal notation for your desired color into the Background text field. Type the hex code 739112 in the Background text field, then click Apply to specify a green as the background color.
|
Set a background color for your page. |
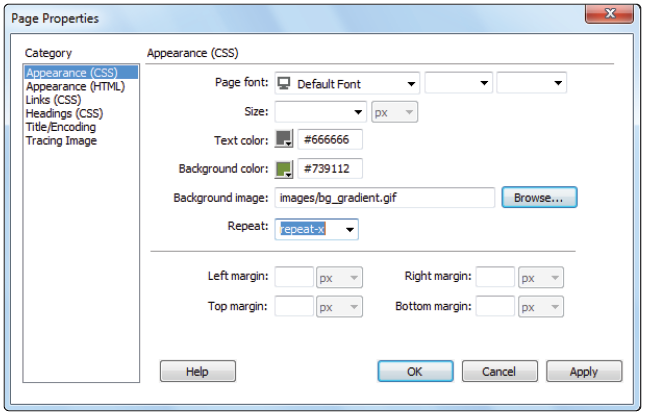
5 The Background image field allows you to set a background image for your page. Dreamweaver mimics a browser’s behavior by repeating, or tiling, the background image to fill the window. To choose a background image, click the Browse button next to the Background image text field. The Select Image Source dialog box appears.
6 Navigate to the folder titled images within the dw02lessons folder and select bg_gradient.gif for your page background; then click Apply. You will see the background image, which is a gradient, appear on the page. Background images are tiled both horizontally and vertically by default, which is not appropriate for this image, so you will fix this with the Repeat property.
7 From the Repeat drop-down menu, choose repeat-x. Click Apply to see the change.
|
Choose a background image for your page (bg_gradient.gif). |
You can also type the path to your background image into the Background image text field. |
8 By default, Dreamweaver places your text and images in close proximity to the top and left edges of the page. To build in some extra room between your page edges and the content on them, use the Margin settings in the Page Properties dialog box. In the Left margin text field, type 25 to place your content 25 pixels from the left edge of the page. In the Top margin text field, type 25 to place your content 25 pixels from the top edge of the page.
The Appearance (HTML) category in the Page Properties dialog box contains many of the same settings you just defined. Setting default page attributes with HTML code, however, is not recommended. Setting appearance with CSS is a better option.
The Links (CSS) category allows you to define the appearance of linked text within your document. For more information on creating hyperlinks, see Lesson 3, “Adding Text and Images.”
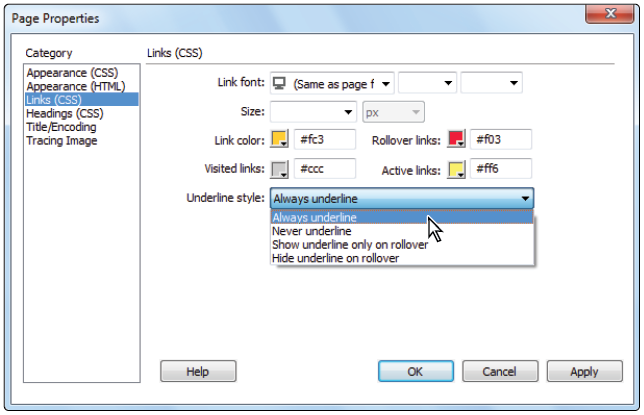
9 Click the Links (CSS) category on the left side and leave the Link font and Size settings at their defaults (same as Page font). This ensures that your hyperlinks will display in the same typeface and size as the rest of the text on your page.
10 Set the colors for your different link types in the following fields:
Link Color: Type #fc3 for the default link color applied to linked text on your web page.
Visited links: Type #ccc for the color applied to linked text after a user has clicked on it.
Rollover links: Type #f03 for the color applied to linked text when a user rolls over it.
Active links: Type #ff6 for the color applied when the user clicks on linked text.
Hexadecimal codes can be written in shorthand using only three alphanumeric characters when the two digits that make up each RGB component are the same value. For instance, #fc3 is the same as writing #ffcc33. |
11 Because you’re using CSS formatting, you can choose whether or not (and/or when) you want your links to be underlined. This is not possible with HTML formatting. Choose the default setting of Always underline in the Underline style drop-down menu.
|
Choose default colors for links, visited links, and active links. |
The Headings (CSS) category allows you to define the font, style, size, and color of heading text within your document.
12 Click the Headings (CSS) category and leave the settings at their defaults for now. You’ll be using CSS to style your heading text later in this book.
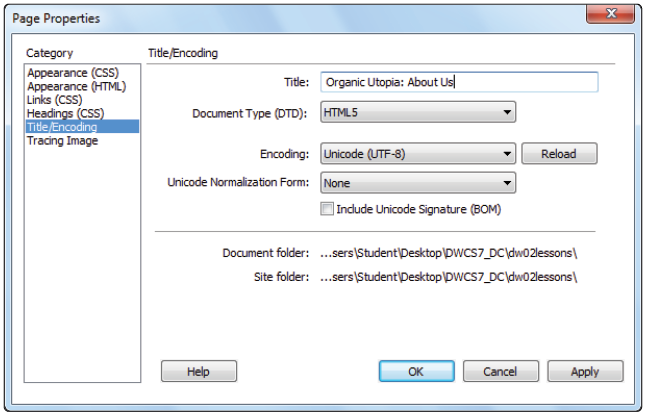
13 Click the Title/Encoding category to the left of the Page Properties dialog box to expose more settings. Most of these settings are better left alone unless you know what they do and why you need to change them, with the major exception of the first one: Title.
14 Type Organic Utopia: About Us in the Title text field. This sets the title that appears in the title bar of most browser windows. It’s also the default title used when a user bookmarks your page.
Leave the Document Type (DTD) set to HTML5. This makes the HTML document HTML5 compliant.
Unicode (UTF-8) will likely be set as the default option. This specifies the encoding used for characters in your page, letting the browser know which character set to use.
The Unicode Normalization Form is likely set to C (Canonical Decomposition). This setting is rarely changed unless you have a specific reason for changing it. Unicode Normalization Forms have to do with the way special characters such as glyphs are rendered on the screen.
|
The Title/Encoding category allows you to title your page or specify the encoding used. |
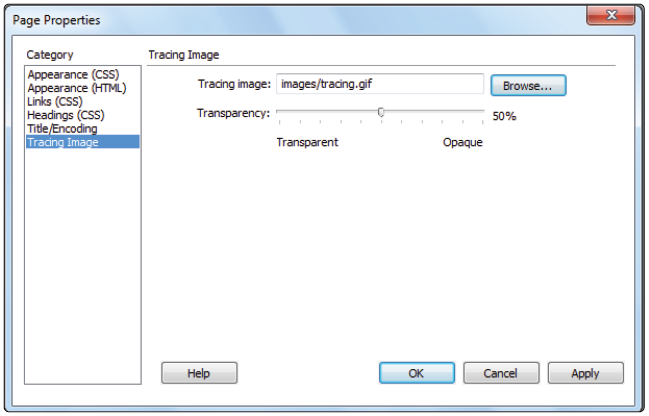
15 Click the Tracing Image category in the left part of the Page Properties dialog box. A tracing image is a JPEG, GIF, or PNG image that you create in a separate graphics application, such as Adobe Photoshop or Fireworks. It is placed in the background of your page for you to use as a guide to recreate a desired page design.
16 Click the Browse button next to the Tracing image text field. You can also type the path to your image directly into this text field.
17 In the Select Image Source dialog box, navigate to your dw02lessons folder, select the file named tracing.gif from the images folder, then click OK (Windows) or Choose (Mac OS).
18 Set the transparency of the tracing image to 50 percent by sliding the Transparency slider to the left.
|
Place a tracing image in the background of your page. |
19 Click Apply to see the results. Tracing Images can be useful tools for building layout. Oftentimes, you can import a page mockup created originally in Photoshop or another application and use it as a visual guideline.
20 When activated, the tracing image replaces any background image you’ve added to your page, but only in Dreamweaver. Tracing images are never visible when you view your page in a browser. Now that you have a sense of how the tracing feature works, you’ll remove it. Select the path within the Tracing Image field and click Delete to remove it.
21 Click OK to close the Page Properties dialog box.
22 Choose File > Save. Now that you’ve finished setting up your page properties, you’ll examine your page in Dreamweaver’s three different work view modes.
Continue to the next Dreamweaver Tutorial: Defining Work Views in Dreamweaver >