Dreamweaver tutorial: Tag hierarchy in Dreamweaver
What you’ll learn in this Dreamweaver Tutorial:
|
This tutorial provides you with a foundation for working with Adobe Dreamweaver tag hierarchy. It is the first lesson in the Adobe Dreamweaver CS5 Digital Classroom book. For more Adobe Dreamweaver training options, visit AGI’s Dreamweaver Classes. |
Adobe Dreamweaver Tutorial: Tag hierarchy in Dreamweaver
HTML tags follow a certain order of weight, or hierarchy, to make sure that everything displays as it should. The tag at the top of the hierarchy is the <html> tag, and every other tag you create is contained within it. Tags such as the <body> tag always hold smaller tags, such as the <p> (paragraph), <img> (image), and <strong> (bold) tags. In addition, structural tags (such as those that create paragraphs, lists, and tables) hold more weight than formatting tags such as <strong> (bold) and <em> (italic). Take this line of code, for example:
<strong><p>Big bold paragraph</p></strong>
Although code such as this may work in certain browsers, it isn’t recommended, because the <strong> tag technically holds less weight than the <p> tag. The following code represents a safer and more proper way to include the bold type:
<p><strong>Big bold paragraph</strong></p>
Dreamweaver generally does a great job of keeping tags properly nested, or contained within each other. When you choose to manipulate the code by hand, you should always keep good coding techniques in mind.
XHTML 1.0 Transitional in Dreamweaver
The latest recommended version of HTML is XHTML 1.0, a stricter version of HTML that makes the language more compatible with newer platforms, such as mobile phones and handheld devices, which require code to be perfectly formed. XHTML combines elements of HTML and XML, a language used to describe data. XML, or Extensible Markup Language, has become a popular method of exchanging information among seemingly unrelated applications, platforms, and systems. By default, Dreamweaver creates new web pages using the XHTML 1.0 Transitional standard.
What’s the difference?
Although tags and attributes remain the same, the structure of the language changes with XHTML, becoming stricter. Whereas HTML was very forgiving of sloppy coding practices such as overlapping or unclosed tags, XHTML requires all tags to be closed and properly nested. HTML doesn’t care which case you use when constructing tags, but in XHTML, all tags must be lowercase.
For example, a <br> (break) tag, which normally doesn’t require a closing tag, now must be closed. You can write tags to self-close by using a forward slash—making sure there is a space between the (br) and the forward slash—and then closing the bracket like so:
<br />
The result is a well-formed language that takes advantage of newer browsers and device platforms, while remaining compatible with older browsers. Working with XHTML in Dreamweaver requires nothing more than selecting XHTML 1.0 Transitional as the Document Type (DocType) when creating a new page.
Explorations in code in Dreamweaver
Although this book occasionally refers to the code for examples, hand-coding is not a primary goal of the included lessons. The best way to learn how code represents the layouts you are building visually is to switch to the Code view and explore what’s happening behind the scenes.
It’s important to remember that every button, panel, and menu in Dreamweaver represents some type of HTML tag, attribute, or value; very rarely will you learn something that is unrelated or proprietary to Dreamweaver alone. Think of the Dreamweaver workspace as a pretty face on the HTML language.
A look at the Welcome Screen in Dreamweaver
A common fixture in most CS5 applications is the Welcome Screen, which is a launching pad for new and recent documents. In Dreamweaver, the Welcome Screen appears when the application launches or when no documents are open. From the Welcome Screen, you can create new pages, create a new site, open a recent document, or use one of Dreamweaver’s many starter pages or layouts.
|
The Welcome Screen appears when you launch the application, or when no documents are open. |
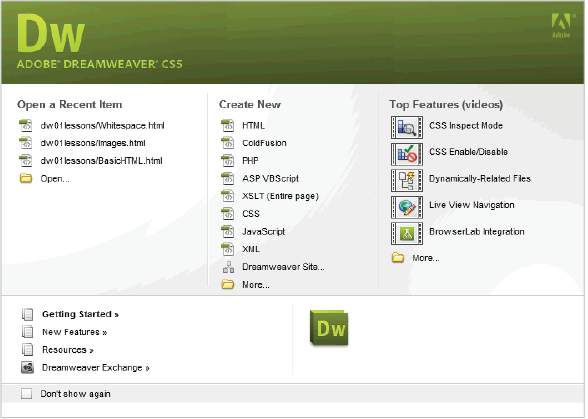
Here’s what you’ll find on the Welcome Screen:
Open a Recent Item: A list of the last few documents you worked on appears in the leftmost column, or you can browse to open a different file using the Open button ( ) at the bottom.
Create New: In addition to HTML pages, you can choose from a variety of new document formats, such as CSS, JavaScript, and XML. Dreamweaver is not just a web page-building tool, but also a superior text editor, making it ideal for creating many non-HTML files. You can also define a new Dreamweaver site using the link at the bottom, or choose the More folder for even more new file options.
Top Features (videos): On the far right side of the Welcome Screen, there is a column that contains Top Features videos. These videos explore some of the new top features of Dreamweaver CS5, such as CSS Inspect Mode, Dynamically-Related Files, and BrowserLab Integration. The videos are located on Adobe’s web site, adobe.com, and when you click on one, Dreamweaver launches the site in your web browser to give you access to the video.
Continue to the next Dreamweaver Tutorial: Creating, opening, and saving documents in Dreamweaver >