Flash tutorial: Organizing and layering graphics in Flash
What you’ll learn in this Flash Tutorial:
|
This tutorial provides you with a foundation for working with Adobe Flash layers. It is the first lesson in the Adobe Flash CC Digital Classroom book. For more Adobe Flash training options, visit AGI’s Flash Classes. |
Adobe Flash Tutorial: Organizing and layering graphics in Flash
As you build more complex graphics on the Stage, you’ll want to position and layer them as needed to make your movie work for you. Flash gives you a lot of control over your Stage through a robust layer structure that you may already be accustomed to using in other Adobe design applications.
Working with layers
On a single layer, you have a great deal of flexibility to arrange Drawing Objects and grouped graphics—however, as your artwork becomes more complex, you’ll want the power of layers to stack and arrange your artwork. In addition to controlling stacking order, layers let you hide specific graphics from view, and even lock those items from accidentally being edited or deleted.
You can think of layers as clear pieces of film that you can place graphics on and stack together; each layer sits above another, allowing you to reveal the items below, but also to control which items appear above or below another. Each layer and its contents can be isolated in view, toggled out of view, or locked to prevent editing.
In the next steps, you’ll separate the graphics you’ve created so far onto individual layers for more control.
1 To start, you’ll make sure that each set of graphics you want to assign to a layer is grouped or converted to a Drawing Object. This will make them easier to move and distribute.
Verify that your word balloon (leave the text separate) is a Drawing Object by selecting it and viewing its info in the Property Inspector. If not, use Modify > Combine Objects > Union to convert it to a Drawing Object.
2 Double-click to select your fish and the gills, then hold down the Shift key and select the eye. Convert them to a single Drawing Object by choosing Modify > Combine Objects > Union.
3 Shift+click to select the fish, the bubble, and the word balloon. Make sure to not select the text. Right-click (Windows) or Ctrl+click (Mac OS) on any of the selected items—a contextual menu appears.
|
Use Distribute to Layers to separate multiple |
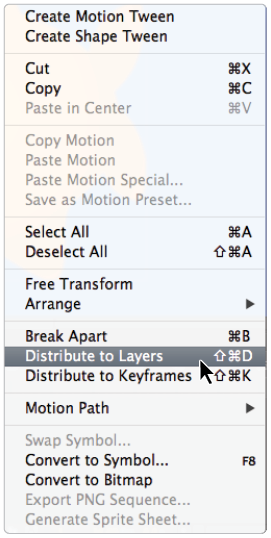
4 At the bottom of the menu, locate and select Distribute To Layers. All the items on your Stage are placed onto several new layers, which appear on the Timeline panel at the bottom.
The layers are named generically (Layer 2, Layer 3, and so on). To fix this, you’ll identify which graphics belong to which layers and rename them appropriately.
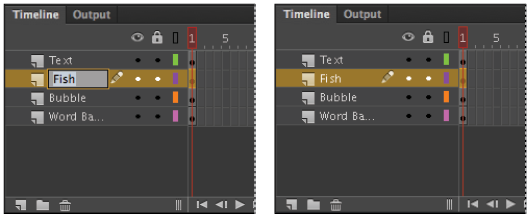
5 Choose Edit > Deselect All. First, click on the fish on the Stage to select it, and look at the Timeline panel below. The layer that becomes selected is the one to which it belongs. Double-click directly on the layer’s name to edit it, and type in the name Fish.
6 Repeat step 4 for the bubble and word balloon, naming them Bubble and Word Balloon, respectively. For Layer 1, rename this layer Text since all the text was left on this layer.
|
Double-click a layer’s name to edit it. Rename your layers clearly so you know exactly what’s on each one. |
7 Choose File > Save to save your file.
Arranging, locking, and hiding layers
Once you’ve arranged your artwork on individual layers, you can easily control which layers are visible (or invisible) and editable, and easily rearrange the order and appearance of items in your movie.
1 Locate the layer titled Bubble, which contains the bubble you created earlier. Click to select it.
2 Click and drag upwards on the layer—you see a black beam follow your cursor within the layers. This indicates where the layer will be moved when you release the mouse.
|
When dragging layers, follow the black beam to |
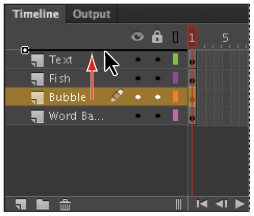
3 Drag the layer all the way up and release it at the top of the layer stack to move the bubble to the top.
4 Locate the two column headers above your layers—one appears with an visibility icon ( ) and one appears with a padlock icon (
 ), which means that it is locked. Under the padlock column, click on the Text, Word Balloon, and Bubble layers to lock those layers (a padlock icon should appear on the layer). Leave the Fish layer unlocked.
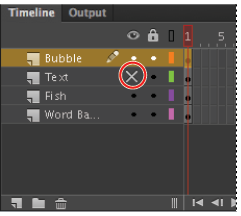
5 Click the Text layer below the visibility column—an X appears and the text disappears. Toggle the layer’s visibility back on again by clicking the X.
|
Click under the padlock or visibility icon to lock, hide, and show specific layers. |
To lock all layers except for the one you’re targeting, hold down the Alt key (Windows) or Option key (Mac OS) and click on the target layer below the padlock column. All layers except for the one you clicked will lock. This also works for visibility! |
Creating layer folders
As you accumulate more layers on the Timeline, it makes sense to try and group them logically so that you can easily view, lock, and hide related layers with a few clicks. You can create layer folders on the Timeline that can group several related layers together, making it easy to collapse, hide, and lock them as needed.
1 Click to select the Text layer, which should currently be the second layer on the Timeline.
2 Locate the New Folder button ( ) below the layer stack, and click it once to create a new folder above the current layer.
3 Double-click the Folder title, and type Word Balloon and Text as the new name.
4 Click and drag the Text layer up below the folder and to the right and release it—it should now appear indented below the folder, indicating it is now inside the new folder. (Follow the bar—it should appear indented below the layer folder before you release the mouse button.)
|
Move layers into your new layer folder. |

5 Repeat step 4 with the Word Balloon layer to add it to the new layer folder. If necessary, rearrange the two layers within the folder so that the text appears above the Word Balloon.
6 Collapse the layer folder and hide its included layers by clicking the arrow that appears to the left of the folder name. The Word Balloon and Text layers temporarily disappear from view on the Timeline.
|
Collapse or expand a layer (and its contents) |

7 Choose File > Save to save your file.
You can now lock or hide all layers under that folder at once by clicking the layer folder under the Padlock and Visibility columns, respectively. To access individual layers again, simply expand the layer folder.
Layer folders can be created several levels deep, allowing you a lot of organizational control when you need it. To create a nested layer folder, select any layer inside of a layer folder and click the New Folder button below the Timeline. |
Continue to the next Flash Tutorial: Transforming graphics in Flash >