Flash tutorial: Using the Pen Tool in Flash
What you’ll learn in this Flash Tutorial:
|
This tutorial provides you with a foundation for working with the Adobe Flash pen tool. It is the first lesson in the Adobe Flash Digital Classroom book. For more Adobe Flash training options, visit AGI’s Flash Classes. |
Adobe Flash Tutorial: Using the Pen Tool in Flash
For precision illustration tasks, you will most likely want to use the Pen tool. The Pen tool allows for point-to-point drawing, and precise control over curves and lines in between. You can even add or remove points to fine-tune your work. If you’ve used the Pen tool in Illustrator CC, you’ll already be familiar with the Pen tool and its related tools.
You’ll use the Pen tool to create fins for your new fish in the following steps.
1 Select the Pen tool ( ) from the Tools panel. In the Properties Panel or Tools panel, set your stroke color to black (#000000).
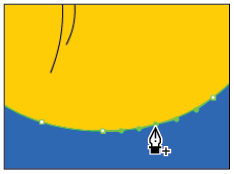
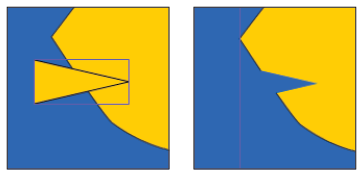
2 In the space above your oval, click and release the mouse pointer on the Stage to create a new point. Move your pointer to the left of the point you just created, and click and release again to create a second point. This point is joined to the first by a new path (line).
3 Position your cursor above and to the right of your last point. Click and hold down your mouse button, and then drag to the right. This forms a curve between your new point and the last one. Once you’ve gotten the curve just right, release the mouse button.
|
Creating precision lines and curves using the Pen tool. |
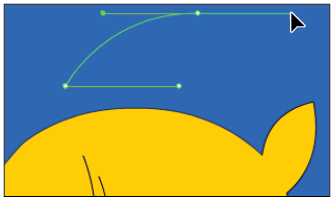
You can create curves from any new point by holding down the mouse button and dragging in the direction you want to form the curve. (Be sure not to release the mouse button first!) |
4 Next, you’ll close up the shape. The next time you create a point, however, the Pen tool will attempt to draw a curve in the same direction as the last. To reset the last point drawn so that you can control the curve, click on the last point you created.
5 Move your pointer over the first point you created, and you should see a small loop appear below the pen cursor. Click and hold down your mouse button; drag to the right to form the final curve, and release the mouse to complete the shape.
6 As with other path-based tools, shapes created with the Pen tool do not automatically fill. To fill the new shape, choose the Paint Bucket tool ( ) from the Tools panel. In the Tools panel, make sure the Fill color is still set to the orange color labeled #FFCC00.
7 Click once inside your new shape to fill it with the currently active fill color.
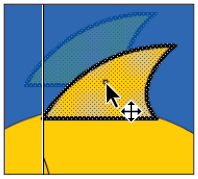
8 Now you’ll move the fin into place and connect it with the rest of the body. Choose the Selection tool ( ), and double-click the fill of the fin to select the entire shape. Drag it into place at the top of the oval, slightly overlapping it. Click the Stage to deselect the shape; when you deselect the shape, the two become merged.
|
Move your new fin into place above the fish body. |
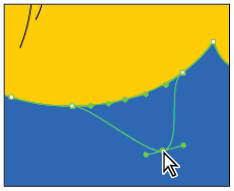
9 The fin should now be merged with the oval. Use the Selection tool and click once to select the portion of the stroke that overlaps onto the oval. Only that portion should become selected. Press Backspace (Windows) or Delete (Mac OS) to clear away the selected stroke.
|
Intersecting strokes in mergeable artwork become segmented and can be individually selected and removed. |
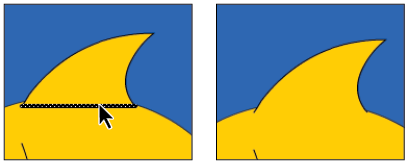
By default, strokes that overlap between two merged shapes become segmented, and individual portions can be selected and removed. |
10 Choose File > Save to save your file.
Using the Add and Delete Anchor Point tools
You can add or remove points along existing paths with the Add and Delete Anchor Point tools. These tools are found under the Pen tool and enable you to further fine-tune your illustrations. You’ll add a bottom fin to your fish by manipulating the existing oval shape that forms its body.
1 Choose the Subselection tool ( ) from the Tools panel. Click on the edge of the oval; this reveals the points and paths that form this shape. From here, you can manipulate, add, or remove points along this path.
|
Use the Subselection tool to activate the points and paths that compose a shape. |
2 Click and hold down your mouse pointer on the Pen tool ()—this reveals the Add, Delete, and Convert Anchor Point tools. Choose the Add Anchor Point tool ( ). Note: You can also use the = and - keys to toggle between the Add and Delete anchor point tools.
3 At the bottom center of the oval, you’ll notice a single anchor point. Using the Add Anchor Point tool, click once to the left and once to the right of that point to add two new anchor points.
If you add the anchor point(s) in the wrong place, or add too many, choose the Delete Anchor Point tool () and click on any point to remove it.
|
Use the Add Anchor Point tool to add two additional points surrounding the bottom point. |
4 Choose the Subselection tool and, if necessary, click on the outline of your oval to reactivate the points and paths. Click the point at the very bottom of the oval to activate it—the point now appears solid instead of hollow.
5 Click and drag the point down and to the right, which extends that portion of the oval into a fin-like shape.
|
With more points in place, you can easily pull out and extend a fin from the existing shape. |
6 Choose File > Save to save your file, and leave the file open.
Using the Combine Objects menu
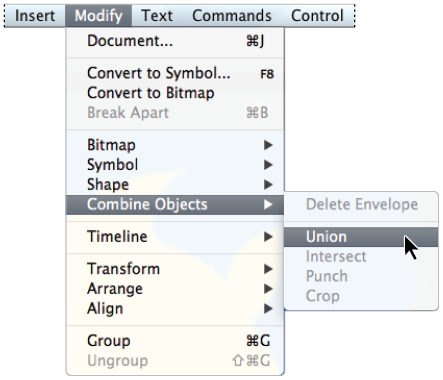
If you need to create more complex combinations of shapes, you can use the Combine Objects menu, found at Modify > Combine Objects. This menu enables you to create punches, crops, or intersections between overlapping shapes, and even lets you convert mergeable artwork into Drawing Objects.
Before you can perform any Combine Objects menu commands on a piece of artwork, it first must be converted to a Drawing Object. To do this, you’ll use the Union command to convert your fish from mergeable artwork to a Drawing Object.
1 Select the entire fish by choosing Edit > Select All. You can also use the Selection tool () to draw a selection area around the artwork if you prefer.
2 Choose Modify > Combine Objects > Union. This command converts the selected artwork to a Drawing Object, and a bounding box appears around your fish and its parts. Choose Edit > Deselect All.
|
Convert mergeable artwork to Drawing Objects using Modify > Combine Objects > Union. |
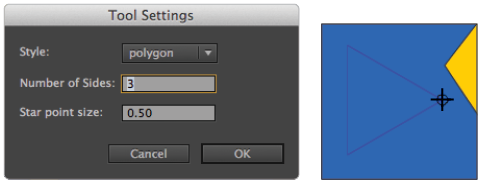
3 Select the Polystar tool ( ), and enable Object Drawing mode by selecting the button at the bottom of the Tools panel. From the Properties Panel, press the Options button. This opens the Tool Settings dialog box for the Polystar tool.
4 In the Tool Settings dialog box, type 3 for the number of sides. Leave the Star point size at its defaults and press OK to exit the dialog box. On the Stage, while holding your Shift key (to constrain the angle), click and drag to draw a right-pointing triangle.
If the new triangle appears unfilled, select any fill color from the Tools panel, and use the Paint Bucket tool to fill it.
|
Use the Polystar tool to set and draw a triangle shape that you’ll punch from the fish below. |
5 With the shape still selected, choose the Free Transform tool ( ) from the Tools panel. A bounding box with handles appears—grab the top middle handle and drag it downward to scale the shape down vertically.
Choose the Selection tool and move the shape so that it overlaps the fish on the left where a mouth should be.
6 Choose Edit > Select All so that the new shape and your fish both appear selected. Choose Modify > Combine Objects > Punch. The new shape is knocked out from your fish, leaving behind a mouth-like opening.
|
Use Modify > Combine Objects > Punch to subtract one shape from another. |
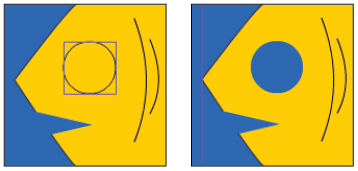
7 Select the Oval tool from the Tools panel. Make sure you have a fill color selected (any color will do). With the Shift key held down, click and drag to draw a small, perfect circle. To match the figure shown in this example, use your Property Inspector to set the circle to a width and height of 50. Switch to your Selection tool and position the circle on top of your fish above the mouth you created.
8 Choose Edit > Select All. With both the circle and fish selected, choose Modify > Combine Objects > Punch. This punches the circle into the body of the fish, making space for an eye.
|
Use the Punch command to create a space for your fish’s eye. |
9 Choose File > Save to save your file.
The Combine Objects menu
There are several commands available at Modify Combine Objects, not all of which you may use right away. Here’s an overview of what each menu command does so that you can decide for yourself when and whether to use them.
|
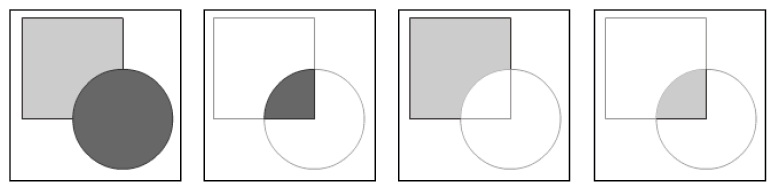
From left to right: Union, Intersect, Punch, Crop. Union: Converts mergeable shapes into Drawing Objects. You can group several shapes into a single Drawing Object. In addition, shapes that are part of an Intersect, Punch, or Crop operation must all be Drawing Objects. Intersect: Leaves behind only the overlapping area of two shapes. Punch: Knocks out the top shape from the bottom shape. Crop: Crops the bottom shape to conform to the top shape. |
Continue to the next Flash Tutorial: Using the Primitive tools (Smart Shapes) in Flash >