Flash tutorial: Working with Drawing Objects in Flash
What you’ll learn in this Flash Tutorial:
|
This tutorial provides you with a foundation for working with the Adobe Flash drawing tools. It is the first lesson in the Adobe Flash Digital Classroom book. For more Adobe Flash training options, visit AGI’s Flash Classes. |
Adobe Flash Tutorial: Working with Drawing Objects in Flash
In contrast to artwork created in Merge Drawing mode (referred to simply as shapes), Object Drawing mode provides more rigid control over artwork created on the Stage. Much like drawing shapes in Illustrator CC, shapes drawn in this mode group their stroke and fill together to avoid separation, and so partial selections are prevented. Drawing Objects give you the ability to stack and arrange shapes within a single layer, providing a deeper level of ordering amongst multiple pieces of artwork.
1 Select a green shade from the Fill color swatch on the Tools panel. Directly beneath the Oval tool, select the Polystar tool ( ).
).
2 Locate the Object Drawing button ( ) at the bottom of the Tools panel, and click to select it. The button should be pressed in at this point, indicating that Object Drawing mode is enabled.
3 Click and drag to draw a new polygon on the Stage. You’ll notice the shape appears inside a bounding box. Switch to the Selection tool ( ) and choose Edit > Deselect All.
|
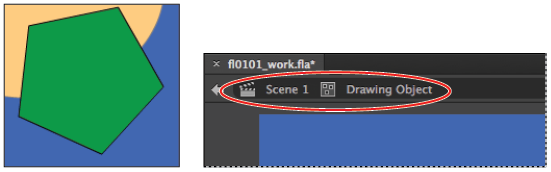
Drawing Objects appear inside of bounding boxes, and their strokes and fills can’t be separated. |
4 If you click once on the fill or stroke of the shape, the bounding box around the entire shape appears selected. Click and drag to draw a selection area (marquee) around part of the polygon, and you’ll see that partial selections also result in the entire shape becoming selected.
5 Double-click the fill of the shape—you’ll be brought inside the Drawing Object to edit its contents. Interestingly enough, the contents of the Drawing Object are simply the same, mergeable shapes you worked with in the last lesson. You can think of a Drawing Object as a container around a mergeable shape that keeps its parts grouped together.
|
Double-clicking a Drawing Object doesn’t select it, but rather brings you inside to edit its contents. |
 | You can also exit a Drawing Object’s Edit mode using the links shown above the Stage. Click on the Scene 1 link to return to the main Timeline, and you should no longer see the words Drawing Object appear to its right. |
6 Exit the Drawing Object by double-clicking on the Stage. Once again, return to the Tools panel and select the Polystar tool (). Click and drag to draw another shape on the Stage that overlaps the polygon you drew in Step 3.
7 Choose the Selection tool and select the new shape. Pull it slightly away from the original shape—you’ll notice the two shapes did not merge as they would with mergeable shapes. Leave the new shape selected and make sure that it still slightly overlaps the first polystar.
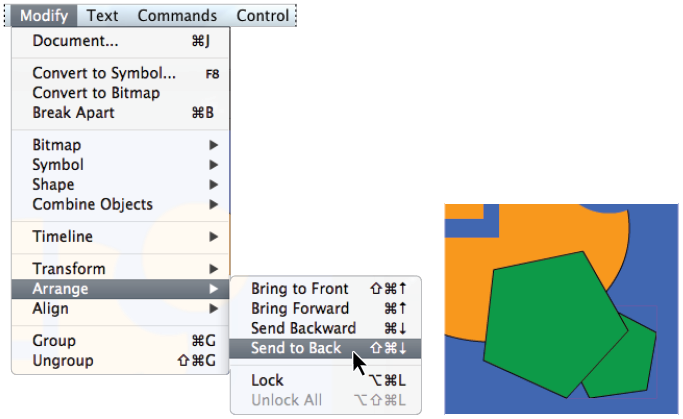
8 Next, you’ll see how Drawing Objects can be meticulously stacked and arranged, even on the same Timeline layer. With the new shape selected, choose Modify > Arrange > Send to Back. The new shape is pushed behind the first. The Arrange menu allows you to restack Drawing Objects, groups, and symbols.
|
When a Drawing Object is selected, you have access to the Arrange menu (Window > Arrange), which allows you to change that shape’s stacking order relative to other Drawing Objects on the Stage. |
| Mergeable shapes always fall below Drawing Objects, groups, or symbols on the Stage. To have a mergeable shape appear above other items, you need to place it on its own layer and move that layer to the top of the stack. |
9 Choose File > Save, then choose File > Close.
Putting it all together
Now that you have a feel for how the two drawing modes work, you’ll complete a piece of artwork using your new skills and become familiar with additional drawing tools.
1 Choose File > Open and navigate to the fl01lessons folder. Select and open the file named fl0102.fla.
2 Choose File > Save As. In the Save dialog box, navigate to the fl01lessons folder, then type fl0102_work.fla into the Save As text field. Press Save.
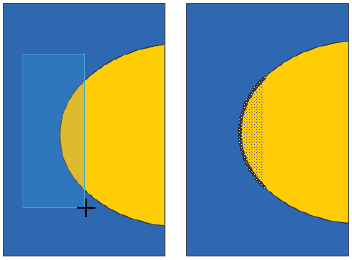
3 On the Stage, you see a single oval—switch to the Selection tool () and click once on the oval to select it. A bounding box appears, indicating that this is a Drawing Object. A look at the Property Inspector confirms this, as it should read Drawing Object at the top.
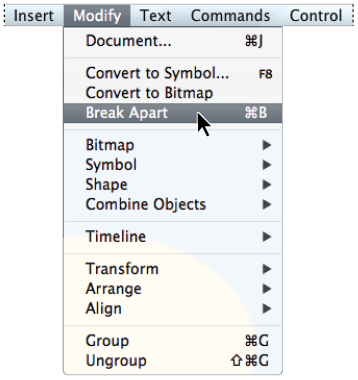
4 In order to dissect this shape further, you’ll need to break it back down to a mergeable shape like the ones you created earlier. Make sure the shape is selected, and choose Modify > Break Apart. The shape now appears with a dotted pattern that indicates it is mergeable artwork.
|
The Break Apart command allows you to break any artwork down to its next most basic form. |
5 Deselect the oval shape by clicking on the pasteboard or a different area of the Stage.To create the mouth of your fish, click and drag with your Selection tool to create a partial selection that overlaps the left edge of the oval. Delete the selected portion by using the Backspace (Windows) or Delete (Mac OS) key. With mergeable shapes, you can delete partial selections to dissect shapes in unusual ways.
|
Create a partial selection around the oval where you’ll form the mouth of your fish. |
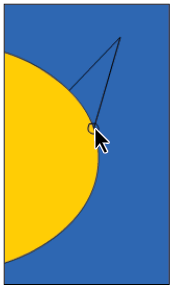
6 With the Selection tool active, move your cursor close to the open-ended stroke at the top of the oval. When an L-shaped angle icon ( ) appears below your pointer, click and drag the anchor point down and to the left as shown below.
7 Continue using the Selection tool to click and drag the bottom anchor point up to meet the first anchor point as shown below.
|
The Selection tool can pull open-ended paths to reshape an object. |

8 Choose File > Save to save your file.
| Paths on mergeable shapes automatically join when Snap to Objects is enabled. Snap to Objects can be enabled using View > Snapping > Snap to Objects, or by using the Snap to Objects button ( ) at the bottom of the Tools panel. |
Using the Line tool
Most illustration programs have a line tool, and while it’s not the most creative tool in the box, you can use Flash’s Selection tool to make it more useful. In the following steps, you’ll form the tail of your fish using a few simple moves.
1 Select the Line tool ( ) from the Tools panel. Make sure that Object Drawing mode is disabled (if necessary, deselect the Object Drawing button () at the bottom of the Tools panel). Select Solid from the style menu on the Property Inspector to set a solid line.
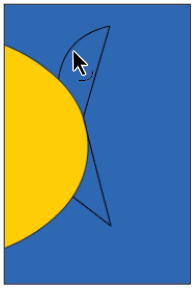
2 Move your crosshair cursor close to the right edge of the oval, and click and drag to draw an upward diagonal line. Starting where your first line leaves off, click and drag to draw a second line that meets the oval again below where the first line began.
|
With Snap to Object enabled and Object Drawing disabled, diagonal lines automatically join if drawn close enough together. |
3 Where the last line meets the oval, click and drag to draw a diagonal line moving downward. As you did in step 2, click and drag where the line leaves off to draw a second line that meets the oval again. These steps should have formed a spiky tail that you’ll fine-tune in the next steps.
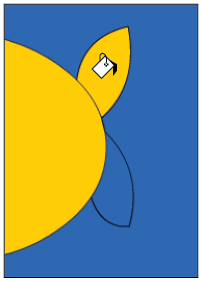
4 To change this from a spiky tail to a rounded, more appropriate one, you’ll use the Selection tool. Choose the Selection tool (), and move your cursor toward the middle of the first diagonal line you created. Once you are close enough, a curved icon appears ( ) below your pointer. Click and drag upward to bend the line into a curve. As you can see, the Selection tool can also bend or reshape straight lines and curves.
|
The Selection tool can be used to easily reshape lines and curves. |
5 Repeat step 4 for each of the three remaining lines until the tail is formed.
6 Next you’ll need to fill the two sides of your new tail. By default, shapes drawn with path-centric tools such as the Line, Pen, and Pencil tools do not automatically fill. To fill these shapes, click and choose the Paint Bucket tool ( ) from the Tools panel.
The Paint Bucket tool allows you to add fills where none exist, or to change the color of an existing fill.
7 Click on the Fill color swatch at the bottom of the Tools panel. Choose the light orange color marked #FFCC00. (You can also type this in the text field at the top of the Swatches panel to select the specified color.) Click inside of the tail fins to fill them with the selected color.
|
Add fills to empty paths using the Paint Bucket tool. |
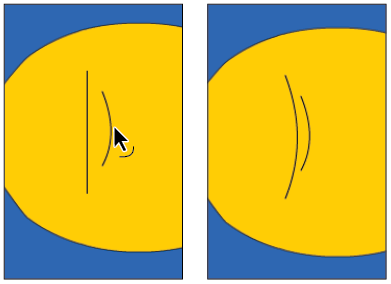
8 Switch back to the Line tool, and click and drag to draw two close, parallel, vertical lines in the middle of the oval. You will use these to form the gills for your fish.
9 Switch to the Selection tool (), and use the technique shown in steps 4 and 5 to bend each line into a slight curve in the same direction.
|
Use the same technique you used to create the tail to bend out some gills for your fish. |
10 With the Selection tool active, click and select each of the two overlapping lines that separate the tail from the fish body. Press Backspace (Windows) or Delete (Mac OS) to clear the lines away.
11 Choose File > Save to save your file.
| You can easily switch from any tool to the Selection tool by pressing the V key, without having to go over to the Tools panel. |
What the hex is a hexadecimal code?
You may have noticed that each color you choose (including colors referenced in these lessons) is marked with a hexadecimal code, a 6-character code preceded by a pound (#) sign. A hexadecimal code is a binary representation of an RGB color, used to indicate colors within web-specific languages and applications (such as HTML, Dreamweaver, and Fireworks).
Each byte, or pair of two digits, represents the red, green, and blue values for that color, respectively, from 00 to FF (in decimal notation, the values 0 to 255). For example, white in standard RGB values is notated as 255,255,255—in hexadecimal notation, #FFFFFF.
While it’s not at all necessary (and somewhat impossible) to memorize the hexadecimal values for every popular color, becoming comfortable with this notation will help you work your way through Flash’s color panels as well as those of other applications.
A helpful hint: the Photoshop and Illustrator color pickers also display a hexadecimal code for any color selected, making it easy to match colors between applications.
Continue to the next Flash Tutorial: Using the Pen tool in Flash >