Illustrator Tutorial: Using Live Paint
What you’ll learn in this Adobe Illustrator Tutorial:
|
This tutorial provides you with a foundation for working with Adobe Illustrator's Live Paint. It is the first lesson in the Adobe Illustrator CS6 Digital Classroom book. For more Adobe Illustrator training options, visit AGI’s Illustrator Classes. |
Adobe Illustrator Tutorial: Using Live Paint
Illustrator provides two methods of painting: you can select a fill, stroke, or both to an object, or you can convert the object(s) to a Live Paint group and assign fills and strokes to the separate edges and faces of paths within. Live Paint is a brilliant solution to painting illustrations with multiple faces that are not necessarily independent shapes that can be easily filled.
1 Choose File > New to create a new file. In the Name text field, type ai0402_work.
2 Choose Print as the New Document Profile.
3 Select Inches from the Units drop-down menu. Leave all other settings at their default and press OK.
Image 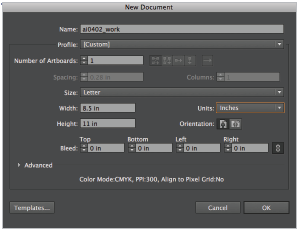 |
Create a new print document. |
The difference between Print New Document Profile and CMYK
You may have noticed that in the New Document Profile drop-down menu there are two selections that appear to be similar; Print and CMYK. Both are providing you with the workspace built for a CMYK (Cyan, Yellow, Magenta, and Black) workflow, but the Print profile is more appropriate for artwork that should be rasterized (converted to pixels) at a higher resolution, as it has a higher default raster setting. This higher setting is more appropriate for illustrations that will be printed on a press, or sent to a service bureau for a higher resolution output. A higher raster setting can make a difference when you start using gradients, effects, and gradient meshes. Using a lower resolution can cause artifacts, or scan lines, to appear in the areas where there is a gradual transition from one shade to another.
Depending upon your computers capabilities, you might see a slower rebuild time when using the Print profile. You can change your raster settings at any time by selecting Effect > Document Raster Effects Settings, and selecting a higher resolution.
Image 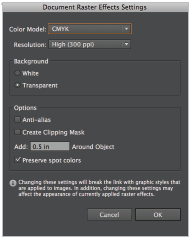 |
Change your raster settings to create smoother gradients and effects. |
4 Press D to make sure that you are at the default color settings of a black stroke and a white fill.
5 Click and hold on the Rectangle tool ( ) to select the Ellipse tool (
 ). Instead of clicking and dragging to create a shape, you will enter exact values into the shapes dialog box. Click once out on the artboard. The Ellipse dialog box appears. Enter 5into the Width and Height text fields. Press OK. The circle appears on the artboard.
6 Choose the Selection tool, and then hold down the Alt (Windows) or Option (Mac OS) key and position your cursor over the ellipse. When you see a double cursor, click and drag to clone (copy) the ellipse toward the lower-right by about .25 inch. Exact position is not important.
Image 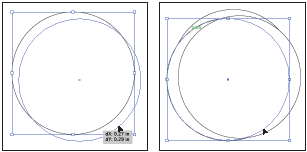 |
Hold down the Alt/Option key to clone the ellipse Clone again to the lower left. to the lower right. |
7 Click on the original ellipse that you created and hold down the Alt/Option key and drag to the lower-left to clone another ellipse.
For the next step, you will make the fill transparent.
8 Using the Selection tool, click and drag so that you create a marquee area that touches all three ellipses. This selects all the ellipses that the marquee crosses over.
Image 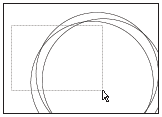 |
Click and drag with the Selection tool to create a selection of all three ellipses. |
9 Click on Fill in the Control panel at the top of the workspace and choose None ( ). This allows you to see all the intersecting faces that have been created. These individual faces are not individual objects that can easily be filled in with the traditional fill and stroke options available in Illustrator. To fill the faces, you will create a new Live Paint object.
Image  |
Change the fill to None. |
Converting the artwork to a Live Paint group
1 Make sure that all three ellipses are still selected and then click and hold on the Shape Builder tool ( ) in the Tools panel to select the hidden Live Paint Bucket tool.
2 Position the cursor over the selected ellipses, and when you see the message, click to make a Live Paint group, click. The ellipses are converted to a group of faces that can now be easily filled with color.
Image 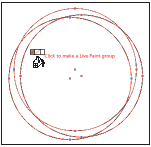 |
Use the Live Paint Bucket tool to convert your ellipses to a Live Paint group. |
Applying Live Paint to the group
In this next step, you will select colors and apply them to the individual faces in the newly created Live Paint group.
1 If the Swatches panel is not visible, choose Window > Swatches. Click on the tab of the panel and drag it out into the workspace to undock it from the panel docking area.
2 Select the color named CMYK Red, and then (with the Live Paint Bucket tool still selected) hover over anyone of the faces in the Live Paint group. Notice that the individual face becomes highlighted. When you have picked a face that you want to fill with red (any one will do) click. The face fills with the red color.
Image 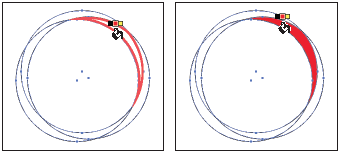 |
Hover over a face in the Live Paint group and then click. The result. |
You might have noticed the color selection appearing above the cursor. You can use this color selection to navigate through the rest of your colors in the swatches panel.
3 Hover over another face in your Live paint group, but this time press the right-arrow key to navigate to the color to the right of CMYK Red in the Swatches panel (CMYK Yellow), then click to fill the face.
4 For the rest of this lesson, use the colors in the Swatches panel to fill random faces in the Live Paint group. No specific color assignment is necessary.
Image 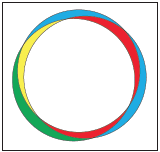 |
Fill the faces of the Live Paint group with color. |
5 Select File > Save, or press Ctrl+S (Windows) or Command+S (Mac OS) to save this file. Keep it open for the next part of this lesson.
6 Choose Window > Workspace > Reset Essentials to reset the panels.
Continue to the next Illustrator Tutorial: Adding a symbol to your artwork >