InDesign tutorial: Understanding layers in InDesign
What you’ll learn in this InDesign Tutorial:
|
This tutorial provides you with a foundation for working with Adobe InDesign panels. It is the first lesson in the Adobe InDesign CC Digital Classroom book. For more Adobe InDesign training options, visit AGI’s InDesign Classes. |
Adobe InDesign Tutorial: Understanding layers in InDesign
Layers help you organize your layout. By positioning related objects together on the same layer, you can turn items off and on for viewing, working on your layout, and even for printing. Layers can even be used to create different versions of projects.
Here you will place text and graphics on separate layers, thus making it easier to proofread text.
1 Using the Pages panel, double-click Page 2 to navigate to this page, then choose View > Fit Spread in Window to display both pages 2 and 3 together. Two adjoining pages in a layout are referred to as a Spread.
2 Click the Layers button ( ) in the panel docking area to open the Layers panel.
|
Use the Layers panel to organize |
 | If you have closed a panel instead of placing it in the docking area, you can access it from the Window menu. For example, you can choose Window > Pages to open the Pages panel. The list of available panels is also determined by the current workspace. To access all panels, choose the Advanced workspace from the Workspace switcher located at the top-right corner of the Application bar. |
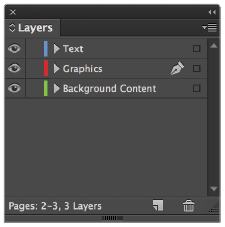
3 In the Layers panel there are three layers: Text, Graphics, and Background Content. Click the Visibility icon ( ) next to the Text layer. Any content on the Text layer is hidden. Click the Visibility icon again to show the contents of the Text layer.
4 Click to turn the visibility of the Graphics and Background Content layers on and off to see the items that are located on each of these layers.
| InDesign layers are document-wide. When you create a layer, it is available on every page in the document, including the master pages. When you hide or show a layer, all pages in the document are affected by this change. |
5 If necessary, open the Pages panel by clicking the Pages Panel icon ( ) or choose Window > Pages. In the Pages panel, double-click page 1 to navigate to this page.
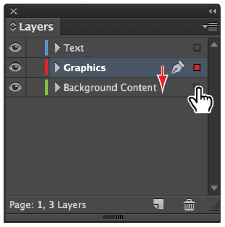
6 Using the Selection tool ( ), click to select the frame containing the snowshoe image at the bottom of the page. If you have trouble selecting it, click the Visibility icon ( ) for the Text layer to temporarily hide the text frames. After selecting the image frame, click the Visibility icon for the Text layer to display the text. In the Layers panel, notice the red square (
 ) located to the right of the Graphics layer. This indicates that the currently selected object is located on the Graphics layer.
7 If the Layers panel is not visible, click the Layers panel icon () or choose Window > Layers. In the Layers panel, click and drag the red square to the Background Content layer. The object is moved to this layer, and the edge of the frame containing the snowshoe graphic is now green, the color of the Background Content layer.
|
Moving an object between layers. |
8 Click the Visibility icon of the Background Content layer to hide the contents of the layer, confirming that the snowshoe image is on this layer. Click the Visibility icon again to make the layer visible.
9 Click the square immediately to the left of the Background Content layer to lock this layer. Locking the layer prevents you or others from modifying any contents on a layer.
|
Locking a layer prevents any changes |
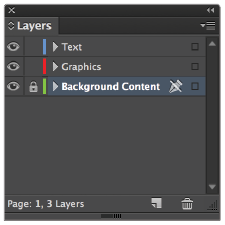
10 Choose the Selection tool and click the snowshoe picture on page 1. You cannot currently select it because the layer is locked.
11 Unlock the layer by clicking the Padlock icon ( ) immediately to the left of the Background Content layer. Locking a layer prevents all items on that layer from being selected. You can use this to organize your layout as you construct your documents. For example, you can create a layer that contains all the guides for your document and lock it so the guides are not accidentally selected, and you can easily show and hide guides that are all placed on a single layer.
| If you accidentally select the wrong object, choose Edit > Deselect All, or if you accidentally move an object, choose Edit > Undo to return it to the original location. |
Applying effects
You can use InDesign to apply special effects to images or objects in your layout, including adding drop shadows to frames, soft feathered edges to pictures, or adjusting the transparency or opacity of objects and images—all without modifying the original object. Here you will discover how to apply effects to objects.
1 In the Pages panel, double-click page 2 or use the page drop-down menu in the lower-left corner of the workspace to navigate to page 2 of the newsletter.
2 Using the Selection tool (), select the blue border in the upper-left corner of the page. The border spans pages 2 and 3.
3 Click the Effects button ( ) in the panel docking area or choose Windows > Effects to open the Effects panel.
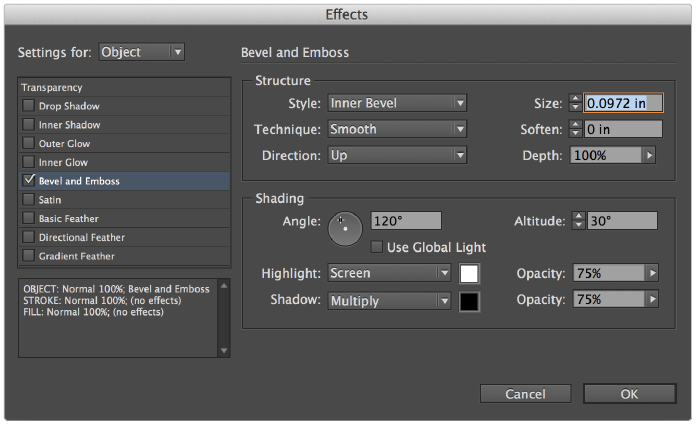
4 In the Effects panel, confirm that Object is highlighted. Click the Add an Object Effect to the Selected Target button ( ) at the bottom of the panel and choose Bevel and Emboss from the menu. The Bevel and Emboss dialog box opens. Click the Preview check box in the lower-left corner of the dialog box to preview the effect before you apply it.
|
The Effects button at the bottom of the Effects panel |
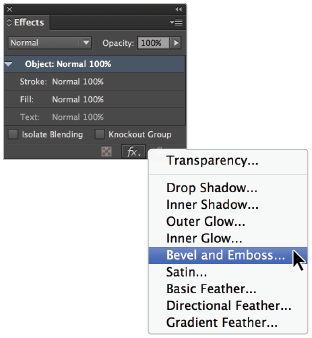
5 In the Effects dialog box, leave the settings at their defaults and click OK.
|
Use the default Bevel and Emboss settings in the Effects dialog box to add an effect to the blue border. |
6 Click the Screen Mode button ( ) in the Application bar at the top of the workspace and switch to the Preview viewing mode. Use the Preview viewing mode to see the final project without any non-printing elements such as guides and frame edges. You can also press the keyboard shortcut W to switch between viewing modes, or use the Screen Mode controls located at the bottom of the tools panel.
7 Choose File > Save, and then choose File > Close to close the file.
You have now completed a tour of InDesign CC, discovering essential skills and concepts for creating layouts.
Resources for additional help
With the help of this book, you are on your way to becoming a skilled InDesign user, but you might still need assistance with certain capabilities and features. We’ve created a comprehensive index at the back of this book to help you find information about specific topics. If you are using an eBook version, use the search capabilities to locate specific topics. There are also a number of other ways to get help when using InDesign, as you will discover in this section.
DigitalClassroomBooks.com
The Digital Classroom authors provide updates and respond to inquiries regarding the book content at the DigitalClassroomBooks.com website. By registering your book at www.DigitalClassroomBooks.com, you will receive updated information regarding any changes in the software, and any reported issues that affect your work with the Adobe InDesign CC Digital Classroom.
In-product help
InDesign includes help documentation directly within the application. Choose Help > InDesign Help to launch the Adobe Help Viewer, which you can use to search by topic. You can also access help quickly by typing a search query in the help search field, indicated by a magnifying glass ( ) in the Application bar at the top of the workspace.
Online help
You can also find documentation for InDesign online. The online help tends to be more current, since it is updated regularly. The documentation that shipped with the software and is part of the help menu might be out-of-date, since it is often written months before the software is in its final format. The online help also gives you the opportunity to add comments to topics that you view, and even receive an e-mail when someone else adds a comment to the topic. You can also download many of the help files in PDF format for printing or easy searching. Find the online help at adobe.com.
Forums
Adobe on-line forums are an excellent resource for finding solutions to questions you have about InDesign or how InDesign integrates with other applications. Adobe forums are contributed to by a community of beginning, intermediate, and advanced users who might be looking for the same answer as you, or who have already discovered solutions and answers to questions and are willing to share their solutions with other users. You can access the InDesign Forums page at http://forums.adobe.com/community/indesign.
Conferences, seminars, and training
The authors of this book regularly speak at conferences and seminars, and are available to deliver instructor-led professional development training sessions. You can learn more about the authors’ professional development training offerings at www.agitraining.com.