Photoshop Elements Tutorial: Adding graphics in Photoshop Elements
What you’ll learn in this Photoshop Elements Tutorial:
|
This tutorial provides you with a foundation for working with Adobe Photoshop Elements graphics. It is the tenth lesson in the Adobe Photoshop Elements 10 Digital Classroom book. |
Photoshop Elements Tutorial: Adding graphics in Photoshop Elements
Adobe Photoshop Elements includes many ready-made graphics that you can use to add flair to your projects. Like the Text tool, graphics are located in the Extras tab of your Panel bin.
1 Click slide 2 in the storyboard to load it into the work area.
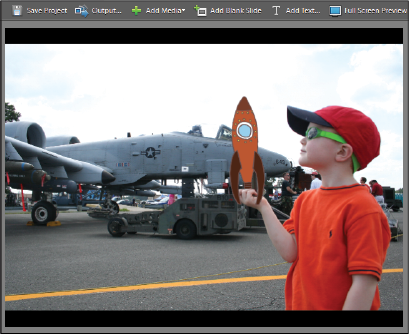
2 From the Extras section of the Panel Bin, press the Graphics button ( ) to reveal the available graphics. The graphics are broken up into various categories; Animals, Costumes, Sports and Hobbies, and Flowers to name a few. Select a Graphic that you like and drag it onto your slide. Adjust the size by dragging a corner handle while holding down the Shift key on your keyboard.
|
Photoshop Elements ships with a wide range of graphics for use in your projects. |
 | Now that you have a graphic selected, the Properties panel changes to give you the parameters that are available for editing graphics. From here, you can alter the size of a graphic and apply graphic styles to it. |
Applying transitions
Transitions are displayed as you move from one slide to the next; they are denoted on the storyboard by the small boxes between the slides. When you created the slide show, a fade transition was automatically added between each slide. Photoshop Elements offers a wide variety of transitions that you can use to make your slide shows more interesting. The number and types of properties that you can edit depend on the individual transitions.
1 Click Transition 1, which is located between the first and second slides in your storyboard.
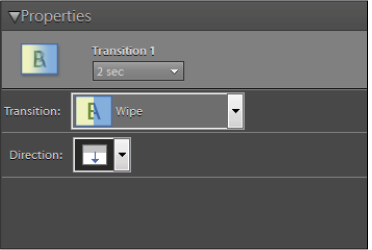
2 In the Properties panel to the right of the Slideshow window, click the Transition drop-down menu and select Wipe from the list. This pops up a secondary property, Direction. Click the Direction drop-down menu and set it to the second option, top to bottom.
|
Each transition has its own unique set of options that you can edit. |
| The random setting allows the slide show to play any one of the available transitions. There are more than 20 from which it selects at random. |
3 Click the Duration drop-down menu and select 3 seconds to create a slower transition.
|
Select the transition’s duration from the menu or type in the desired value. |
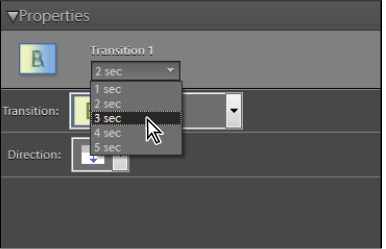
| You can set transitions to one of the default duration settings, or to customize the length by selecting the custom option from the drop-down menu. |
4 Change at least three other transitions in the slide show.
| You can hold down the Ctrl (Windows) or Command key (Mac OS) key to select multiple transitions at once and edit them as a group. |
5 Click the first slide in the slide show, and then press the Play button to preview it.
6 Press Ctrl+S (Windows) or Command+S (Mac OS) on your keyboard to save the changes to your slide show.
Panning and zooming
The phrase pan and zoom refers to the movement of a camera with the subject. In Photoshop Elements, the Pan & Zoom effect allows you to simulate the appearance of camera movement over a still image. This technique, which you often see in documentary filmmaking, can be used to add emphasis and liven up an otherwise static image.
| The Pan & Zoom effect is not supported by some output file types, most notably PDF. |
1 Select slide 3 in your storyboard to load it into the project window.
2 Press the Enable Pan & Zoom checkbox in the Properties panel.
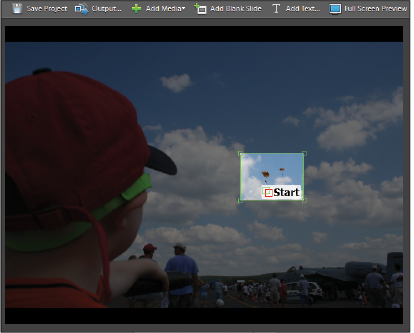
3 A green bounding box named Start appears in the work area; this indicates the start position of the Pan & Zoom effect. Scale this bounding box by dragging with your cursor at one of its corner points. Move the bounding box by positioning the cursor inside of it and dragging. Position it over the skydivers so that it matches the following figure.
|
The Start bounding box determines the focus when the slide is first displayed. |
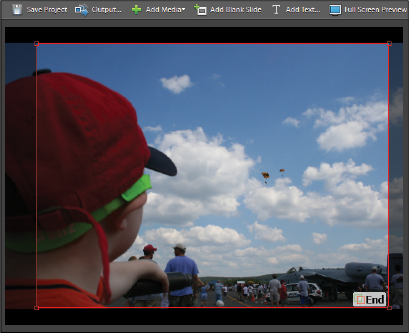
4 Click on the End point thumbnail in the Properties panel, and position the new bounding box to enclose the entire frame.
|
The End bounding box determines the final appearance of the image. |
5 Preview the slide show by clicking the Play button at the base of the work area. Press the pause button to stop the slideshow from playing.
Reordering slides
When you first added the slides to the project, you did not have the opportunity to set the order sequence. It is often necessary to change the order of the slides to fit the story you are telling. There are three ways to do this: using the drop-down menu, dragging and dropping on the storyboard, and using the Quick Reorder menu. You can also reset any changes you have made to the slide order from here.
Setting the slide order
Click the Slide Order drop-down menu in the upper-right corner of the storyboard to choose one of the auto-sorting methods for the slides: from organizer, date based, random, or folder location.
Drag and drop on the storyboard
1 On the storyboard, click slide 5, then drag it past slide 6.
2 When a vertical blue bar appears, release your mouse button to drop the slide; this changes the slide order.
Quick Reorder menu
The Quick Reorder menu is a great way to change the order of multiple slides. It allows you to view your entire slide show at one time.
1 Press the Quick Reorder button ( ) located in the upper-left corner of the storyboard.
2 In the menu that appears, drag and drop slides to change their positions. Press the Back button ( ) when you have finished editing to return to the main Slide Show Editor.
| You can press the Shift key to select contiguous slides or Ctrl (Windows) or Command (Mac OS) keys on your keyboard to select non contiguous slides. |
Continue to the next Photoshop Elements Tutorial: Working with audio in Photoshop Elements >