Photoshop Elements Tutorial: Creating a PNG in Photoshop Elements
What you’ll learn in this Photoshop Elements Tutorial:
|
This tutorial provides you with a foundation for working with video images in Adobe Photoshop Elements. It is the thirteenth lesson in the Adobe Photoshop Elements 10 Digital Classroom book. |
Photoshop Elements Tutorial: Creating a PNG in Photoshop Elements
To create a web-ready PNG file, you follow the same steps that you used to create a JPEG. The differences arise once you open the Save for Web dialog box. There are actually two types of PNG files. The PNG-8 format is intended to replace the GIF format and can save an image with a maximum of 256 colors, while the PNG-24, like a JPEG, can save an image with millions of different color values. In this lesson, you will create a PNG-24 to take advantage of the variable transparency that it allows.
|
The PIXEL.psd file. |

1 Using the Editor workspace, open the file PIXEL.psd from the Lessons folder.
2 Choose File > Save for Web; this opens the Save for Web dialog box.
3 Choose PNG-24 from the Preset drop-down menu on the right side of the Save for Web dialog box. This displays the options available for a PNG file.
|
The presets in the Save for Web dialog box are often the best place to start when optimizing a file. |
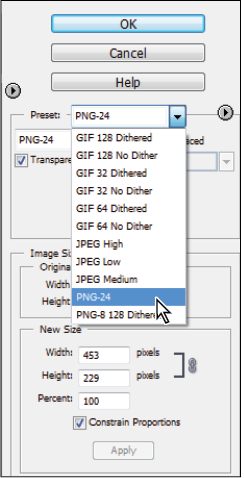
4 The image is 453 pixels wide and 229 pixels high; you will now reduce these dimensions. In the Image Size section of the dialog box, change the width to 300. The height value automatically changes, as the Constrain Proportions option is enabled by default.
You can also change the image size by adjusting the percentage or height values; it depends on what your target size or use for the image will be.
|
Width, Height, and Percent are all proportional to each other. |
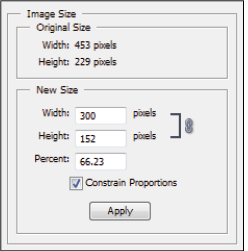
5 Press Apply to change the size of the image.
6 The original image was 178 kilobytes in size. The optimized image is approximately 8.4 kilobytes in size. The third row of numbers is the expected time it would take to download the image.
|
The side-by-side display of the dialog box allows you to compare your original to the optimized version. |
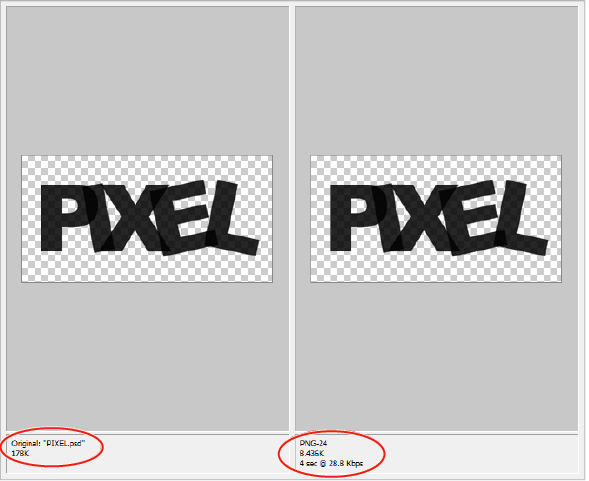
 | If you right-click on the expected download time, you can choose to see the time it would take to download the optimized file on different connections by choosing a different connection speed from the list that appears. |
7 Press Cancel, and close the image in the Editor.
PNG options
In the Save for Web dialog box, the PNG-24 format doesn’t offer as many options as the JPEG format. In fact, the PNG-24 format only offers three options: Transparency, Interlaced, and Matte.
Transparency: This checkbox simply controls whether transparent pixels in your image are rendered as transparent or not. It’s the reason you can see the gray and white transparency grid behind your image. The fact that the Transparency option is enabled by default is the reason why the matte color option has been disabled. With a PNG-8 image, pixels are either fully transparent or fully opaque, but with a PNG-24 image, there is a range of transparency values that images can contain and so pixels can be transparent, opaque, or semi-transparent in the same image.
Interlacing: This is a process that allows for a PNG image to be displayed incrementally in the browser as it loads onto your viewer’s computer. The visual effect is that the image at first appears blurry, and then becomes less and less blurry as more of it is downloaded, until finally it is the clear image that you optimized in Photoshop Elements. The advantage of interlacing is that it allows an image to download in stages; the disadvantage is that not all web browsers support this feature.
Matte Color: When the Transparency option is disabled, The Matte feature sets the color to which you want to convert all transparent or semi-transparent pixels.
The PNG-8 format has a few additional options to compensate for the fact that it allows you to save an image with a total of only 256 different colors. Most of these additional options control how the colors in the image are reduced, and try to correct the image for the display of limited colors.
|
A PNG-8 file has more options than a PNG-24 file to allow you to control how colors are reduced and displayed. |
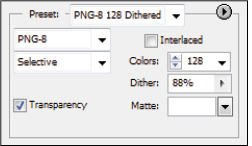
Color Reduction Algorithm: This feature specifies the mathematical algorithm used to reduce the number of colors in your image. The four choices are: Perceptual, Selective, Adaptive, and Restrictive (web). The best choice for the color reduction algorithm is determined by the details of the specific image you are trying to reduce.
Maximum number of colors: This feature specifies the maximum number of colors allowed in the image. While the absolute maximum number of colors in a PNG-8 is 256, you can purposely use fewer colors to reduce the image size. Choosing the right number of colors is a compromise between visual quality and file size.
Amount of Dither: This is a technique used to reduce the color banding in images that can occur when colors are reduced. Dithering systematically places patterns of available colors to emulate colors that are removed by the selected color reduction algorithm. Dithering will increase the size of the image being optimized. The best dithering choice depends on the details of the image that is being optimized.
Preparing images for video
With the affordability in recent years of video camcorders and the growth of sharing sites like YouTube and Vimeo, more people than ever are creating and watching video online. Video standards vary by region, with the United States’ NTSC settings and Europe’s PAL settings being the two primary standards.
NTSC is an acronym for the National Television Standards Committee; it is the video standard used in the United States and Japan.
Width | Height | Frame rate |
720 pixels | 480 pixels | 30 fps |
PAL is an acronym for Phase Alternating Line; it is the video standard used by most of Europe and Asia.
Width | Height | Frame rate |
720 pixels | 576 pixels | 25 fps |
There are, of course, other video standards that are used in the world; for example, High Definition Video and film projects use their own set of standards for both frame size and rate. However, NTSC and PAL are the two most common formats used in the world today, and HDTV represents the future of video production.
In addition to the standards-based video mentioned previously, there is a wide variety of other video sizes and formats floating around the Web. Cellular phones, webcams, and mini-camcorders can all have different settings for frame rate and size. Whatever the video format you are going to work with, it is important to build your graphics in Photoshop Elements for the same size or larger.
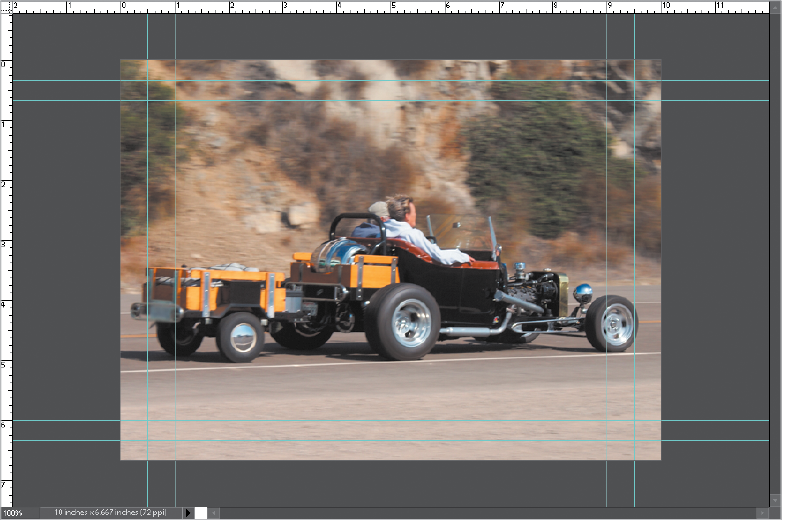
Safe margins
Because of the nature of the television medium, if you were to create a graphic that took up the entire frame size, parts of it would not be displayed on all TVs. Two sets of margins have been created to ensure that you never have a title or image that vanishes off the side or bottom of the screen. Called safe margins, they define the area where it should be safe to place your content. The action safe area, which encompasses about 90 percent of the frame, is where you should be safe to have movement or animation. The title safe area, which encompasses approximately 80 percent of the frame size, defines the boundary of where text should be placed. The video presets that ship with Photoshop Elements include guides that define the safe margins of the image for you.
Safe margins are only applicable to video files that are going to be displayed on a television. If you are creating graphics for video projects that are only going to be displayed on a computer, then you can ignore them completely, as computers don’t crop the visible area of video files.
|
The action safe area is the outer margin, and the title safe area is the inner margin created by the eight sets of overlapping guidelines. The safe margins are automatically a part of every new file created with the film and video presets in Photoshop Elements. |
Imagery intended for video depends as much on what you plan to do with it after it leaves Photoshop Elements, as on the content of the actual imagery. Most video graphics are prepared in Photoshop Elements for import into either motion graphics programs like Adobe After Effects, or editing applications like Adobe Premiere Elements. The main thing you have to be concerned about is transparency. Each of the video applications on the market has its own set of importable formats. Here you will use the TIFF format to save an image with transparent areas. For this lesson you are going to open a pre-built file and save it as a TIFF with an alpha channel. The alpha channel is how video editing applications recognize transparency.
| If you plan on bringing your transparent file into one of the other Adobe applications, you can save it as a native Photoshop document. The TIFF format is necessary when you are using an application that does not support native PSD import. |
Saving files for video
The program that you use for your video editing determines the type of optimizing you have to perform. If you are taking your image to a program like Adobe Premiere Elements or another Adobe program, you can just save it as a PSD file as you normally would. Other Adobe programs can usually read native Photoshop Elements PSD files without a problem. If, however, you are going to another video editing program, you usually have to save your file as a TIFF with an alpha channel. An alpha channel, called a saved selection in Photoshop Elements, lets video editing programs know which areas of an image are transparent and which are not.
1 In the Organizer, type Video into the Search text field; this isolates the file, VideoFrame.psd. Right-click on the image and choose Edit with Photoshop Elements from the contextual menu that appears. This image is intended to frame a video as it plays. If you receive a message asking if you’d like to correct the image, press No. You are receiving this error because the aspect ratio is intended for a TV screen not a computer screen. A secondary message box may appear informing you that this image would be best displayed on a television monitor. Just press OK to continue to the Editor.
2 Choose View > Guides if the guides are currently not displayed.
3 In the Toolbox, select the Magic Wand tool to activate it. In the Options bar across the top of the screen, click the checkbox for Sample All Layers. Then click in the empty center layer of the artwork to select it.
|
The Magic Wand tool selects colors that are similar to each other; when used on a transparent area, it selects the entire transparent area. |

4 Choose Select > Inverse to reverse the selection, and now the artwork is selected.
| The keyboard command for Inverse is Ctrl+Shift+I (Windows) or Command+Shift+I (Mac OS). |
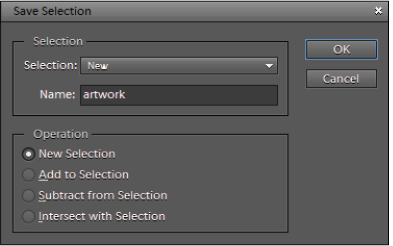
5 Choose Select > Save Selection. In the Save Selection dialog box, name the selection artwork and press OK.
|
Saved selections are saved as alpha channels. They store extra information about your file and can be used by other programs to determine transparency. |
6 Select File > Save As. Choose a location to save your file and select TIFF as the format.
7 In the Save options field, make sure that Layers is checked off. Press Save.
| Clicking off layers should automatically add the word “copy” to your filename; you will want to change it back. |
8 In the TIFF Options window, press OK. You have now saved a TIFF file that will have a transparent area in your video editing application. Close the file.