Photoshop Elements Tutorial: Creating a text effect in Photoshop Elements
What you’ll learn in this Photoshop Elements Tutorial:
|
This tutorial provides you with a foundation for working with text effects in Adobe Photoshop Elements. It is the twelfth lesson in the Adobe Photoshop Elements 10 Digital Classroom book. |
Photoshop Elements Tutorial: Creating a text effect in Photoshop Elements
Text doesn’t only have to be just functional; it can also be a lot of fun. So far, you have mostly used the filters in Photoshop Elements to alter and correct images, but you can also use them to apply some very interesting special effects to both text and images.
|
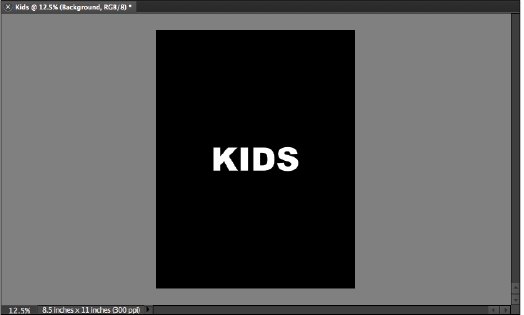
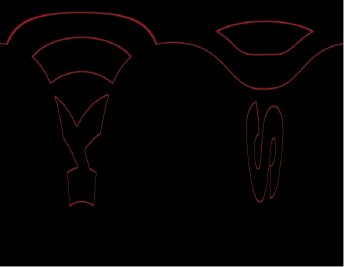
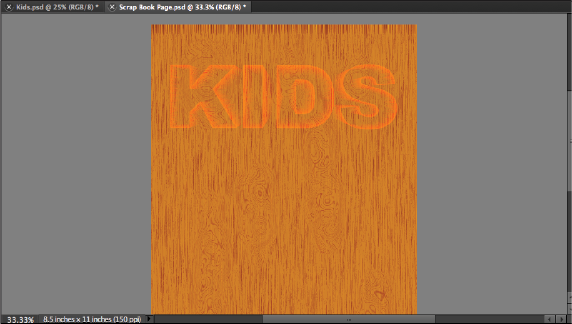
When completed, the text should appear to be zooming toward you. |

In this exercise, you will create a fun text effect that you sometimes see where the text seems to be zooming toward the viewer.
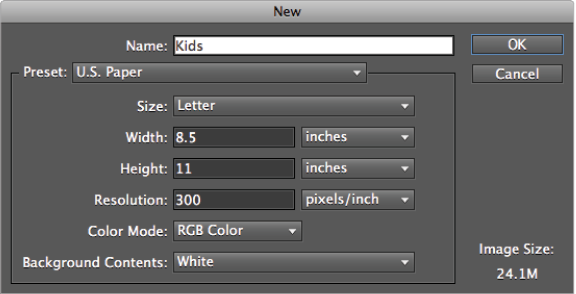
1 Choose File > New > Blank File. Type Kids in the Name text field. Choose U.S. Paper from the Preset drop-down menu and make sure the Size is set to Letter. Choose RGB Color from the Color Mode drop-down menu, if it is not already selected, and press OK to create the new document.
|
The New dialog box includes presets for a variety of different projects. |
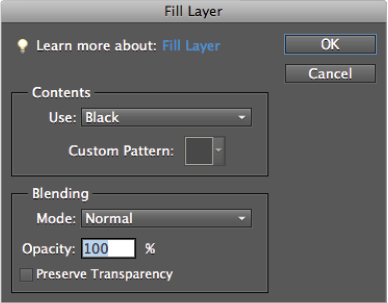
2 Choose Edit > Fill Layer. In the Contents section, choose Black from the Use drop-down menu. Leave all other settings at their defaults and press OK. This fills the document background with black.
|
The Fill Layer dialog box allows you to fill a layer with a solid color or a pattern of your choosing. |
3 Choose the Type tool ( ) from the Toolbox. In the Options bar at the top of the workspace, choose Arial Black or Arial Bold from the Font Family drop-down menu and type 100 in the Font Size text field. Change the text color to white (R: 255, G: 255, B:255) by clicking on the Set the text color option in the options bar.
|
Change the type settings in the Options bar. |

Click in the middle of your document with the Text tool and type KIDS in all caps. Click the green checkmark at the top of the workspace to commit the change and deselect the active text. Because filters really can’t be used on live text, after a few adjustments to the position of the text, the next step will be to convert the text into a graphic by combining it with the background layer.
4 Choose the Move tool ( ) from the Toolbox and select the KIDS text layer from the Layers pane to activate it. Hold down the Shift key on your keyboard and click the Background layer so that they both become selected.
5 In the Options bar, press the Align button ( ) and select Vertical Centers from the drop-down menu that appears. Press the Align button again and choose Horizontal Centers.
|
To use the Align commands, two or more layers must be selected. |
6 Select the KIDS text layer from the Layers panel, and press Ctrl+E (Windows) or Command+E (Mac OS) on the keyboard to merge the KIDS text layer with the background layer.
 | Alternately, you can use the menu command Layer > Merge Layers. This works as long as the text layer is selected, and above the layer you want to merge it with. |
7 Select the new merged Background layer and choose Filters > Blur > Gaussian Blur. Type 1.5 in the Radius text field. This blurs the text shape to produce a soft edge. Press OK.
| You can experiment with values that are slightly lower or higher based upon your preference and taste. |
|
The Gaussian Blur filter creates a hazy effect around the edges of the text. |

8 Choose Filter > Stylize > Solarize. The Solarize filter doesn’t have any options to set but instead automatically converts the black letters into an outline of the text and blends the positive and negative areas of an image. This is why blurring was necessary. Blurring pushed some of the white outside the edges of the text, resulting in more of an outline around the text after using the Solarize filter. Without the blur, there would not have been enough of a text outline when the Solarize filter was used.
|
The Solarize filter reverses the positive and negative areas of an image. |

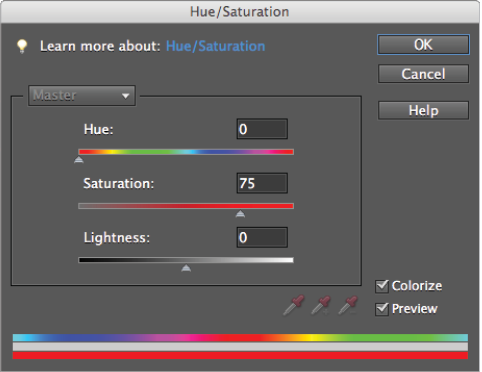
9 Choose Enhance > Adjust Color > Adjust Hue/Saturation. In the Hue/Saturation dialog box, click the Colorize checkbox. Type 75 in the Saturation text field or move the slider to 75, make sure the Hue and Lightness text fields are set to 0, and then press OK. This results in changing the white outline to red around the text. If you have a hard time seeing it, it is probably due to your zoom level. To change your zoom level choose View > Zoom In.
|
The Hue/Saturation effect allows you to control the color in your image. |
10 Choose Filter > Distort > Polar Coordinates and select the Polar to Rectangular radio button. Press OK.
| The Polar Coordinates filter creates a distortion in which a selected layer’s contents are converted from a rectangular coordinate system to a polar system, or vice versa. While there are some interesting uses of this filter, it is most commonly seen as an intermediary step in tutorials. |
|
The distortion caused by the Polar Coordinates filter is used as an intermediary step in this lesson. |
11 Choose Image > Rotate > 90° Right.
|
The Rotate command rotates an image 90 degrees left or right, 180 degrees, and arbitrary values. |
12 Choose Filter > Stylize > Wind. In the Wind dialog box, choose Wind from the Method section and choose From the Left in the Direction section. Press OK. Press Ctrl+F (Windows) or Command+F (Mac OS) twice to run the filter two more times. The next few steps will return the image to a viewable state.
|
The Wind filter simulates the effect of wind blowing against a surface and pieces being blown off. |
13 Choose Image > Rotate > 90° Left.
14 Choose Filter > Distort > Polar Coordinates, and choose the Rectangular to Polar radio button.
15 Choose the Crop tool ( ) from the Toolbox. Click and drag to draw a marquee around the text. Click the green checkmark just below the proposed cropped area to commit the change.
|
When completed, the text should appear to be zooming toward you. |

16 Choose File > Save As. Navigate to the Lessons folder you copied to your hard drive. Confirm that the format is set to Photoshop and that the file is named Kids.psd, then press Save.
Reversing the text effect
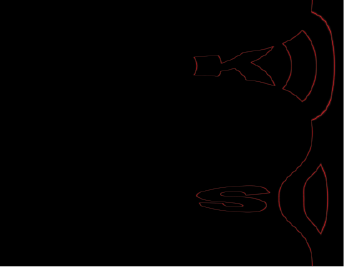
The text appears to have a motion trail behind it. This creates the impression that it is zooming toward the viewer. With a few simple changes, the results of this effect can be completely reversed along with the direction of the motion trail.
This variation on the tutorial follows the exact same steps right up to step 11.
- Choose Image > Rotate > 90° Left.
- Choose Filter > Stylize > Wind. In the Wind dialog box, choose Wind from the Method section, then choose From the Left in the Direction section. Press OK. Press Ctrl+F (Windows) or Command+F (Mac OS) twice to run the filter two more times.
- Choose Image > Rotate > 90° Right.
- Choose Filters > Distort > Polar Coordinates and choose Rectangular to Polar from the options at the bottom of the dialog box.
|
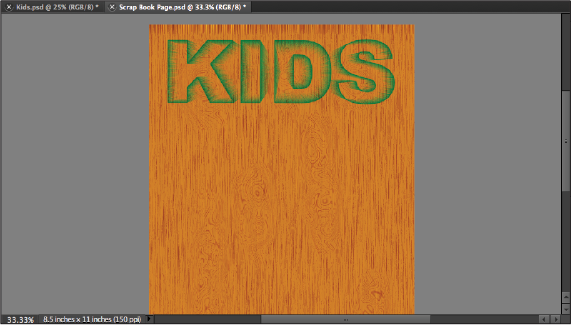
Reversing the effect. |

Adding text to the background
When you have two images, you can combine them together using your selections and the Copy and Paste commands.
1 Double-click the Kids.psd file, located in the Project Bin, to make it active or choose Window > Kids.psd.
2 Choose Select > All to select the entire document.
|
The Select All command creates a marquee around the entire image area. |

3 Choose Edit > Copy or use the keyboard shortcut, Ctrl+C (Windows) or Command+C (Mac OS). This copies the image to your computer’s clipboard, so that it can be pasted in the next step.
4 Double-click the Scrap Book Page.psd file, located in the Project Bin or choose Window > Scrap Book Page.psd, to make it active. Choose Edit > Paste or use the keyboard shortcut, Ctrl+V (Windows) or Command+V (Mac OS), to paste the file into the document. In the Layers panel, double-click the new layer named Layer 1. In the Layer properties dialog box, type text in the Name text field and press OK.
|
When using the Copy and Paste commands, new layers are created for the pasted artwork and are placed above the selected layer in the destination document. |
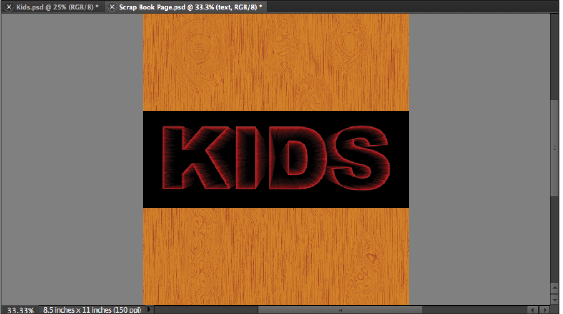
The text file includes a black background that just doesn’t fit with the wood texture of the page. You will remove the background color layer using blending modes.
5 Choose the Move tool () from the Toolbox, then click and drag the text to the top of the document.
6 In the Layers panel, make sure the text layer is selected and choose Screen from the Blending mode drop-down menu. This blending mode removes the darkest areas from a layer and leaves only the lightest, which in this case would be the lettering.
|
Blending modes are used to control how light from lower layers is visible through the layers above. |
Now, the text is too light to easily be seen. A quick reversal should change this.
7 With the text layer selected, choose Filter > Adjustments > Invert, or use the keyboard shortcut, Ctrl+I (Windows) or Command+I (Mac OS), to reverse the color values of the targeted layer. Choose Multiply from the Blending mode drop-down menu in the Layers panel. This blending mode has the exact opposite effect of the Screen blending mode and makes the text easier to see.
|
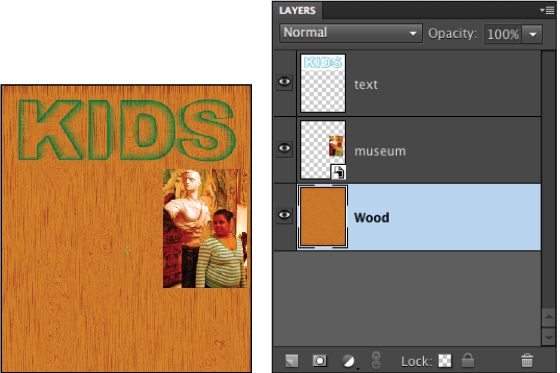
The finished project. |
8 Choose File > Save As or use the keyboard shortcut, Shift+Ctrl+S (Windows) or Shift+Command+S (Mac OS). Close the Kids.psd file by double-clicking it in the Project Bin and choosing File > Close. Leave the Scrap Book Page.psd file open, as you will need it in the next step.
Add images and create a border
Now that you have a background and title in place, you will proceed to edit and add images to fill in the rest of the page. Three images have been prepared for use in this exercise. You will import one of them into your scrapbook page document and add a few effects to it for emphasis. At the conclusion of the exercise, you will be given the opportunity to continue this project on your own so that you can add your own artistic flair.
1 With the Scrap Book Page.psd file open, select the Wood layer in the Layers panel. Choose File > Place and, in the resulting Place dialog box, navigate to the Lessons folder. Select the scrapbook_01.psd file and press Place. This imports the file as a new layer.
It was important to select the Wood layer in this step because when you use the Place command, the file you are placing is inserted on a new layer right above the currently highlighted layer. When working on a project that uses both text and images, you usually want to keep the text on top of all other layers.
2 When a file is placed into Photoshop Elements, you are given the opportunity to resize, rotate, and move it into the position you like before finalizing it. In the Options bar at the top of the workspace, click the checkbox next to Constrain Proportions, if it is not already checked. Type 65 in the Width text field. Because you have the Constrain Proportions option checked, the image’s height will automatically change.
|
In Photoshop Elements, the Options bar allows you to set the options for the tools you are currently working with. |

Click the green checkmark located on a tab attached to the bottom of the placed photo to commit the current changes to the layer.
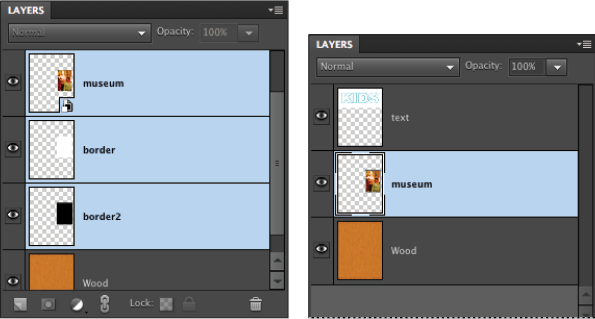
3 In the Layers panel, double-click the scrapbook_01 layer. In the Layer Properties dialog box, type museum in the Name text field, and press OK.
|
Drag the museum layer to the upper right of the document. |
4 Choose the Move tool ( ) from the Toolbox, then click and drag the photograph to the upper right corner of the Scrap Book Page document, but below the text.
5 Hold down the Ctrl (Windows) or Command (Mac OS) key and click the Smart Object thumbnail ( ) located on the bottom right corner of thumbnail in the museum layer. This selects everything on the layer that isn’t transparent. In this case, that would be the entire photo. This is referred to as loading the opacity mask of the layer.
6 Choose Select > Modify > Expand to open the Expand Selection dialog box. Type 15 into the Expand By text field and press OK to enlarge the selection by 15 pixels.
7 At the bottom of the Layers panel, press the Create a New Layer button ( ) to add a new layer above museum. Double-click the new layer, named Layer 1, and, in the Layer Properties dialog box, type border in the Name text field. Press OK. Click and drag the border layer below the museum layer in the Layers panel.
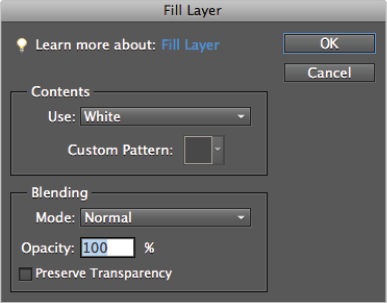
8 Choose Edit > Fill Selection. In the Fill Layer dialog box that appears, choose White from the Use drop-down menu in the Contents sections and leave all other settings at their default. Press OK.
|
The Fill Layer dialog box can be used to add color or a pattern to a layer or selection area. |
9 Press the Create a New Layer button in the Layers panel to add a new layer above the border layer. Double-click the new layer, named layer 1 again, and, in the Layer Properties dialog box, type border2 in the Name text field. Press OK. Click and drag the new border2 layer below the border layer in the Layers panel.
10 Choose Select > Modify > Expand to open the Expand Selection dialog box. Type 10 in the Expand By text field, then press OK to enlarge the selection by 10 pixels.
11 Choose Edit > Fill Selection. In the Fill Layer dialog box that appears, choose Black from the Use drop-down menu in the Contents section and press OK.
12 In the Layers panel, the border2 layer should still be highlighted. Hold down the Shift key on the keyboard and select the border and museum layers to highlight them as well.
13 Choose Layer > Merge Layers to combine all three layers together into one. The new layer is named museum.
|
When selected layers are merged, they take on the name of the topmost layer. |
14 Choose Select > Deselect or use the keyboard shortcut, Ctrl+D (Windows) or Command+D (Mac OS), to remove the selection border.
|
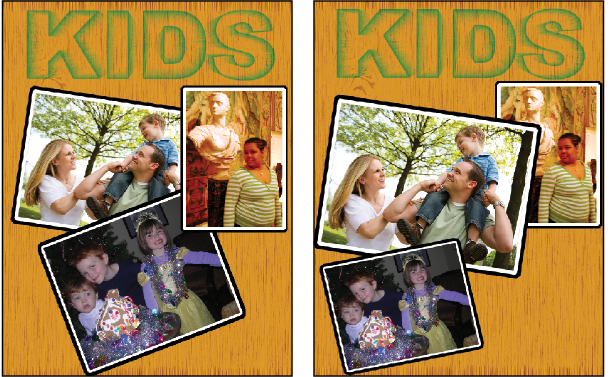
The double border on the photograph is used to add emphasis and separate it from the background. |

15 Chose File > Save or press Crtl+S (Windows) or Command+S (Mac OS) on your keyboard to save your file.
16 Now it’s all up to you. Import the other two images (scrapbook_02.psd and scrapbook_03.psd) and use your imagination to come up with your own creative results. Here are a few things you might try:
- When you place an image, rotate it slightly to give it a sense of movement.
- Instead of using black and white, try varying the color of the borders you use. Try using the same brown color that you used in the wood-textured background.
- Change the stacking order of the layers and overlap the photos to create a more interesting composition.
- Add drop shadows from the layer effects to the photos.
|
The variations available on a project like this are unlimited. |
17 Save and close Scrap Book Page.psd.