Photoshop Elements Tutorial: Making selections in Photoshop Elements
What you’ll learn in this Photoshop Elements Tutorial:
|
This tutorial provides you with a foundation for working with Adobe Photoshop Elements selections. It is the fifth lesson in the Adobe Photoshop Elements 10 Digital Classroom book. |
Photoshop Elements Tutorial: Making selections in Photoshop Elements
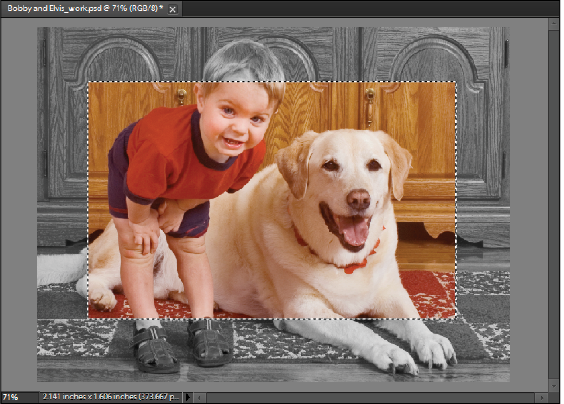
Selections define the editable pixels in a photograph. They allow you, for example, to darken one area in a photo without affecting the rest. Selections can be made with either a selection tool or a selection command. A selection outline surrounds the selection, and can be hidden. You can edit the pixels inside a selection border, but you can’t access pixels outside the selection outline until you deselect the selection.
|
Selections define the editable areas in a photo. |
The importance of selections
Photoshop Elements provides selection tools for different kinds of selections. For example, the Rectangular Marquee tool selects square and rectangular areas, the Magic Wand tool can select an area of similar colors with one click, and freeform selections can be made with one of the Lasso tools. Further, you can smooth the edges of a selection with feathering and anti-aliasing.
About the selection tools
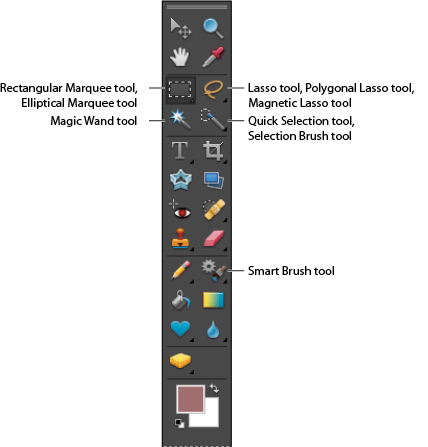
Selection tools can be found in the Toolbox, which is located, by default, on the left side of the workspace.
|
Photoshop Elements provides you with different selection tools for different selection needs. |
The Rectangular Marquee tool draws square or rectangular selections.
The Elliptical Marquee tool draws round or elliptical selections.
The Lasso tool draws freehand selections.
The Polygonal Lasso tool draws multiple straight-edged segments of a selection.
The Magnetic Lasso tool draws a selection that automatically snaps to contrast edges you drag over in the photo.
The Magic Wand tool selects pixels of similar color with one click.
The Quick Selection tool automatically makes a selection based on color and texture when you click or click-drag an area.
The Selection Brush tool automatically selects or deselects the area you paint, depending on whether you’re in Selection or Mask mode.
The Smart Brush tool applies color and tonal adjustments and effects to a selection. The tool automatically creates an adjustment layer for non-destructive editing.
In this exercise, you’ll use one of these tools, the Selection Brush tool, to work with selections.
Using the Selection Brush tool
You can make selections in two ways using the Selection Brush tool: in Selection mode, by painting over the area you want to select, or in Mask mode, by painting out areas you don’t want to select using a transparent overlay.
You can also start with a rough selection made with another selection tool, and then fine-tune your selection with the Selection Brush tool. Also, you can add to or subtract from the selection by choosing from the Selection brush tool options.
|
Choose from Selection Brush tool options to fine-tune your selection. A. Add to selection. B. Subtract from selection. C. Brush drop-down menu. D. Brush size. E. Mode. F. Hardness. |
1 Select the Selection Brush tool ( ) from the toolbox. If necessary, click and hold on the Quick Selection tool (
 ) in the toolbox and select the Selection Brush from the list of nested tools that appears.
Next, you’ll set Selection Brush tool options in the Options bar at the top of the workspace.
2 By default, the tool is set to Add To Selection. (To subtract from the selection, you would click Subtract From Selection in the Options bar.)
3 Choose the Hard Round 13 pixels brush from the Default Brushes drop-down menu.
4 Increase the brush size to 20 pixels by dragging the Size slider to the right, by clicking on the word Size and dragging to the right, or by typing 20 in the size field.
5 From the Mode drop-down menu, choose Selection to add a selection to the image.
6 Set the brush tip’s hardness to a value of 100 percent for a crisp edge on your selection.
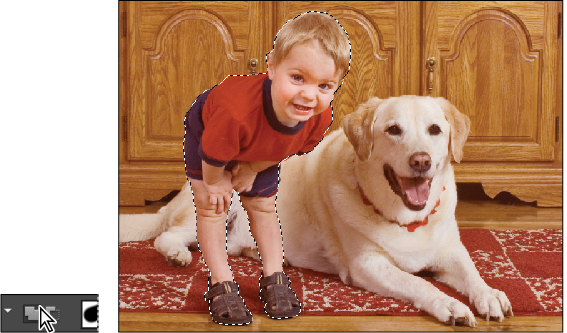
7 Click and drag in your photo to select the boy in the image. Don’t worry if you select too much, you will edit your selection in the next steps.
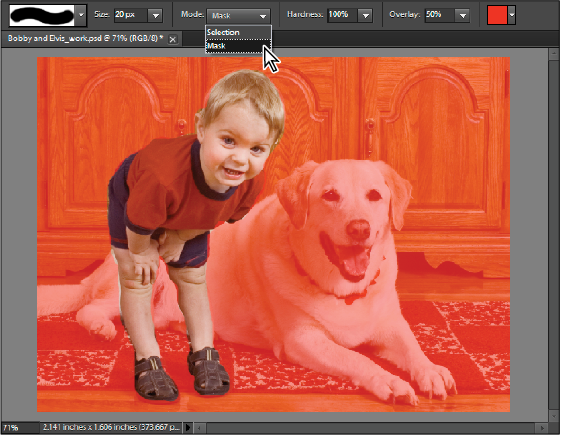
8 From the Mode drop-down menu, choose Mask to switch to Mask mode. The red overlay shows areas that are masked, or not currently selected. You can use mask mode to remove areas from your selection.
9 Paint out any areas that you’ve selected in error by dragging with your cursor (brush) outside of the edge of the boy. You are now removing selected areas from the selection. Zoom in if necessary for finer control.
10 Choose Selection from the Mode menu to return to the Selection mode.
|
Subtract from a selection while in Mask mode. |
Add to or subtract from a selection
You can add to or subtract from an existing selection to adjust selection borders.
1 Choose any Selection tool, and hold down Shift (a plus sign appears next to the pointer) to add to the selection, or hold down Alt (Windows) or Option (Mac OS) (a minus sign appears next to the pointer) to subtract from a selection. Then select the area to add or subtract and make another selection.
2 In the Options bar, click Add To Selection or Subtract From Selection and make another selection.
|
Add to or subtract from a selection using settings in the Options bar. |
Smoothing selection edges with anti-aliasing and feathering
Anti-aliasing and feathering are terms that refer to smoothing the hard edges of a selection. Anti-aliasing smooths the jagged edges of a selection by softening the transition between edges and background pixels. Because only the edge pixels change, no detail is lost.
1 Select the Lasso ( ), Polygonal Lasso (
 ), Magnetic Lasso (
 ), Rectangular Marquee (
 ), Elliptical Marquee (
 ), or Magic Wand tool (
 ).
).
2 In the Options bar, notice that Anti-alias is selected by default. It is best to keep this on for most selections.
Blur the edges of a selection by feathering
You can smooth the hard edges of a selection by feathering. Feathering builds a transition between the selection and surrounding pixels. This blurring can create interesting effects but at times can cause some loss of detail at the edge of the selection.
You can create a feathered selection with the Elliptical Marquee, Rectangular Marquee, Lasso, Polygonal Lasso, or Magnetic Lasso tool. You can also add feathering to an existing selection by using the Select menu.
|
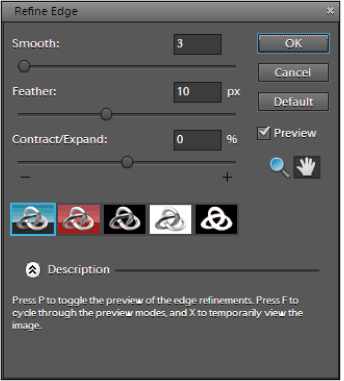
Add feathering to a selection by using the Refine Edge Command. |
Define a feathered edge for an existing selection
1 If necessary, use the Selection Brush tool to reselect the boy in your photo.
2 Choose Select > Refine Edge. The Refine Edge dialog box allows you to preview your selection and control its appearance.
3 Type 10 in the Feather text field. This defines the width of the feathered edge.
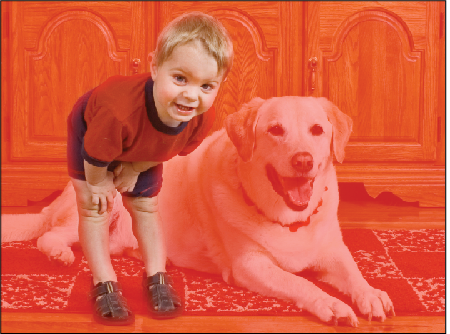
4 Press the Custom Overlay Color button ( ) to display your selection as a mask. When this is on, you can actually see what the edge of your selection looks like. There are five different preview modes that provide different options for viewing your active selection. These modes include Standard, Custom Overlay Color, On Black, On White, and Mask.
When using Custom Overlay Color, the default color is red. In some photos, this may be difficult to see. Double-click the Custom Overlay Color button ( ) to display the Custom Overlay Color dialog box, and click the red color to display the color picker where you can choose a more appropriate color.
|
The Custom Color Overlay button allows you to view the edge of your selection. |
After feathering is applied, you will not see much of a visual change in the selection appearance. A feathered edge is noticeable when merging the selected area with another part of the image or when placed in another image. You will see the effects of the feathered edge later in the exercise. Press OK.
Saving selections
When you save a selection, you can edit that area of your photo at a later time. You can also work on other parts of the photo before loading the saved selection.
|
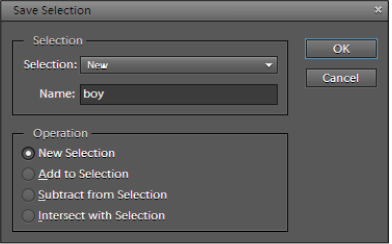
The Save Selection dialog box allows you to save your selection for later editing. |
1 With your selection of the boy active, choose Select > Save Selection.
2 In the Save Selection dialog box, choose New from the Selection drop-down menu.
3 Type boy as the name for the selection in the Name text field, then press OK.
4 Choose Select > Deselect or use the keyboard shortcut Ctrl+D (Windows) or Command+D (Mac OS) to hide the selection.
|
You have saved the selection of the boy, next you will add it to a new selection. |
Modifying a new selection with a saved selection
New selections can be modified by replacing, adding to, or subtracting saved selections from them.
1 Use the Selection Brush tool ( ) to make a selection for the dog in your photo. Don’t worry too much about where the dog appears behind the boy, just estimate where the dog’s body would appear.
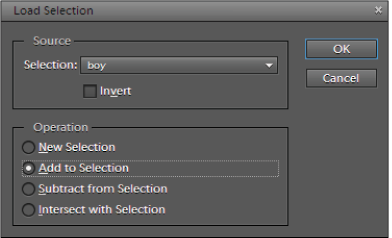
2 Choose Select > Load Selection.
3 In the Load Selection dialog box, choose the selection of the boy you made earlier from the Selection drop-down menu.
4 Select Add to Selection to add the current selection (of the dog) to the saved selection (of the boy).
The Load Selection dialog box allows you to add to, subtract from, or intersect with a new selection.
5 Press OK to load the selection.
You should see a selection of both the boy and his dog, which you’ll now invert to select the background.
Inverting a selection
When you invert a selection, Photoshop Elements changes the unselected areas into selected areas, and protects the pixels you previously selected.
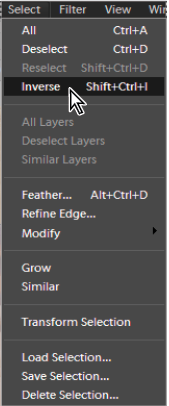
1 With the boy and dog selected, choose Select > Inverse.
 | This command is commonly used to select an object that appears against a solid-colored area. You can select the solid color using the selection tool of your choice, and then choose Select > Inverse. |
|
Invert a selection using the Select > Inverse command. |
You’ll now convert the background of your photo to black and white, to add emphasis to the boy and his dog.
Converting to Black and White
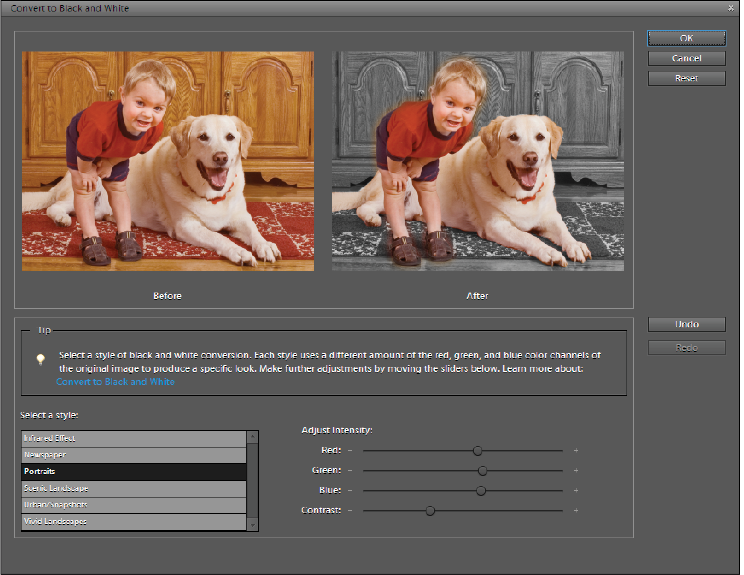
When you use the Convert to Black and White command, you can compare and choose from image styles that reflect the content of your image, and then use the intensity sliders to adjust the conversion.
|
Control conversion in the Convert to Black and White dialog box. |
1 Confirm that the background of your photo is selected. If you do not select an area or layer, the entire image is converted.
2 Choose Enhance > Convert to Black and White.
3 Select the Portraits style option, as it reflects the content of your image.
4 Experiment by dragging the Adjustment Intensity sliders to adjust red, green, blue, or contrast in the black and white background.
 | These sliders won’t colorize your image; instead, they include more or less information from the original color channels in the new black and white image. |
5 To convert the background to black and white, press OK.
6 Choose File > Save. Keep the file open as you will use it in the next exercise.
Adding color to areas of an image
You can colorize an entire image, or select areas to colorize with different colors.
 | If the image you are coloring is in grayscale mode, convert it into RGB by choosing Image > Mode > RGB Color in the Editor. |
1 In the Editor, confirm that the background of your image is still selected.
2 Choose Enhance > Adjust Color > Adjust Hue/Saturation.
3 Select Colorize. If the foreground color isn’t black or white, Photoshop Elements converts the image into the hue of the current foreground color. The lightness value of each pixel does not change.
4 Use the Hue slider to select a new color. Use the Saturation slider to experiment with the saturation amount. Press OK and save your image.
Saving and exporting images
About saving images and file formats
When you’ve finished adjusting an image in the Editor, you’ll need to save it, or you’ll lose your changes. To preserve all image data, you should save regular images in Photoshop (PSD) format. Multiple-page creations are always saved in Photo Project (PSE) format. These formats don’t compress your image data.
Although your digital camera may save photos in JPEG format, it’s better to use the PSD format rather than resave a photo in JPEG format. Every time you save in JPEG format, the image data is compressed, causing some data to be lost. The only disadvantage of saving in PSD format is that the file size increases significantly because the file is not compressed.
With Photoshop Elements, you can save images in several file formats, depending on how you plan to use them. See the sidebar at the end of this lesson for more information.
1 Choose File > Save As.
2 Change options like the filename or format, set any of the following file-saving options, then press Save.
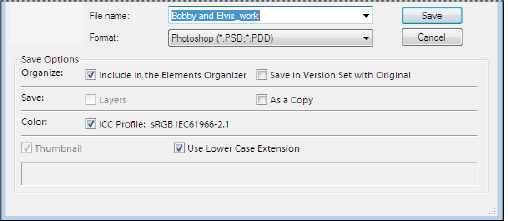
Explore the options available in the Save As dialog box.
- File name defines the filename of the saved image.
- Format defines the file format of the saved image.
- Include in the Elements Organizer includes the saved file in your catalog so that it displays in the Media Browser. This option is not available for all file formats that are supported in the Editor.
- Save in Version Set with Original saves the file, then adds it to a version set in the Photo Browser to keep the different versions of the image organized, but only if Include in the Elements Organizer is selected.
- Layers preserves all layers in the image. In some formats, all layers are flattened. To preserve layers, be sure to choose a format that supports layers.
- As a Copy saves a copy of the file while keeping the current file open. The copy is saved to the folder containing the currently open file.
- ICC Profile embeds a color profile in the image for various formats.
- Thumbnail saves thumbnail data for the file. This option is available when the Ask When Saving option for Image Previews is set in the Preferences dialog box.
- Use Lower Case Extension writes the file extension in lowercase.
File formats for saving
Photoshop Elements can save images in the following file formats:
BMP: A standard Windows image format.
CompuServe GIF (Graphics Interchange Format): Commonly used to display graphics and small animations in web pages. GIF is a compressed format designed to minimize file size and transfer time.
JPEG (Joint Photographic Experts Group): Used to save photographs, JPEG format retains all color information in an image but compresses the file size by selectively discarding data.
PCX: A bitmap format widely supported on a variety of platforms.
PSD (Photoshop): The standard Photoshop Elements format for images. You should generally use this format for edited images to save your work in a single-page file.
PSE (Photo Project Format): The standard Photoshop Elements format for multiple-page creations. You should generally use this format for photo projects to save your work in a multiple-page file.
Photoshop PDF (Portable Document Format): A cross-platform and cross-application file format. PDF files accurately display and preserve fonts, page layouts, and both vector and bitmap graphics.
Photoshop EPS (Encapsulated PostScript): Used to share Photoshop files with many illustration and page-layout programs.
PICT: Used with Mac OS graphics and page-layout applications to transfer images between applications. PICT is especially effective at compressing images with large areas of solid color.
Pixar: Used for exchanging files with Pixar image computers.
PNG (Portable Network Graphics): Used for lossless compression and for displaying images on the Web.
Photoshop Raw: Used for transferring images between applications and computer platforms when other formats don’t work.
Scitex CT: Used in the prepress industry.
TGA (Targa): Designed for systems using the Truevision video board. When saving an RGB image in this format, you can choose a pixel depth of 16, 24, or 32 bits per pixel and RLE compression.
TIFF (Tagged-Image File Format): A flexible bitmap image format supported by most paint, image-editing, and page-layout applications. Most desktop scanners can produce TIFF files.
In addition, Photoshop Elements can open files in several other older formats: PS 2.0, Pixel Paint, Alias Pix, IFF format, Portable Bit Map, SGI RGB, Soft Image, Wavefront RLA, and ElectricImage.
