Photoshop Elements Tutorial: Making tonal adjustments using Levels in Photoshop Elements
What you’ll learn in this Photoshop Elements Tutorial:
|
This tutorial provides you with a foundation for working with correcting images in Adobe Photoshop Elements. It is the fourth lesson in the Adobe Photoshop Elements 10 Digital Classroom book. |
Photoshop Elements Tutorial: Making tonal adjustments using Levels in Photoshop Elements
The Levels command allows you to look at a histogram showing you where most of the tones in an image are located. You can control the darkest and the lightest portions of the image and all the midtones in between. In the last two exercises, you corrected the shadows, highlights, brightness, and contrast, but you never really removed the blue color cast. Now, you’ll fix the contrast of this photo using Levels, you’ll also remove the blue color cast.
Histogram
The Histogram panel indicates the tonal balance of your image. It can tell you whether the image contains enough detail in the shadow (dark areas), midtone (middle tones), and highlight (light) areas. Choose Window > Histogram to display the Histogram panel. If the Histogram option is not available, that is because the Histogram panel is only available in Full Edit mode. If necessary, click the Full button just below the Edit tab, then choose Window > Histogram to open the panel.
|
The Histogram panel shows the tonal balance of the image. |
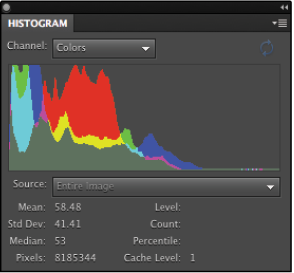
1 Click on the Organizer button ( ) to switch to the Organizer. Find the file named Lighting Levels.jpg and select it. Click on the triangle to the right of the Fix tab and choose Full Photo Edit to open the file in the Editor. In the Histogram panel, you’ll see that the tonal information of the image is represented graphically by peaks and valleys within the Histogram panel. Shadow areas are represented on the left side of the Histogram panel and highlight areas are represented on the right side of the panel. The higher the peaks are, the more of that particular pixel value appear within the image. In this image, you’ll notice that most of the “peaks” are toward the left side of the histogram. This means that the image is lacking light tones, which would be displayed on the right side of the histogram and would give the image more contrast. You can close the histogram for now by choosing Window > Histogram to uncheck it; you’ll be seeing it again when you learn about Levels.
|
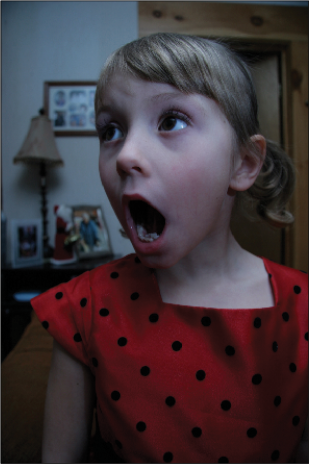
The image before the Level changes. |
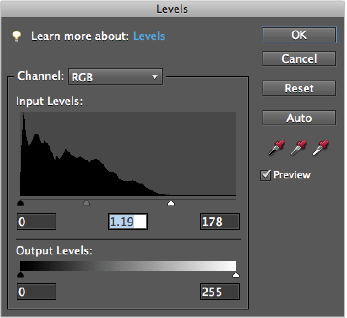
2 Choose Enhance > Adjust Lighting > Levels. In the Input Levels section of the Levels dialog box, there are three sliders at the bottom of your histogram; the two end sliders control white and black, and the middle slider controls the colors in between. Drag the white slider to the left, to 178, which brings it to the bottom of the first peak displayed in the histogram. You have now made all the tones that exist from 178 to 255 white, brightening the photo.
3 To further lighten the photo, drag the middle slider to the left, to 1.19. If you were to drag the middle slider to the right, it would darken the image.
|
The adjusted Levels settings. |
4 The image is starting to look better but you still need to correct for the blue color cast. At the top of the dialog box, use the Channel drop-down menu to choose the Blue channel. Drag the middle slider to the right to .75 to decrease the blue in the image.
|
The final image after removing color from the Blue channel. |

5 Press OK to commit the changes. Choose File > Save to save your edits. If the Save As dialog box opens, deselect the Save in Version Set with Original checkbox and press Save. If Photoshop Elements asks you to replace the file, press Yes, then press OK when the JPEG Options dialog box appears.
Making tonal adjustments using Curves
Curves allow you to have pinpoint control over the appearance of the shadow (dark tones), midtone (middle tones), and highlight (light tones) in your image. The most straightforward use of Curves is to enhance the contrast in an image, but the controls available with Curves allow you to do far more than that. The Curves dialog box allows you to correct highlights and shadows, as well as midtone contrast and brightness, but unlike Levels, it does not allow you to adjust individual channels.
1 In the Organizer, locate and select the file named Curves.jpg. Click on the triangle to the right of the Fix tab and choose Full Photo Edit.
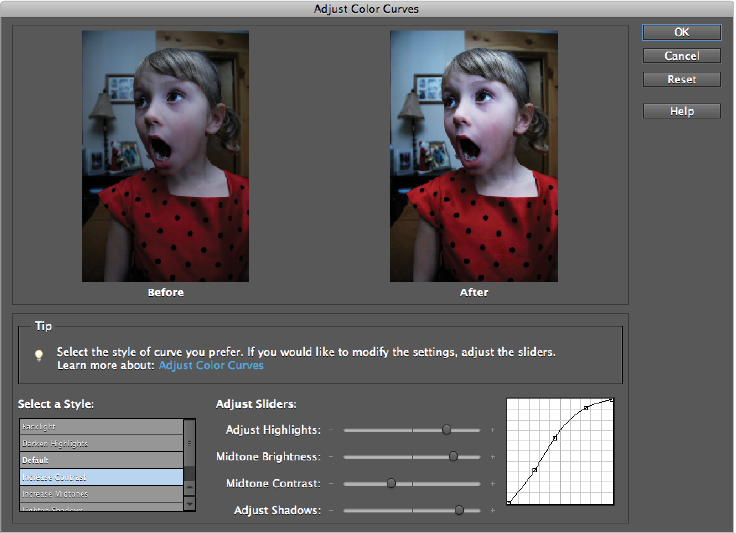
2 Choose Enhance > Adjust Color > Adjust Color Curves. Select the Increase Contrast style on the bottom left side of the panel. The image becomes darker.
3 Drag the Midtone Brightness slider to the right to increase the midtone brightness.
4 Drag the Midtone Contrast slider slightly to the left to increase the contrast of the image. There are no set numbers in this window, so feel free to experiment with all the different sliders. When you are finished, press OK.
5 Drag the Adjust Highlights and Adjust Shadows sliders to the right to brighten the highlights and shadows in the image. Press OK.
|
Changing the color curve. |
6 Choose File > Save to save your edits. If the Save As dialog box opens, deselect the Save in Version Set with Original checkbox and press Save. If Photoshop Elements asks you to replace the file, press Yes, then press OK when the JPEG Options dialog box appears.
Comparing images in Full Edit view
You will now compare all four photos in Full Edit view to see the effect each command has on the image. Make sure you still have all four files open; if not reopen them.
1 Click on the Full button below the Edit tab to make sure you are working in Full Edit mode.
2 Press the Arrange button ( ) located just below the Menu bar and choose the Tile All in Grid option. This tiles the images into four separate boxes in the workspace.
You can now compare what each command did to these files. The edits you made on these documents were destructive meaning that the image has been permanently altered. There is no way of turning off or undoing any of the adjustments you just made. The histograms for these images show how image data was lost. Because of this, you would want to run any of these commands only one at a time. Later in this lesson, you will learn about adjustment layers which allow you to make similar adjustments, but are non-destructive.
3 Choose File > Close All. If you are prompted to save any changes, press No.
Using adjustment layers
There is a non-destructive way to make corrections to your image. When using Adjustment layers, instead of making changes to the actual image, you create a new layer and allow that layer to control the tonal range or color of all the layers below it. If you decide you don’t like an adjustment, you can just discard the layer, and you are back to the original image. In this exercise, you will create an adjustment layer and save the image as a .psd file because a .psd (Photoshop Document) is a file format that can retain the layer structure.
1 In the Organizer, Locate and select the file named at_the_beach.jpg. The image is too dark, and you’ll use a Levels adjustment layer to edit it. Press the arrow to the right of the Fix tab at the top of the workspace and choose Full Photo Edit from the drop-down menu.
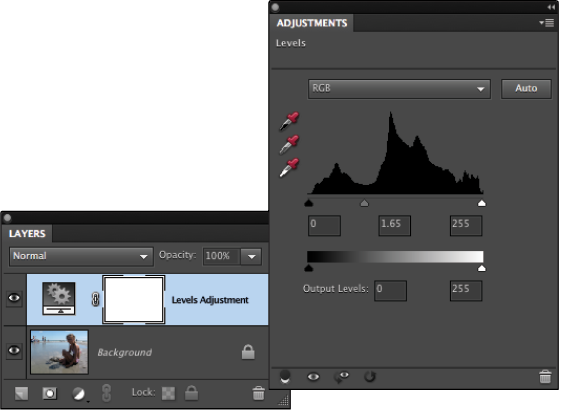
2 Choose Layer > New Adjustment Layer > Levels. In the New Layer dialog box, type Levels Adjustment in the Name text field, then press OK.
 | It’s always a good idea to name layers and adjustment layers as you create them. It gives you a better indication of what layers you’ve created, and helps you understand their purpose. |
3 The Adjustments panel becomes active with the Levels settings displayed. The levels looks the same as in previous exercises, but in this case, a new adjustment layer has been created for you.
4 Grab the middle slider in the Levels dialog box and drag it to the left to lighten the image. Drag the slider to 1.65.
|
The Adjustment panel and the adjustment layer in the Layers panel. |
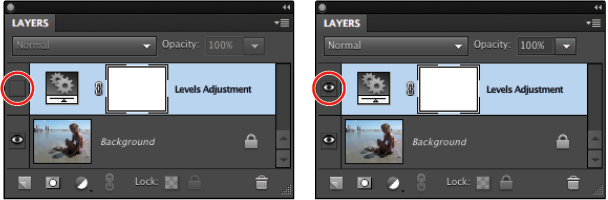
6 To turn the effect on or off, make the Layers panel active and press the visibility icon ( ) to the left of the adjustment layer.
7 If you’d like to go back and adjust any settings, simply activate the Adjustment panel with the adjustment layer selected or double-click the gears icon ( ) on the adjustment layer to enter the Levels dialog box.
|
Adjustment layer visibility turned off. Adjustment layer visibility turned on. |
8 In order for Photoshop Elements to store these layers, the image should be saved in the Photoshop (.psd) format. Choose File > Save As. Navigate to your Lessons folder, change the format to Photoshop, uncheck the Save in Version Set with Original checkbox, then press Save.
9 Choose File > Save As again. Navigate to your Lessons folder, change the format to .jpg and uncheck the Save in Version Set with Original checkbox. Name the file at_the_beach_copy.jpg, then press Save, then press OK in the JPEG Options dialog box. You’ve saved a version of this image in another file format to understand the importance of file formats when manipulating files.
|
Notice the warning icon that appears next to the Layers option. |
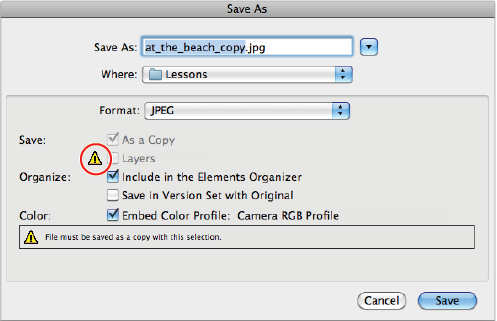
10 Choose File > Open, navigate to the Lessons folder and select at_the_beach_copy.jpg, then press Open. Notice how adjustment layers were not saved in the .jpg format. You can navigate easily between open files by double clicking on each file in the Project bin. If the Project bin is not open, simply choose Window > Project bin.
11 Choose File > Close All to close all open files.
| You can also save images in the .tiff format to retain your layers. |
Continue to the next Photoshop Elements Tutorial: Correcting selected parts of an image in Photoshop Elements >