Photoshop tutorial: Navigating Photoshop CC: Workspace, Tools, and Panels
What you’ll learn in this Photoshop Tutorial:
|
This tutorial provides you with a foundation for working with the Adobe Photoshop workspace. It is the first lesson in the Adobe Photoshop CC Digital Classroom book. For more Adobe Photoshop training options, visit AGI’s Photoshop Classes. |
Adobe Photoshop Tutorial: Navigating Photoshop CC: Workspace, Tools, and Panels
In this lesson, you’ll learn how to use the Adobe Photoshop CC work area efficiently. You will also discover how to open a document using Adobe Bridge, use the Tools panel, and easily navigate through images.
Starting up
Before starting this lesson, make sure that your tools and panels are at the Photoshop CC default settings by resetting your preferences. See “Resetting Adobe Photoshop CC preferences” in the Starting up section of this book.
You will work with several files from the ps01lessons folder in this lesson. Make sure that you have loaded the pslessons folder onto your hard drive that are included with this book or available for download if you purchased the digital version of the book. See “Loading lesson files” in the Starting up section of this book.
Adobe Photoshop is an image-editing program that can open an image stored on your system, captured by a scanner, digital camera, phone, tablet device, or downloaded from the Web. It can also open captured video images and vector illustrations. In addition, you can create new documents in Photoshop. The documents that you create or edit in Photoshop are typically created from pixels, but can also include vector graphics. Vector graphics can be enlarged or reduced in size with no loss of clarity.
In this lesson, you will discover how to open existing files in Adobe Photoshop using a feature called Mini Bridge. In addition to many other helpful options, Mini Bridge allows you to see details about your file before opening it in Photoshop.
Although Adobe Bridge is available and works with all the applications in the Creative Cloud, it might not be installed on your system. Keep in mind that you must have Adobe Bridge installed to use both Adobe Bridge and Mini-Bridge. You can check your Programs folder (Windows) or Applications folder (Mac) to see if Adobe Bridge CC is installed. If it is not, launch the Adobe Application Manager and select to install it from the Creative Cloud. Don’t fret if you forget to do this. If you access Adobe Bridge from any application, and don’t have it installed, you will automatically be taken to the Adobe Application Manager.
Opening an existing document in Mini Bridge
Mini Bridge works like the stand-alone Adobe Bridge application, but exists as a panel in Photoshop. You can access Mini Bridge by choosing File > Browse in Mini Bridge.
1 Launch Adobe Photoshop CC and choose File > Browse in Mini Bridge; Mini Bridge appears as a panel across the bottom of the workspace. If a message appears indicating that “Bridge must be running to browse files,” click Launch Bridge.
 | If you are launching Bridge for the first time, you might be asked to enable application-specific extensions in Bridge; select “Yes”. The first time Adobe Bridge launches, it could be slow because it is caching the files that it is preparing to display. |
Even though you will be instructed to use Adobe Bridge throughout the lessons in this book, you can choose to use Mini Bridge.
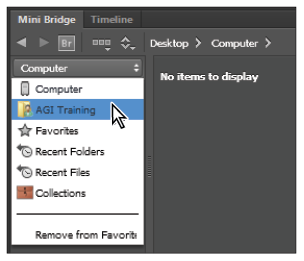
2 From the drop-down menu in the navigation pod on the left side of Mini Bridge, select your User name. You now see personal folders that you can navigate to, such as Desktop, Documents, and Pictures.
3 Double-click Desktop to see the folders on your desktop appear in the Navigation pod, including the pslessons folder that you downloaded or dragged to the desktop from the DVD. If you do not see your folder on the Desktop, verify that you didn’t save your folder to the Desktop of another User.
|
Select your user name to see the desktop folder, |
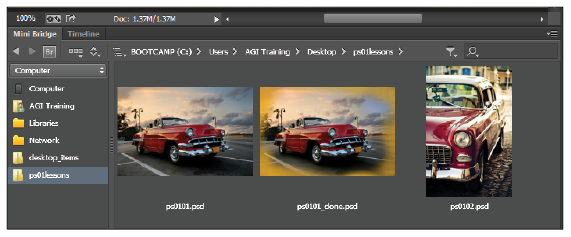
4 Double-click the pslessons folder to reveal the contents, and then click ps01lessons. The Mini Bridge now displays three images of an antique car in the folder.
|
Use Mini Bridge to locate your lesson files. |
5 Locate and double-click to open the file named ps0101_done.psd. An image of an antique car appears. This is the finished project. You can keep it open as you work or close it once you have examined the file.
|
The completed lesson file. |

As you practice with the files throughout this book, you will find that you are instructed to save a work file immediately after opening the original file.
6 Open the file named ps0101.psd, which is the starting file used for this lesson. Choose File > Save As to open the Save As dialog box.
7 Navigate to the ps01lessons folder. In the File name, or Save as text field, type ps0101_work, and choose Photoshop from the Format drop-down menu. Click Save.
Discovering the Tools panel
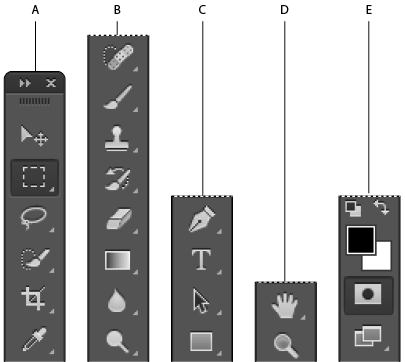
When you start Photoshop, the Tools panel appears docked on the left side of the screen—by default, it is docked on the left side of the workspace. There are four main groups of tools separated by functionality on the Tools panel: selection, cropping, and measuring; retouching and painting; drawing and type; and navigation. At the bottom of the Tools panel, you find Set foreground color and Set background color, as well as Quick Mask.
|
A. Selection, cropping, and measuring tools. |
Selection, Cropping, and Measuring Tools | ||
Icon | Tool Name | Use |
| Move (V) | Moves selections or layers. |
| Marquee (M) | Makes rectangular, elliptical, single row, and single column selections. |
| Lasso (L) | Makes freehand, polygonal (straight-edged), and magnetic selections. |
| Quick Selection (W) | Makes selections by painting. |
| Crop (C) | Crops an image. |
| Eyedropper (I) | Samples pixels. |


Retouching and Painting Tools | ||
Icon | Tool Name | Use |
| Spot Healing (J) | Removes imperfections. |
| Brush (B) | Paints the foreground color. |
| Clone Stamp (S) | Paints with a sample of the image. |
| History Brush (Y) | Paints with the selected state or snapshot. |
| Eraser (E) | Erases pixels—or reverts to a saved history state. |
| Gradient (G) | Creates a gradient. |
| Blur (no shortcut) | Blurs pixels. |
| Dodge (O) | Lightens pixels in an image. |


| You can create a floating Tools panel by clicking the dark gray title bar at the top of the Tools panel and then dragging it to a new location. You can dock it again by dragging it back to the left side of the workspace; release when you see the blue vertical bar appear. |
Drawing and Type Tools | ||
Icon | Tool Name | Use |
| Pen (P) | Draws a vector path. |
| Horizontal Type (T) | Creates a type layer. |
| Path Selection (A) | Allows you to manipulate a path. |
| Rectangle (U) | Draws vector shapes. |


Navigation Tools | ||
Icon | Tool Name | Use |
| Hand (H) | Navigates the page. |
| Zoom (Z) | Increases and decreases the relative size of the view. |


| Can’t tell the tools apart? You can view tooltips that reveal a tool’s name and keyboard shortcut by positioning your cursor over the tool. |
The Tools panel is in a space-saving, one-column format. Click the double-arrows in the gray title bar area above the Tools panel to bring the Tools panel into the two-column view. Click the double-arrows again to bring the Tools panel back to the default, single-column view. Keep the Tools panel set to whichever format works best for you.
Accessing tools and their options
With the selection of most tools comes the opportunity to change options. In this exercise, you will have the opportunity to use the Brush tool and change its options to become even more powerful.
1 With the ps0101_work.psd image open, select the Brush tool ( ). Look in the Options bar to see a variety of options you can change.
|
A. Brush Preset Picker. B. Painting Mode. C. Opacity. D. Flow. E. Airbrush. F. Pressure. |

Most tools have additional options available in the Options bar at the top of the workspace.
Note that by default, your brush is loaded with black paint. The paint color is indicated at the bottom of your Tools panel in the Foreground and Background color swatches. If you have not reset preferences, you might have a different color in your foreground.
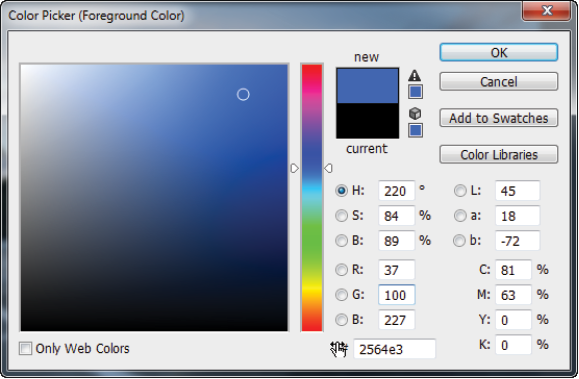
2 Click once on the foreground color to open the picker so you can select a different color.
|
A. Color Pane. B. Color Slider. |
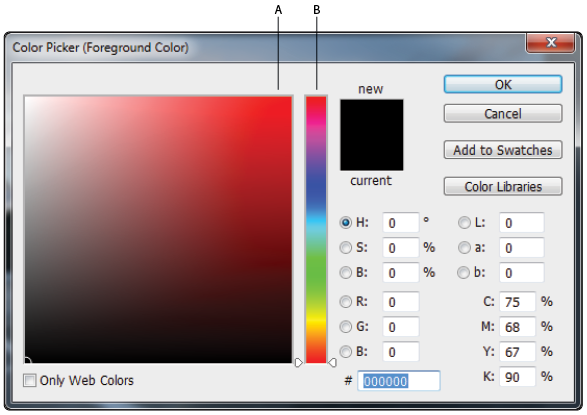
Using the Color Picker, you can select a blue color that you will use to brighten up the sky.
3 In the Color Picker, click once on the section of the Color Slider that contains blue hues, and then choose a bright blue color from the large Color Pane. In our example, we pick a color that is created R: 37, Green: 100, B: 227. Click OK.
Keep in mind that, depending upon the destination of your image, you might not be able to achieve the same color of blue that you see in the screen. Lesson 5, “Painting and Retouching,” discusses color and how to use it in your images, in more detail.
|
Click once in the blue section of the Color Slider, and then choose a bright blue color from |
Now you will change some of the Brush tool options in the Options bar at the top of the workspace.
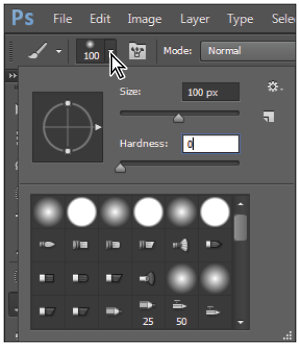
4 Click the Brush Preset Picker to see your options for size and hardness. There are several options that you can change; for now you will focus on two.
5 Click and drag the size slider, which controls the size of the brush, to the right until you reach approximately 100 px. If the Hardness slider, which controls the hardness or softness of the brush, is not all the way to the left at 0%, slide it to the left now. This is now a large soft brush that will blend well at the edges of the strokes
In the next step, you will paint and then undo it. This is to help you understand the concept of blending and how it can make a difference when you paint.
|
Change the brush size and hardness. |
6 Click and drag anywhere in the image one time to create a brush stroke across your image. Note that you have created a large opaque streak.
7 Choose Edit > Undo Brush Tool, or use the keyboard shortcut Ctrl+Z (Windows) or Command+Z (Mac OS) to undo the paint streak.
8 Now click and hold the Painting Mode drop-down menu; you see a list of options that allow you to change how your paint interacts with the image underneath. Select Color from the bottom of the list.
9 Click the arrow to the right of the Opacity option to see the slider. Click and drag the Opacity slider to the left until it reaches approximately 20%.
|
Select the paint blending mode named Color, and change the Opacity to 20%. |

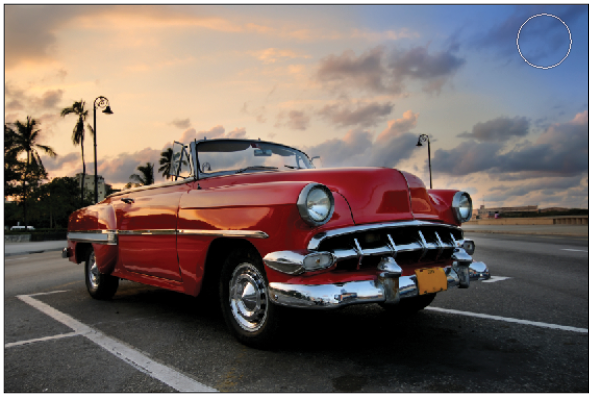
10 Now click and drag to paint in the upper-right corner of the image. You see that the result is quite different and you are brightening the sky.
|
Click and drag to paint blue in the upper-right corner of the image. |
11 Notice that you can build up the color by releasing the paint brush and painting over the same area. If you make a mistake, choose Edit > Undo, or press Ctrl+Z (Windows) or Command+Z (Mac OS) to undo.
| To go back multiple steps, choose Edit > Step Backward, or use the keyboard shortcut Ctrl+Alt+Z (Windows) or Command+Option+Z (Mac OS) |
12 Choose File > Save. Keep this file open for the next part of this lesson.
Continue to the next Photoshop Tutorial: Using panels in Photoshop >