Photoshop Elements Tutorial: Photo Retouching: Secrets of the Pros in Photoshop Elements
What you’ll learn in this Photoshop Elements Tutorial:
|
This tutorial provides you with a foundation for working with Adobe Photoshop Elements retouching. It is the eighth lesson in the Adobe Photoshop Elements 10 Digital Classroom book. |
Photoshop Elements Tutorial: Photo Retouching: Secrets of the Pros in Photoshop Elements
In this lesson, you’ll discover how to fix images using the photo retouching tools in Photoshop Elements. Some of the retouching you will do involves overall corrections, much like the ones you learned about in Lesson 5 “Adjusting Color.” You will also find out how to make selective changes to affect only portions of an image. You will see how fixing blemishes is a breeze when working with the editing tools.
Starting up
Within the Photoshop Elements Organizer: You will work with several files from the Lessons folder in this lesson. Make sure that you have downloaded the Lessons folder onto your hard–drive. In order to access these files in the Organizer, you need to import them. See “Adding files and folders to the Organizer” located in Lesson 1.
Within the Photoshop Elements Editor: The Photoshop Elements Editor defaults to the last panel layout that you used. Before starting, make sure your tools and panels are consistent with the examples presented in these lessons by resetting the panels. Do this by choosing Window > Reset Panels, or by pressing the Reset panels button ( ) in the Options bar.
Working with what you have
There is an old saying in the photo-retouching world: Garbage in, garbage out. There is only so much you can do to fix an image. However, if your image is flawed, but has enough pixel information, you are already ahead of the game, and can probably fix the image with no serious issues. On the other hand, if you are provided with a low-resolution image, perhaps from a cell phone, your chances of making an improved image are much slimmer. This is mostly due to three reasons:
- The resolution may be too low, so the image may appear pixelated.
- There is a limitation in the dynamic range of tonal values that are recognized. The better the camera, the more tonal values it can recognize. The result of a higher dynamic range is a smoother transition from one shade of color to another.
- The image has already been edited. You will see, later in this lesson, how even minor edits can affect the quality of your image, giving more reasons for being cautious when editing your images.
Fortunately, there is a feature in Photoshop Elements that will help you determine whether images are lacking the information you need, before, and even while you are working on your image. This feature is the histogram. In this next section, you will open an image and make changes to the image. This will offer you the opportunity to make a comparison between an image with and without the information that is needed for retouching.
Using the histogram
The Histogram panel displays the overall distribution of information about tonal values, in the highlight (bright), midtone (area between bright and dark), and shadow (dark) areas of an image. In this exercise, you will open an image and watch how your changes affect the histogram for that image. Keep in mind that you may open images whose histogram indicates a lack of information. These are the images that you can expect to have the most problems retouching and correcting.
1 If you have not yet launched Photoshop Elements, do so now. When the welcome screen appears, press the Organize button ( ) to open the Photoshop Elements Organizer.
2 In the Organizer, locate the image Smiles.jpg. Select the image, then click on the arrow to the right of the Fix tab and choose Full Photo Edit or simply use the keyboard shortcut Ctrl+I (Windows) or Command+I (Mac OS) to open the image in the Elements Editor. An image of a man and his son opens in the Full editing mode in Photoshop Elements.
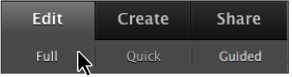
 | If you are not sure if you are in the Full editing mode, look at the Edit tab in the upper right corner of your workspace. Make sure that Edit Full is the selected item. |
|
Make sure you are in the Full editing mode. |
3 Choose Window > Histogram to open the Histogram panel. Choose RGB from the Channel drop-down menu at the top of the panel. You may see an alert icon ( ) in the upper-right corner of the Histogram panel. If you do, click on it once to refresh the data in the Histogram panel.
|
The Histogram panel. |
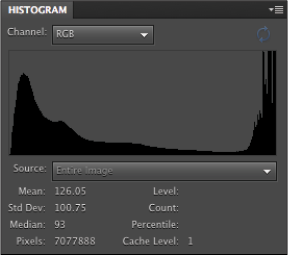
Notice that the histogram shows a lot of information, as represented by the mountain-shaped looking data spanning the panel. To give you an idea of how a good histogram looks as compared to a bad histogram, look at the examples below.
|
A histogram displaying a lot of data. |
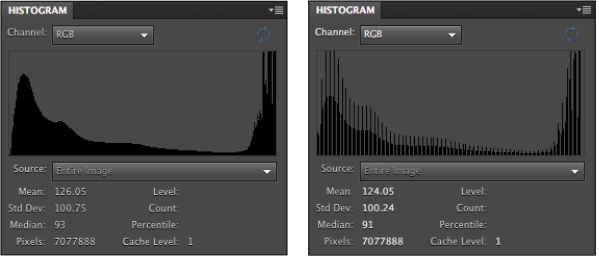
A histogram showing that data has been removed.
Working over the image
Now you will have the opportunity to intentionally destroy an image. By running through the steps in this lesson, you will see how common steps that you might take can inadvertently destroy valuable information in your image, and how you can prevent this from happening.
1 With the Smiles.jpg image open, and the Histogram panel visible, choose Enhance > Auto Levels. The histogram’s alert icon appears, indicating that you have made a change and the display needs to be refreshed. Click the alert icon ( ).
).
Note that when you refresh the histogram display, there are now gaps in the data, indicating that some of the tonal values are missing.
2 Choose Enhance > Auto Contrast, then choose Enhance > Auto Smart Fix.
3 Click the alert icon in the histogram to refresh the display. Notice that the more corrections you make to an image, the more gaps appear in the histogram, indicating that data is missing. As you can see in the image below, the more data that is missing, the more choppy the image appears. The tonal values jump from one value to another, without a smooth transition. This is also known as banding.
|
The histogram shows less data. |
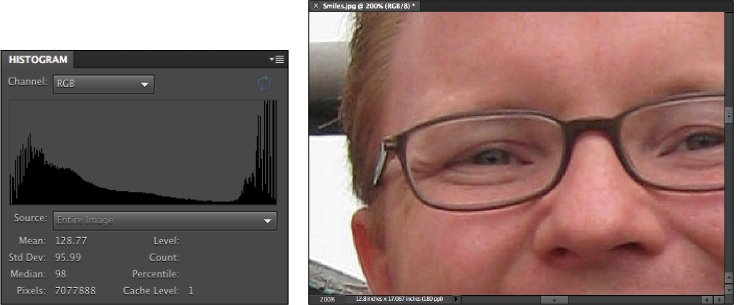
The image, as it appears after having data deleted through editing.
So how can you avoid this? First, become aware that as you make drastic changes to your images, they can be negatively impacted. Just keep an eye on the Histogram panel; when those big gaps start to appear, you are probably doing a little too much to your image.
Use adjustment layers, as discussed in Lesson 5, “Adjusting Color,” Adjustment layers can be changed and minimize the negative impact that editing can have on your original image data.
4 Choose File > Close to close the Smiles.jpg file. When the alert message appears asking if you want to save the changes, choose No (Windows) or Don’t Save (Mac OS).
Improving your image
Now that you know how to analyze the quality of your images, you will find out how to retouch an image using the editing tools that are available to you. In this part of the lesson, you will open an image with a mother and three daughters. The exercises will take you through a series of steps to eliminate flaws, such as food on the face, then proceed to more difficult selective changes to the skin tone.
1 In the Organizer, locate the file Family.jpg. Select the image, then click on the arrow to the right of the Fix tab and choose Full Photo Edit. An image of a mother and her three daughters opens in the Editor.
You will first perform an overall correction to the image to lighten it up a bit. You will do this using a non-destructive Levels adjustment layer. Note that you will be making a simple adjustment that will lighten the midtones (middle values) of this image. See Lesson 5, “Adjusting Color,” for more in-depth details on using the Levels dialog box.
2 If you do not see the Layers panel, choose Window > Layers. The Layers panel appears.
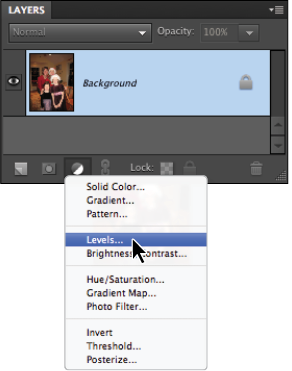
3 Press the Create new fill or adjustment layer button ( ) and choose Levels from the drop-down menu. The Levels dialog box appears inside of the Adjustments panel.
|
Select Levels from the Create adjustment layer drop-down menu. |
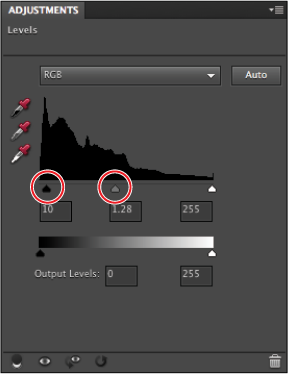
4 Click and drag the midtone slider (middle marker) to the left until you see an approximate value of 1.28 appear in the Adjust midtone input level text field. This action makes the image lighter. To see the effect of the adjustment, press the Toggle layer visibility button ( ) off and then back on in the Levels 1 adjustment layer.
5 Back in the Adjustments panel, increase the contrast slightly by clicking and dragging the shadow slider to the right until a value of 10 appears in the shadow input level text field. A Levels adjustment layer is created.
|
Make minor adjustments in the Levels dialog box to lighten the image. |
Continue to the next Photoshop Elements Tutorial: Making a selective change using the adjustment layer’s mask in Photoshop Elements >