Photoshop Elements Tutorial: Using the Magic Extractor in Photoshop Elements
What you’ll learn in this Photoshop Elements Tutorial:
|
This tutorial provides you with a foundation for working with the magic extractor in Adobe Photoshop Elements. It is the ninth lesson in the Adobe Photoshop Elements 10 Digital Classroom book. |
Photoshop Elements Tutorial: Using the Magic Extractor in Photoshop Elements
The Magic Extractor makes it easy to select people or objects so that you can superimpose them on other backgrounds. You’ll use it as a way to silhouette the marine image in this exercise.
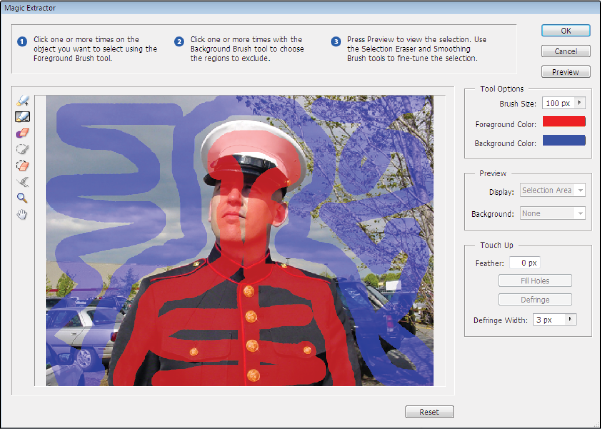
Use the Magic Extractor to make accurate selections based on the appearance of foreground and background areas that you specify. You define these areas by placing colored mark adjust the brush size by adjusting the Brush Size value and click and drag multiple times to mark the area you want to extract. In this case, click the Marine’s hat, face, and uniform.
1 In the Layers panel, click to select the Marine layer.
2 Choose Image > Magic Extractor.
The Magic Extractor dialog box opens with the Foreground Brush tool ( ) selected by default.
3 If desired, adjust the brush size by adjusting the Brush Size value, and click and drag multiple times to mark the area you want to extract. In this case, click the Marine’s hat, face, and uniform.
4 Choose the Background Brush tool ( ) and click and drag multiple times to mark the area that you do not want included in your selection. In this case, click on the sky, the cars in the background, and the tree.
|
Use the Magic Extractor to remove an unwanted background from an image. |
 | When selecting objects with varied colors and textures, you can drag across all the colors and textures to ensure a more accurate selection. |
5 To help with your selection, try using the Zoom tool ( ) or the Hand tool (
 ) to magnify and navigate around the photo.
6 To specify a different brush size, choose a new size from the Brush Size field. You can also use the keyboard to increase or decrease the brush size. Pressing ] (open bracket) increases the size of the brush while pressing [ (close bracket) decreases the brush size.
7 Click Preview to see the current selection.
|
Press the Preview button to preview your selection. |
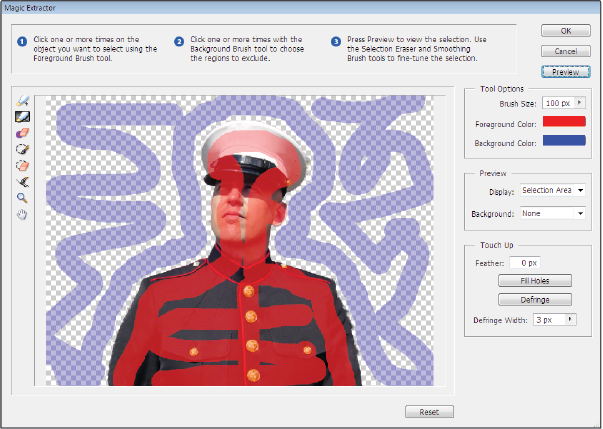
8 To add to or subtract from the selection, place more marks in the image using either the Foreground or Background Brush tool. You can press the Preview button again to see the effects of your new extraction. In areas where the color in the foreground is similar to the color in the background, you may need to “fine tune” your selection by accurately painting over the areas that you want to keep or remove.
9 Press OK to extract the selected areas. If you want to start over and remove all marks, press Reset.
You should now see the image of the Marine, silhouetted from its background.
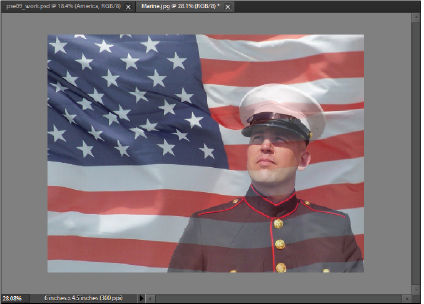
10 Use the Move tool ( ) to reposition the Marine layer to the lower right side of the image, as shown.
|
You can see through the background of a silhouetted image to the layer or layers below. |
| If you haven’t been successful in removing the entire background, try some of the methods listed in the sidebar below. |
Editing a Magic Extractor selection
In addition to placing marks in an image, you can fine-tune a Magic Extractor selection in the following ways:
- To erase foreground or background dots, select the Point Eraser tool (
 ) and click or drag over the marks you want to remove.
 - To add areas to a selection, select the Add to Selection tool (
 ) and click or drag over the area you want to add.
 - To remove areas from the selection, select the Remove From Selection tool (
 ) and drag over the areas you want to remove.
 - To smooth the edges of your foreground selection, select the Smoothing Brush tool (
 ) and drag over the areas you want to smooth.
 - To soften the edges of your selection, specify a higher value in the Feather box.
- To fill remaining holes in the main selection, click Fill Holes.
- To separate and remove an area from the main selection, select the Remove From Selection tool and drag a line between the main selection and the area you want to remove. Then click Fill Holes.
- To remove fringe colors left between the foreground and background, click Defringe. To increase or decrease the amount of fringe removed, specify a value from the Defringe Width menu.
Flattening an image
Next you’ll flatten your composite image into one layer to prepare it for further compositing.
When you flatten an image, Photoshop Elements merges all visible layers into the background, greatly reducing the file size. In most cases, you won’t want to flatten a file until you’ve finished editing individual layers.
1 Make sure that both layers in your file are visible.
2 Choose Flatten Image from the Layers panel menu ( ).
).
| You can see the difference between your image’s layered file size and its flattened file size by choosing Document Sizes from the status bar drop-down menu at the bottom of the document window. |
Completing the composite
Now you’ll combine this composite image with the type layer you created earlier.
1 With the Move tool ( ) selected, click on the flattened Marine.jpg image and click and drag over the tab of the pse09_work file. Pause for a second then when the pse09_work file becomes active, move your cursor down to the main image area and release the mouse button. This moves the composited Marine image into the pse09_work file as a new layer.
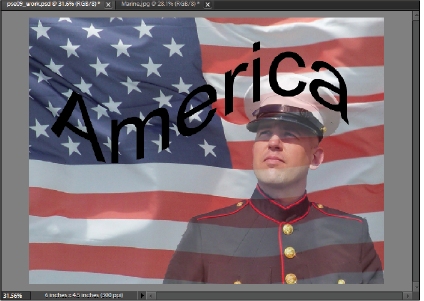
2 In the Layers panel of your new composite file, drag the type layer named America above the flattened image layer, and position it at the top.
The layered look of this file is characteristic of most composite images. Now you’ll use clipping groups and layer styles to make the type layer more interesting.
|
Click and drag from one image to another for further compositing. |
Working with clipping groups
To improve the look of the type layer in your new composite file, you’ll create a clipping mask.
About layer clipping masks
A clipping mask is a group of layers to which a mask is applied. The bottommost layer, or base layer, defines the visible boundaries of the entire group. In this exercise, the base layer contains some text, and the layer above it contains a photograph. If the photograph appears only through the type outline in the base layer, it also takes on the opacity of the base layer.
You can create a clipping mask only with contiguous layers. The name of the base layer in the group is underlined, and the thumbnails for the layer are indented. In addition, the layer above displays the clipping mask icon.
Creating a clipping mask
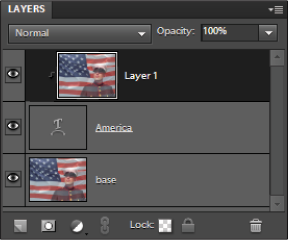
1 In the Layers panel, create a duplicate of the image layer by dragging and dropping it over the New Layer button ( ). Name the new layer base, and position it at the bottom of the layer stack.
2 Click and drag the original image layer (layer 1) to a position directly above the type layer.
3 Hold down Alt (Windows) or Option (Mac OS), and position the pointer over the line dividing the top two layers in the Layers panel (the pointer changes to two overlapping circles), and then click.
| Alternatively, in the Layers panel, select the top layer of a pair of layers you want to group, and choose Layer > Create Clipping Mask. |
|
Create a unique transparent effect for your type with a clipping mask. |
It may now be difficult to see the clipping mask, because the layers being masked have the same opacity and mode attributes of the bottommost layer in the Layers panel. To see the appearance of the mask, click on the visibility icon ( ) to the left of the base layer to temporarily hide the layer revealing the clipping mask. Click the visibility icon again to show the base layer.
Using Layer styles
You’ll now make your clipping mask layer stand out by adding layer styles to it.
About layer styles
Layer styles let you quickly apply effects to an entire layer. In the Effects panel, you can view a variety of pre-defined layer styles and apply a style with a click of your mouse.
|
Use the Effects panel to apply layer styles. |
The layer style’s effects are automatically updated whenever you edit that layer. Layer styles are also cumulative, which means that you can create a complex effect by applying multiple styles to a layer. You can also change a layer’s style settings to adjust the final result.
When a layer style is applied to a layer, an effects icon () appears to the right of the layer’s name in the Layers panel. Layer styles are linked to the layer contents. In other words, when you move or edit the contents of the layer, the effects move with them.
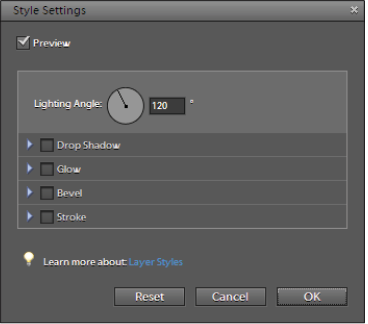
Select Layer 1 in the Layers panel, and choose Layer > Layer Style > Style Settings to edit the settings of a layer’s style. Currently there are no styles applied, so simply press the cancel button to close the Style Settings dialog.
|
Edit the properties of layer styles in the Style Settings dialog box. |
Working with layer styles
Not only can you apply special effects to a layer, but you can also hide or show the styles in a layer, and even change the scale of a layer style.
Apply a layer style
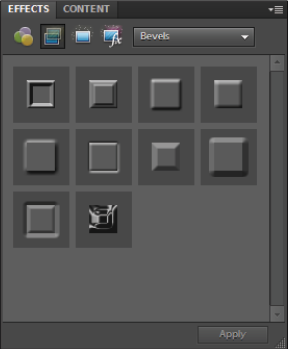
1 Select the America layer in the Layers panel.
2 In the Effects panel, choose Layer Styles ( ) from the category menu and in the drop-down menu, choose Bevels.
3 Find Simple Emboss. Do any of the following:
- Select the style, and click Apply.
- Double-click the style.
- Drag the style onto a layer.
You can also drag the style to the image; it is applied to the selected layer.

Apply a layer style to the type layer for a special effect.
Hiding or showing all layer styles in an image
1 Select the America layer in the Layers panel.
2 In the Effects panel, choose Layer Styles ( ) from the category menu.
3 Choose Layer > Layer Style > Hide All Effects to hide the style.
4 Choose Layer > Layer Style > Show All Effects to show the style.
Change the scale of a layer style
1 In the Layers panel, select the layer containing style effects you want to scale. In this case it would be the America layer.
2 Choose Layer > Layer Style > Scale Effects.
3 Select Preview to see the changes in your image, click on the down arrow next to the Scale percent and drag the Scale slider to the left and right to see the changes that the Scale has on the Effect.
4 Identify how much you want to scale the effects. For example, if you are increasing the size of an outer glow, 100 percent is the current scale, and so 200 percent doubles the glow size. Press OK.
Copying style settings between layers
1 In the Layers panel, select the America layer.
2 Choose Layer > Layer Style > Copy Layer Style.
3 Select the bottom layer named Base in the Layers panel, and choose Layer > Layer Style > Paste Layer Style. Note the changes to the edges of the base layer.
4 Choose Edit > Undo or use the keyboard shortcut, Ctrl-Z.
Removing a layer style
1 In the Layers panel, select the layer containing the style you want to remove.
2 Choose Layer > Layer Style > Clear Layer Style or drag the layer style icon ( ) to the right of the layer onto the trash can (
 ) at the bottom of the Layers panel.
3 Choose Edit > Undo or use the keyboard shortcut, Ctrl-Z (Windows) or Command+Z (Mac OS). Choose File > Save. Close any open documents.
Congratulations, you’ve completed the lesson! With your newly acquired knowledge of photo compositing, you’ve uncovered a whole new world of capability within Photoshop Elements 10.