Premiere Pro tutorial: Trimming clips on the Timeline in Premiere Pro
What you’ll learn in this Premiere Pro Tutorial:
|
This tutorial provides you with a foundation for working with trimming clips in Adobe Premiere Pro. It is the third lesson in the Adobe Premiere Pro CS5 Digital Classroom book. For more Adobe Premiere Pro training options, visit AGI’s Premiere Pro Classes. |
Adobe Premiere Pro Tutorial: Trimming clips on the Timeline in Premiere Pro
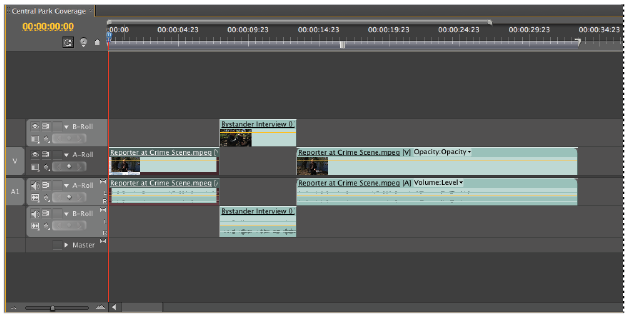
You can begin editing clips after you add them to the Timeline. The type of edit you do in the Timeline helps you judge how each clip relates to the other clips in your sequence, thus refining the rough edit you do by trimming clips in the Source Monitor.
In this part of the lesson, you will trim the beginning and end of the Bystander Interview 01.mpeg clip to refine the edit.
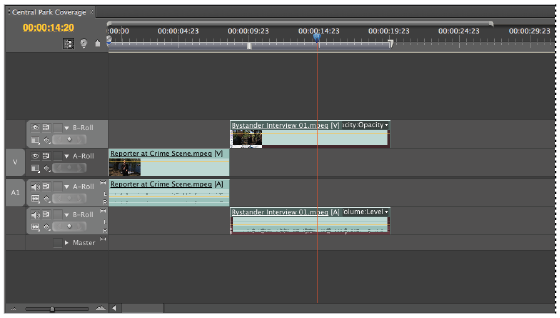
1 With the pr0301-working.prproj project still open and the Timeline panel active, move the playhead to the 14-second and 20-frame mark (00;00;14;20) on the Timeline. This is a good point in the clip at which to end it because it is a momentary pause in the character’s rant; since he is moving around, this pause point fits with the Cut on Action principle of continuity editing.
|
Click the current time field in the upper right side of the Timeline panel and type 1420 to |
 | When working on your own projects, we strongly recommend that you play through the Timeline many times to determine the best edit point for your footage. |
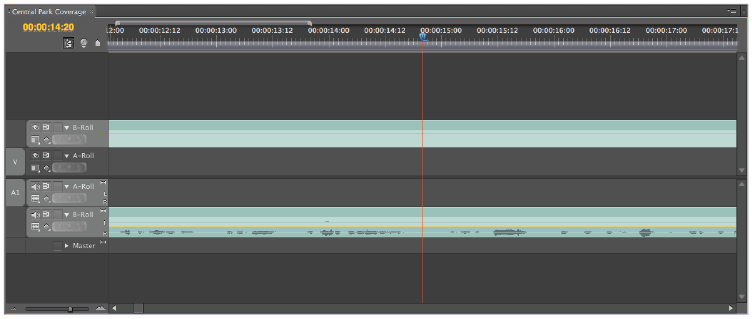
2 Press the + sign on your keyboard three times to cause the Timeline panel to Zoom In on the current position of the playhead. Notice the small graph on the audio track. This is called a waveform, and it displays the volume of a track over time. The playhead is currently positioned at a level point on the waveform, which represents a point of silence, when the speaker is quiet. This point is usually the best place to cut a clip, because it gives the illusion the speaker is taking a pause and has the most natural affect.
|
When cutting a clip, you must be careful to not cut too closely to where a person is starting or stopping while speaking. |
3 Click the – sign on the keyboard three times to return to the Timeline panels previous display and confirm that the Selection tool is the active tool in the Tools panel. Position your cursor at the end of the Bystander Interview 01.mpeg clip. Notice that the selection tool changes to a Trim tool ( ).
).
| You can press the V key on your keyboard to activate the Selection tool. |
4 Click the end of the clip with the Trim tool and drag it toward the playhead. The cursor snaps to the playhead when it gets close. This trims the Out Point of the clip to match the current position of the playhead.
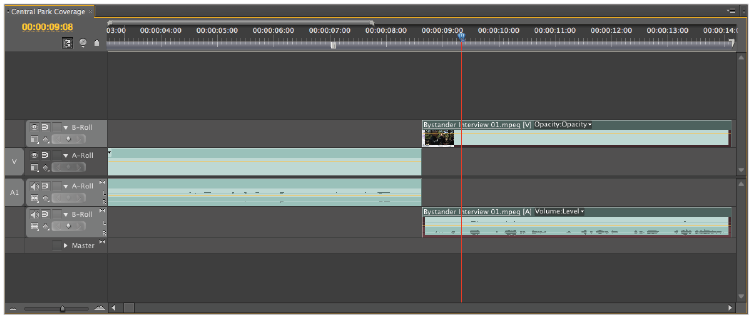
5 Trim the beginning of the same clip. Move the playhead to the 9-second and 8-frame mark (00;00;09;08) on the Timeline.
| To move your playhead on the Timeline manually and to move it precisely one frame at a time, press the left and right arrow keys on your keyboard. |
The Selection tool leaves a space between two segments of a clip, called a gap, when you use it to trim a clip. In the next step you will use a tool that automatically removes gaps as it trims your clips.
6 Click the Ripple Edit tool on the Tools panel to activate it. If the Tools panel is not visible, select Window > Tools.
Move the tool to the beginning of the Bystander Interview 01.mpeg clip and click and drag it to the playhead to perform a ripple edit to the clip.
|
The tool appears to not work; in fact, the entire clip moves automatically to the left to remove the gap created by trimming the clip. |
7 Press the Home key on your keyboard or manually move the playhead to the beginning of the Timeline, and then press the spacebar to preview the edits in the Program Monitor.
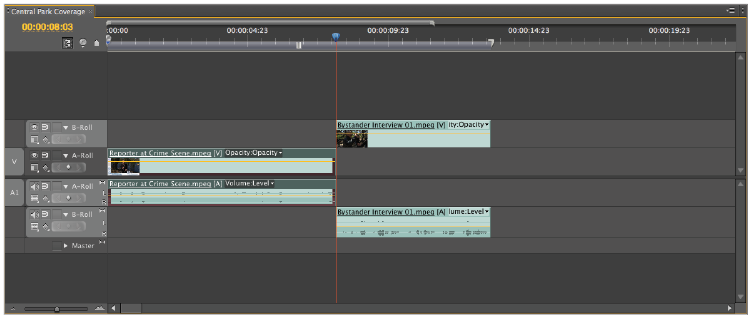
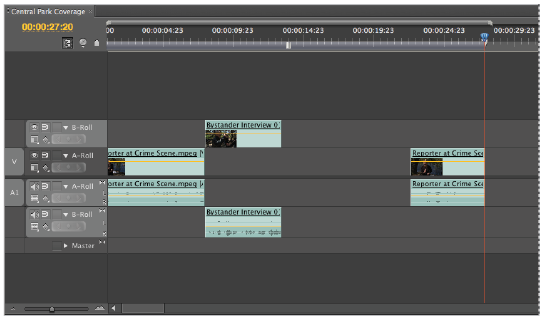
8 The edit point of the reporter cutting to the bystander is still rough; trimming the Reporter at Crime Scene.mpeg clips fixes this.
Move the playhead to the 8-second and 3-frame mark (00;00;08;03) on the Timeline.
Place the Ripple Edit tool at the end of the Reporter at Crime Scene.mpeg clip and click and drag it toward the playhead.
Notice that when you trim the clip, all clips to the right shift to maintain the integrity of your edits.
|
The Ripple edit tool automatically removes gaps that would otherwise be created when trimming clips with the Selection tool. |
9 Press the Home key on your keyboard or manually move the playhead to the beginning of the Timeline, and then press the spacebar to preview the edits in the Program Monitor. Notice that at the beginning of the reporter scene, she seems to hesitate before saying the word “The”; you will correct this as explained in the next step.
10 Move the playhead to the 5-frame mark (00;00;00;05) on the Timeline and place the Ripple Edit tool at the beginning of the clip.
Click and drag towards the playhead to perform the Ripple Edit.
Again move the playhead to the beginning (00;00;00;00) of the Timeline and preview the edits in the Program Monitor by pressing the spacebar on your keyboard.
The edits seem more refined.
11 Choose File > Save or press Control + S (Windows) or Command + S (Mac OS) to save these changes to your project. Do not close this file; you will need it in the next part of the lesson.
Using the Razor tool
You can use the Razor tool to shorten the duration of a clip or remove footage from the middle of a clip on the Timeline.
1 With the pr0301-working.prproj project still open, locate the Reporter at Crime Scene.mpeg clip in the A Roll bin in the Project panel.
Drag this clip directly onto the A-roll video track on the Timeline so the beginning is adjacent to the end of the Bystander Interview 01.mpeg clip.
|
When viewing clips on the Timeline, we recommend you zoom in and out frequently to have a better |
| You can zoom out on the Timeline to see the beginning and end of the Timeline simultaneously by pressing the - key. |
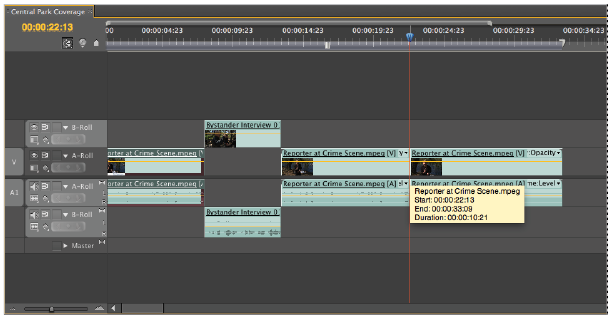
2 Since you did not trim this clip in the Source Monitor before adding it to the Timeline, you must remove a lot of footage at the beginning and end of the clip to get to the reporter’s sign-off.
Move the playhead to the 22-second and 13-frame mark on the Timeline (00;00;22;13), which is the point immediately prior to where the reporter begins to sign-off.
3 Click the Razor tool in the Tools pane to activate it. You can use the Razor tool to cut or split clips to isolate the parts you want to keep.
Move the Razor tool to the playhead and click the Reporter at Crime Scene.mpeg clip to cut it.
|
The Razor tool cuts through the audio and video of a clip on the Timeline. |
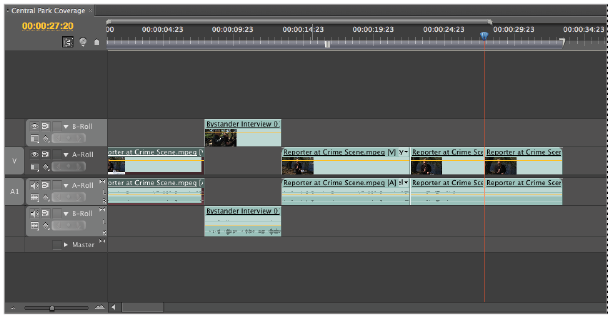
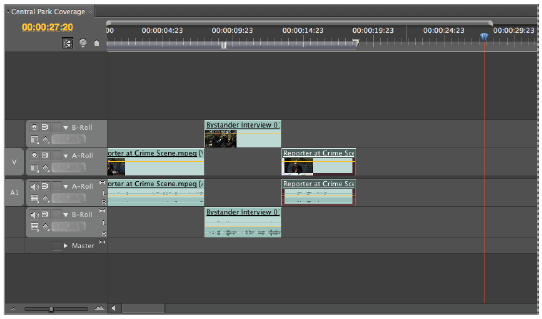
4 Move the playhead to the 27-seconds and 20-frame mark on the Timeline (00;00;27;20), move the Razor tool to the playhead, and click the Reporter at Crime Scene.mpeg clip.
Notice that after the second cut, the clip is split into three sections. Keep the middle section and remove the other two as explained in the next step.
|
Use the Razor tool to sub-divide a clip so every part is independent from each other. |
5 Click the Selection tool in the Tools panel to activate it, and then click the first part of the Reporter at Crime Scene.mpeg clip to select it.
|
When working with clips on the Timeline, remember to select them first. |

Press the Backspace (Windows) or Delete (Mac OS) key on your keyboard to remove it.
|
When you delete a clip, it leaves a gap on the Timeline. |
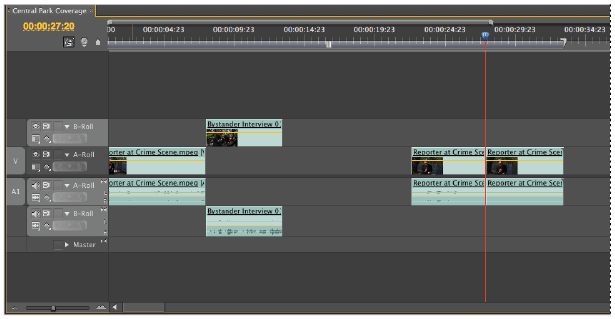
6 With the Selection tool still active, click the last part of the Reporter at Crime Scene.mpeg clip to select it and again press the Backspace (Windows) or Delete (Mac OS) key on your keyboard to remove it.
|
You can right-click a clip and choose Clear from the menu that appears, to delete it. |
7 With the Selection tool, click the middle of the Reporter at Crime Scene.mpeg clip and drag it to the left until it snaps into place next to the preceding clip.
|
Clips on the Timeline snap to the playhead and to each other. |
8 Press the Home key on your keyboard or manually move the playhead to the beginning of the Timeline, and then press the spacebar to preview the edits in the Program Monitor.
Choose File > Save or press Control + S (Windows) or Command + S (Mac OS) to save these changes to your project. Do not close this file; you will need it in the next part of the lesson.
Making an Insert edit
An Insert edit allows you to add a clip currently previewed in the Source Monitor to the Timeline using a button or keyboard shortcut. Use an Insert edit to add a new clip to the Timeline at the beginning, end, or middle of clips currently on the Timeline. When you perform an Insert edit in the middle of an existing clip, the command splits that clip and moves all adjacent clips to the right.
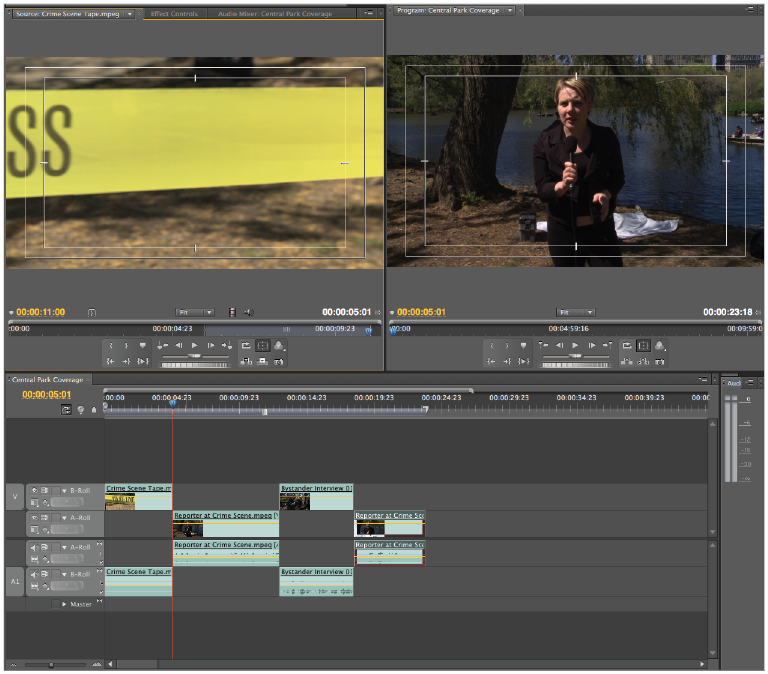
1 With the pr0301-working.prproj project still open, double-click the Crime Scene Tape.mpeg clip in the B Roll bin in the Project panel to preview it in the Source Monitor.
This clip is a just over nine seconds long; you will trim it down to use only the five seconds that include a left to right pan.
2 In the Source Monitor, move the playhead to the 6-second mark (00;00;06;00) and click the Set In Point button or press the I key on your keyboard to mark the clip’s new In Point at 6 seconds.
3 Move the playhead to the 11-second mark (00;00;11;00) and click the Set Out Point button or press the O key on your keyboard to mark the clip’s new Out Point.
4 Prepare the Timeline to receive the trimmed clip.
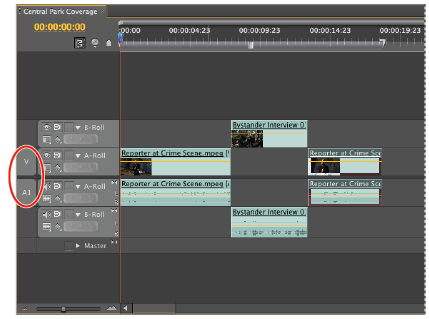
Click the Timeline panel to activate it, and then move the playhead to the beginning (00;00;00;00) of the Timeline panel.
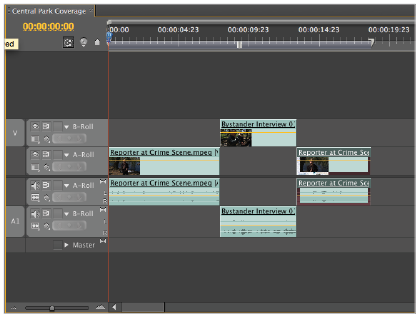
Notice the V and A1 labels to the left of the A-roll audio and video tracks. These are called Source Track Indicators and correspond to the video and audio tracks of the clip that is active in the Source Monitor.
|
The Source Track Indicators appear when a clip is active in the Source Monitor. |
Specifying the destination of clips with track targeting
|
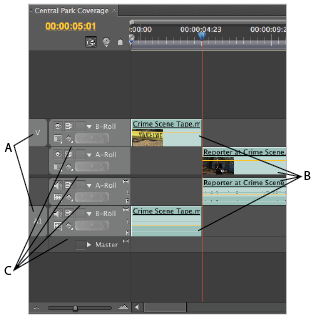
A. Source Track Indicators. B. Track Headers. C. Clips. |
In Premiere Pro, you start with 3 video and 2 audio tracks by default, but you can have up to 99 separate audio and video tracks in a single sequence. To add tracks to the Timeline using keyboard shortcuts, the controls in the Source Monitor, or the copy and paste commands, you must specify a destination track. This is called as track targeting.
When you add clips to the Timeline panel by dragging them from the Source Monitor, the Project panel, or the Media browser, you automatically select a track by dropping the clip onto that track. However, when you use the Source monitor controls, keyboard shortcuts, or copy and paste, you must specify a target track in advance. The highlighting on the Track Header area (where the track names are) indicates that a specific track is targeted and is ready to receive clips. You can have more than one audio and video track targeted at a time, or specify only a single audio or video track for targeting. For precise placement of content from the Source Monitor, you can map the tracks of the clip currently active in the Monitor to specific tracks on the Timeline by dragging the Source Track Indicators present to the left of the Track Headers.
5 Drag the Source Track indicator to the audio and video B-roll tracks and confirm that all four tracks are highlighted. In order for the Insert edit to function properly, all four of the track headers must be highlighted. When a track header is lighter than the rest of the interface around it you know it is currently selected. Click on the track header of any track that is not highlighted to select it.
The highlight indicates that the tracks are selected and can accept the clip that you insert.
| The Track headers contain name of the track as well as controls for muting, hiding and locking them. |
|
You must target video and audio tracks to receive a clip. |
6 With the Timeline panel still active, click the Insert button on the Source Monitor to perform an Insert edit. Notice that the clip is added to the B-roll tracks at the current position of the playhead and all the footage on the Timeline shifts to the left.
|
By using an Insert edit, you can increase the overall duration of the Timeline. |
7 Press the Home key on your keyboard or manually move the playhead to the beginning of the Timeline, and then press the spacebar to preview the edits in the Program Monitor.
8 Choose File > Save or press Control + S (Windows) or Command + S (Mac OS) to save these changes to your project, and then close the file.