Premiere Pro tutorial: Understanding the Workspace in Premiere Pro
What you’ll learn in this Premiere Pro Tutorial:
|
This tutorial provides you with a foundation for working with the Adobe Premiere Pro workspace. It is the second lesson in the Adobe Premiere Pro CS5 Digital Classroom book. For more Adobe Premiere Pro training options, visit AGI’s Premiere Pro Classes. |
Adobe Premiere Pro Tutorial: Understanding the Workspace in Premiere Pro
In this lesson, you will gain an understanding of the key elements of the Premiere Pro interface and how to configure them to better suit your needs.
Starting up
In this lesson, you will work with the project files from the pr02lessons folder. Make sure that you have loaded the prlessons folder onto your hard drive from the supplied DVD. The Starting Up section at the start of this book provides detailed information about loading lesson files, resetting your workspace, locating missing media, and opening the files in CS5.5. If you have not already done so, please review these instructions before starting this lesson.
Understanding the Premiere Pro interface
Adobe Premiere Pro uses a docked, panel-based interface. The entire interface configuration is called a workspace; the application has five pre-built workspaces to accommodate different working styles and the different tasks you need to accomplish. You will perform most of your editing work in the different panels of the program’s interface. These panels allow you to import and organize your media and preview your video and audio footage. The Timeline, where most of the actual video editing is performed, is also a panel.
Understanding the default Editing workspace
There are 25 different panels available in the Premiere Pro interface, and the most commonly used are described below.
|
A. Tools panel. B. Project panel. C. Resource Central panel. D. Source Monitor panel. E. Effects Controls panel. F. Audio Mixer panel. |
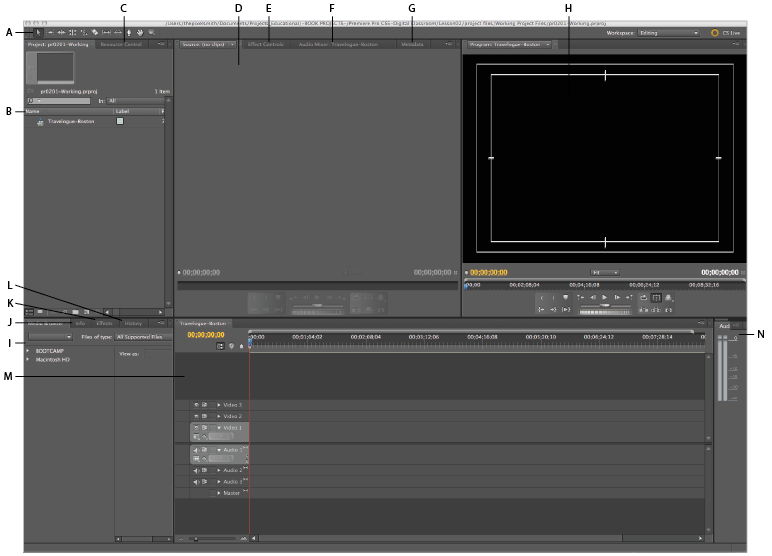
Tools: Docked to the top of the interface in the editing workspace in the Options bar, the Tools panel stores the various editing tools you can access in the application. When you select a tool, the cursor changes appearance based on the tool that is active and the type of content that you are hovering over; for example, the selection tool ( ), which you can use to move clips in the Timeline, changes to become a trim tool () when you place it at the beginning or end of a clip.
Project: Video editing is a non-destructive editing process because you do not edit the original content of your files. The Project panel contains references to all the footage files (video, audio, images) that you have imported into Premiere Pro in addition to the sequences, titles and other supporting material you create in the application.
Resource Central: The Resource Central panel connects you to the Adobe website, where you can download templates to use in your projects.
Source Monitor: You can use the Source Monitor to playback and preview individual clips. You can also use the Source Monitor to prepare clips before you add them to a sequence. In the Source Monitor, you can set In and Out points, add markers, and specify how the clip will be added to the Timeline. You can view clips in the monitor by dragging and dropping them from the Project panel or by double-clicking them.
Effect Controls: Effects are built-in filters that you can apply to video and audio clips on the Timeline. Some effects can change color video to black-and-white, while others alter the color balance of an image or help to simulate the look of film. The Effect Controls panel allows you to edit effects that have been applied in the Timeline panel. To access the effects that were applied to a clip, you must select it in the Timeline by clicking it. If you do not have a clip selected, the panel remains blank. You can also use the panel to access the inherent Motion, Opacity, and Audio properties of clips.
Audio Mixer: Use the Audio Mixer to adjust settings while listening to audio tracks and viewing video tracks. Each Audio Mixer track corresponds to a track in the Timeline of the active sequence. You can also use the mixer to add effects, change the volume of relative tracks, or to record audio directly into sequence tracks.
Metadata: Metadata is a set of information that describes the content or properties of a file. Video and audio files automatically include information regarding their file size, format, creation date, and duration; you can include additional information, such as location, director, scene, shot, etc. The metadata panel allows you to edit and view these properties so you can use them to organize and sort your files, or share with other Adobe applications.
Program Monitor: Use the Program Monitor to playback and preview only the clips on the Timeline.
Media Browser: The Media Browser helps you browse and preview files on your hard drive. You can leave the Media Browser open and dock it, just as you would any other panel. The Media Browser gives you quick access to all your assets while you edit.
Info: The Info panel displays information regarding the currently selected item and active sequence.
Effects: The Effects panel is a repository for all the video and audio effects and transitions available in the application. You can place transitions such as Dissolves, Dip to Black, and Page Peels between clips to allow you to transition from one clip to another. You can add effects such as Black and White, Levels, and Balance to individual clips, to change their appearance or audio qualities.
History: The History panel stores a list of the actions you have performed to change the state of your project in the current working session. As an alternative to using Edit > Undo, or the keyboard commands Ctrl + Z (Windows) or Command + Z (MacOS), you can use this panel to jump back to any previous state in the current work session. However, you should note that changes you make to the program that affect panels, windows, or preferences are not stored in the History panel. Also, when you close and reopen Premiere Pro, the History panel is automatically reset and you lose access to the previous states of your project.
Timeline: You perform the majority of your edit work on the Timeline panel, including adding clips, positioning them, and changing their properties. You can also use the Timeline to add effects and transitions to the video and audio clips in your project. Each sequence in the project is a separate, independent Timeline. When multiple Timelines are visible, the panel uses a tabbed display similar to a web browser to separate each.
Audio Master Meters: This panel is a VU (Volume Units) meter. It shows the volume of clips that are on the Timeline. The display in this panel is active only when you preview the video and audio clips on the Timeline.
Understanding the tools
Premiere Pro has eleven different tools that were designed to perform a single specific task useful during the editing process.
|
The tools in Premiere Pro |
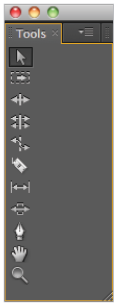
Selection Tool: Use this tool to select clips, menu items, buttons, and other objects found in the user interface. We recommend you configure the Selection tool to be selected by default after using the more specialized editing tools, since most clip and interface interaction requires using the Selection tool.
Track Selection Tool: Use this tool to select all clips to the right of the cursor in a sequence. Click a clip with this tool to select the clip and the ones to the right on a single track. Hold the Shift key and click a clip to select the clip and the ones to the right on every track.
Ripple Edit Tool: You can use the Selection tool to trim the start or end of a clip in the Timeline; however, you might create an empty space between the clips on your Timeline. Use the Ripple Edit tool to trim the In or Out point of a clip, close gaps caused by the edit, and preserve all edits to the left or right of the trimmed clip.
Rolling Edit Tool: Use this tool to simultaneously change the In and Out points of a pair of adjacent clips on the Timeline: the Rolling Edit Tool trims the In point of one clip and the Out point of the other clip, leaving the combined duration of the two clips unchanged.
Rate Stretch Tool: This tool is used to shorten or lengthen a clip in the Timeline. The Rate Stretch tool speeds up or slows down the playback of the clip without trimming the clip, thus leaving the In and Out points of the clip unchanged.
Razor Tool: Use this tool to split clips in the Timeline. Click any point on a clip to split it at that exact location. To split all clips across all tracks at an exact point, press and hold the Shift key while clicking a clip.
Slip Tool: Use the Slip tool to simultaneously change the In and Out points of a clip in a Timeline, while keeping the overall duration of the clip unchanged.
Slide Tool: Use this tool to move a clip to the right or left on the Timeline while trimming any adjacent clips. The combined duration of the clips, and the location of the group in the Timeline, remain unchanged.
Pen Tool: All clips have a set of inherent properties that you can animate using the Effect Controls panel. Select the Pen tool to set or select key frames for clips in the Timeline.
Hand Tool: Use this tool to move the viewing area of a Timeline to the right or left as an alternative to the scroll bar at the base of the Timeline panel.
Zoom Tool: Select this tool to zoom in or out in the Timeline viewing area.
Continue to the next Premiere Pro Tutorial: Customizing the interface in Premiere Pro >