Excel Tutorial: Adding Headers and Footers in Excel
It is common to need to add headers and footers to an Excel file. Headers and footers are text that appear in the top and bottom margins of your worksheets. You can add the current date and time, page numbers, and other specific text to this area. The easiest way to add headers and footers to your worksheet is to switch to Page Layout mode.
- In the Status Bar, click the Page Layout button.
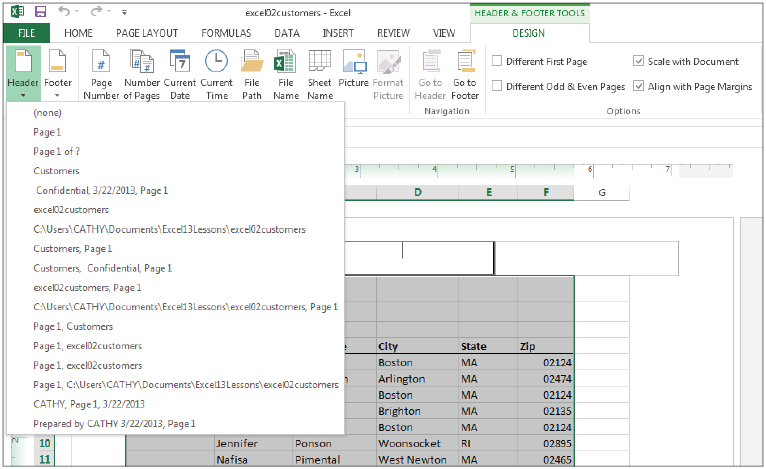
- On your preview page, click the area labeled Click to add header to display the Header & Footer Tools tab.
- From the Design tab, choose Header to display a list of sample headers.

- Add headers and footers directly to your worksheet in Page Layout mode.
- Choose excel02_customers from the displayed list to add the file name to the header. Scroll to the bottom of the Page Layout view and click the area labeled Click to add footer to display the Header & Footer Tools tab
- From the Design tab, choose Footer to display a list of sample footers.
- Choose Page 1 from the displayed list.
- Click the Normal view button from the Status bar.
Changing margins when using Headers and Footers in Excel
Depending on the amount of data you have or the manner in which you want your worksheet printed, you can change the margin settings.
- Choose Margins from the Page Layout tab.
- Choose Narrow from the resulting menu.
Changing the orientation of a sheet in Excel
Many times, you can fit more data on the printed page by switching the Page Orientation from Portrait to Landscape.
- From the Page Layout tab, choose Orientation.
- Choose Landscape.
Printing titles in Excel
If the data in your worksheet spans multiple pages, you can add print titles to your print job so the column or row headings appear on each page of the printout. To indicate Print Titles, select the row or column that contains the headings.
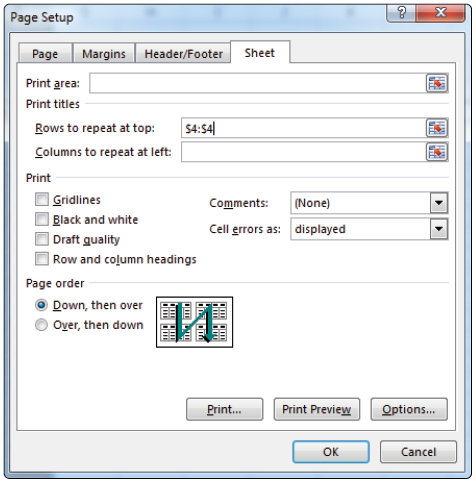
- From the Page Layout tab, choose Print Titles.
- Click Rows to repeat at top to set the insertion point inside the text box.
- Click the row heading for row 4. You will see the range $4:$4 indicated.

- Designate Print Titles in your worksheet so that column headings appear on every page of the printout.
- Click OK.
- From the File tab, choose Print and then click the Print button to print the worksheet.
- To turn off Print Titles, choose Print Titles again and remove the row reference from the Rows to repeat at top box.
Turning grid lines off and on when printing in Excel
Excel automatically turns off the worksheet grid lines when you print. You can, however, elect to include the grid lines in your printout. Follow these steps to turn grid lines off or on in Excel when printing:
- Click the Page Layout tab.
- Select Print in the Gridlines section to have Excel print the gridlines on your paper.
- Select Print again to turn them off in the printouts.
- Choose File > Save to save your work.
Tools for Adding Headers and Footers in Excel | ||
| Tool | Action | Example |
Page Number | Inserts the current page number | Page 1 |
Number of Pages | Inserts the current page out of the total number of pages | Page 1 of 3 |
Current Date | Inserts the current date | 3/20/2013 |
Current Time | Inserts the current time | 2:30 pm |
File Path | Inserts the file name, including the entire path | C:\users\username\document\budget2013 |
File Name | Inserts the file name only | Budget2013 |
Sheet Name | Inserts the name of the current sheet | Expenses |
Picture | Inserts an image | |