Flash tutorial: Adding text to your artwork in Flash
What you’ll learn in this Flash Tutorial:
|
This tutorial provides you with a foundation for working with Adobe Flash text and filters. It is the first lesson in the Adobe Flash Digital Classroom book. For more Adobe Flash training options, visit AGI’s Flash Classes. |
Adobe Flash Tutorial: Adding text to your artwork in Flash
Flash allows you to create and style text to include in your movies, which can also be incorporated into animations or rendered in 3D. In addition, text is one of a few objects in Flash that can have filters applied to enhance its appearance.
In this lesson, you’ll use the Text tool to add and style some cool text inside your fish’s word balloon and alongside the edge of the Stage.
1 Select the Text tool ( ) from the Tools panel.
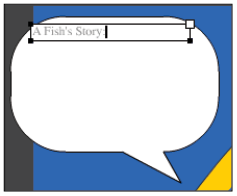
2 Click once and drag within your word balloon to create a new text box that’s slightly smaller than the balloon itself. The box appears with a blinking cursor in the upper-left corner, indicating that you’re ready to type.
3 Type the words A Fish’s Story: within the text box. Click and drag across all the text within the box to select it.
|
Use the Text tool to add some text to your word balloon. |
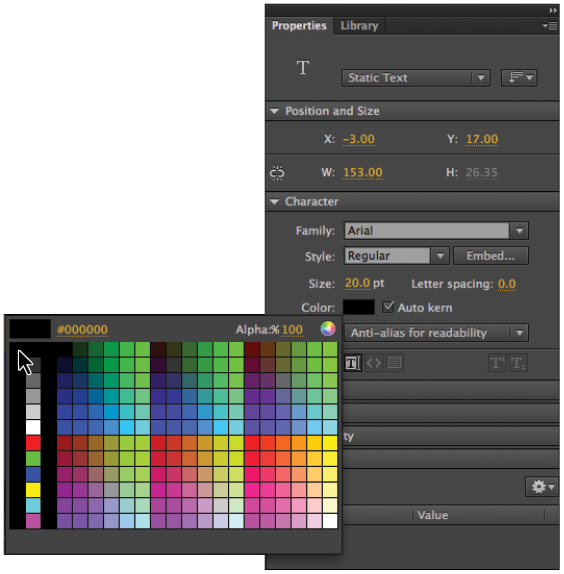
4 In the Property Inspector, locate the Character options, which include options to set Family (font), Color, and Size. Choose Arial (or equivalent) from the Family menu to change the typeface. Move your cursor above the Size value, and drag to set the type size to 24 points. Click the Color swatch and set the type color to black (#000000).
|
Specify typeface, size, and color options for your new text from the Property Inspector. |
5 Press the Escape key twice to exit the current text box and make the Text tool active again. You’ll now add some text along the left side of the Stage for more visual impact.
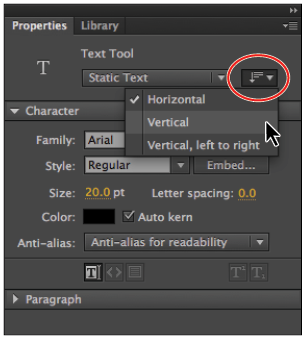
6 At the top of the Property Inspector, locate the Change orientation of text drop-down menu. Click it and select the Vertical option. This will create vertically-oriented text next time you use the Text tool.
|
The Change orientation of text drop-down menu. |
7 Click (but don’t drag) near the left edge of the Stage to create a new text box, and type the words Go Fish! You’ll see that the text now is created vertically alongside the left edge of the Stage.
You’ll notice that you’ve created text on the Stage using two slightly different techniques: Clicking and dragging to create a pre-sized text box, or simply clicking on the Stage to begin a new type path. The former of the two will result in a text box that can take advantage of advanced type options and such as text-flow, multi-column text. The single click approach is a good way to create single lines of text for more basic and aesthetic purposes. |
Adding filters
To enhance the appearance of text, you can add popular live filters such as drop shadows, blurs, glows, and more. Filters can also be applied to other objects in your movie, such as button and movie clip symbols (covered later in this book). For now, you’ll add some basic filters to make your text stand out.
1 Switch to the Selection tool ( ), and click once on your text box in the lower-left corner to select it.
Pressing the V key while editing text simply types a v in the text box; it doesn’t switch to the Selection tool as anticipated. To exit a text box, use the Esc (escape) key, and then press the V key to jump to the Selection tool. |
2 At the bottom of the Property Inspector, locate and expand the Filters section. (Try collapsing the Container and Flow options to give your filter options more space.)
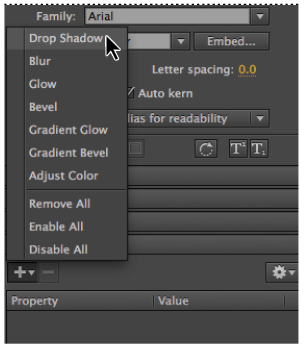
3 In the upper-left corner of the Filters section, press the Add Filter button ( ) to add a new filter. A menu appears, showing you the various filters you can apply to your text. Select the Drop Shadow filter.
|
Apply filters to selected text from the Filters section of the Property Inspector. |
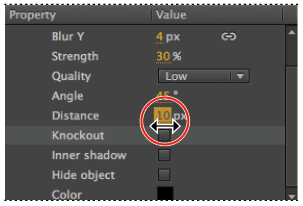
4 Options appear for the new Drop Shadow filter, which you can fine-tune. To start, click and drag the Strength value to reduce the strength (opacity) to 30 percent.
5 Click and drag the Distance value to increase the distance to 10 pixels. Under the Quality setting, select High.
|
Set specific options for your filter, including color, strength, and distance. |
6 Choose File > Save to save your file.
Continue to the next Flash Tutorial: Working with Colors in Flash >