Tracing images in Illustrator CC
Learn two options for how to trace images in Illustrator
|
This tutorial provides you with a foundation for working with Adobe Illustrator to trace images. It is the first lesson in the Adobe Illustrator CC Digital Classroom book. For more Adobe Illustrator training options, visit AGI’s Illustrator Classes. |
How to trace images in Illustrator CC
Illustrator is often used to convert artwork that has been scanned or rendered in a pixel-based painting program, like Adobe Photoshop, into crisp vector line art. There are two ways to trace images in Illustrator CC. You can manually trace them using template layers and drawing tools or you can use the Image Trace feature, discussed in further detail later in this section, that automatically converts a bitmap image into a vector graphic.
In the first part of the exercise, you will place a scanned image as a template and retrace it using the skills you just learned with the Pen tool. In the second part of the exercise, you will learn how to use the Image Trace feature, equipped with built-in presets and custom settings, to convert a bitmap image into a vector graphic.
Trace Imges in Illustrator by placing an image as a template
1 Create a new Illustrator document by choosing File > New. In the New Document dialog box, type ai0502_work into the File name text field. Choose Print from the Profile drop-down menu. Choose Letter from the Size drop-down menu, if it is not already selected. Click OK.
2 Select File > Save. Make sure that you are in the ai03lessons folder, and keep the type Adobe Illustrator. When the Illustrator Options dialog box appears, click OK.
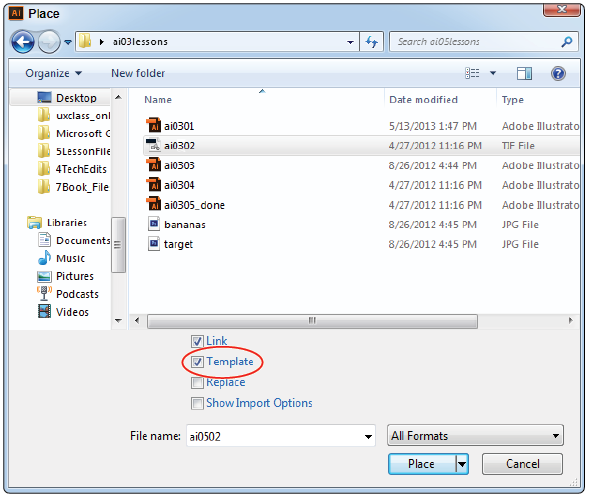
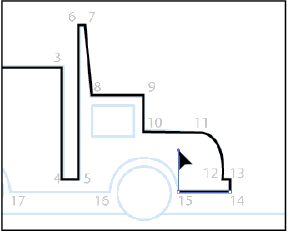
3 Choose File > Place. In the Place dialog box, navigate to the ai03lessons folder and select the ai0502.tif file. Select the Template check box at the bottom of the Place dialog box to import the selected artwork as a template layer. Click Place. A faint outline of a truck appears in your document.
|
Turn your artwork into a template before placing it in on the artboard. |
4 Select the Move tool ( ), and then click anywhere on the artboard to deselect the truck artwork.
5 In the Control panel, choose None ( ) from the Fill Color drop-down menu and choose the color black from the Stroke Color drop-down menu, if it isn’t already selected. Choose 2 pt from the Stroke Weight drop-down menu.
|
Set the attributes for the vector stroke. |
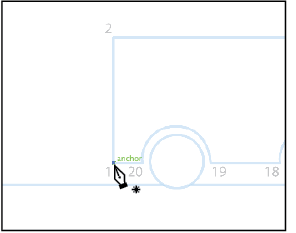
6 Select the Pen tool ( ) from the Tools panel. Position the cursor near label 1, then click and release to create the first anchor point of the path along the tracing template for the truck. If necessary, increase the magnification to see the template more clearly.
|
Create the first anchor point of the truck. |
7 Press and hold the Shift key and click along the truck outline near label 2. Because you held down the Shift key, Illustrator creates a straight 90° line to the second anchor point.
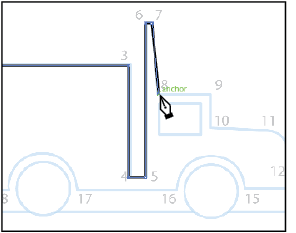
8 Press and hold the Shift key, and click at label 3 to continue tracing the truck’s outline.
9 Continue to hold down the Shift key, and click along the truck body at labels 4, 5, 6, and 7.
10 The line between labels 7 and 8 is diagonal, and not on a 45° or 90° angle, so release the Shift key and click at label 8.
|
Continue outlining the truck. |
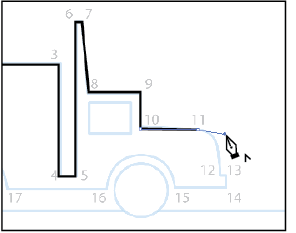
11 Again, press and hold the Shift key, and click at labels 9 and 10.
12 Release the Shift key on the keyboard and click at label 11. Up to this point, the exercise has dealt entirely with creating straight lines and corner points; for the line between labels 11 and 12, you need to create a curved line.
Because the point created at label 11 is a corner point, the Pen tool automatically will default to creating a straight line between this anchor and the next anchor point. You will change this behavior by converting the anchor point from a corner to a curved anchor point.
13 Hover the Pen tool over the anchor point created at label 11, and look for the Convert Anchor Point symbol ( ) to appear next to the tool. Click and drag with the tool in the direction of the curve to create a new direction handle.
|
As you drag to create the directional handle, the cursor |
14 Click with the Pen tool at label 12 to create a smooth point and complete the line.
15 Hold the Shift key on the keyboard, and click labels 13, 14, then 15.
16 The half circle between labels 15 and 16 presents the same challenge that you faced previously. Again, hover the Pen tool over the anchor point you just created. While holding the Shift key, click and drag upward to create a constrained directional handle.
|
Move the direction handle up to start another curve. |
17 At label 16, click and drag the cursor down to create a new smooth point and continue the line.
18 Position the cursor over the anchor point that you just created at label 16, and click on it when you see the Convert Anchor Point symbol ( ) appear next to the Pen tool. Hold down the Shift key and click at label 17 to convert the curve point to a corner point.
19 Repeat the process, explained in step 18, until you reach the anchor point numbered 20. After you have collapsed the anchor point at label 20, position your cursor over label 1. A circle appears next to the Pen tool ( ), indicating that this action will close the path you have just drawn. Click on the anchor point to complete the line and close the path.
20 Choose File > Save, then choose File > Close.
Trace an image in Adobe Illustrator by placing an image using Image Trace
A second option for tracking an image in Illustrator is by using the Image Trace feature. Illustrator CC provides an Image Trace feature that converts raster images into editable vectors. Using the Image Trace feature, you choose from a number of presets to help you create the best conversion and achieve the results that you want.
When you place a bitmap image in your document, you can access Image Trace in two ways: using the default presets located in the Control panel or using the Image Trace panel.
|
A. Auto-Color. B. High Color C. Low Color. |
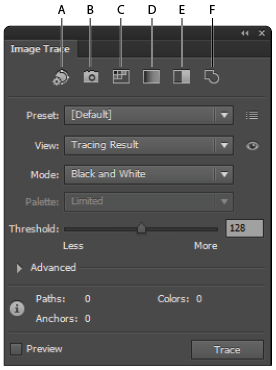
Along the top of the Image Trace panel are six preset buttons: Auto-Color, High Color, Low Color, Grayscale, Black and White, and Outline. Simply select your image and choose one of the default presets. The preset you choose will preview live on the artboard.
To customize the results, you may want to fine-tune the trace, which can be done manually using the options in the Image Trace panel. You can control the number of colors used, path and corner appearances, complexity of the tracing, and more.
Image Trace Options
Preset: Specifies 11 types of tracing presets.
View: Specifies the view of the traced object. You can choose to view the tracing result, source image, outlines, and other options.
Mode: Specifies if the tracing result will be in color, grayscale or black-and-white.
Palette: Specifies the palette used to determine the number of colors in the tracing result. To let Illustrator determine the colors, select Automatic (this option is available only when the Mode is set to Color).
Color settings: Depending on what is selected for the Mode and Palette options, the following color settings are displayed:
Colors: The number of colors used in the tracing result (this option is available only when Mode is set to Color).
Grays: The number of grays used in the tracing result (this option is available only when Mode is set to Grayscale).
Threshold: Value for generating a black-and-white tracing result from the original image (this option is available only when Mode is set to Black and White).
Paths: Controls the distance between the traced path shape and the original path shape. The lower the value, the tighter the path fits; the higher the value, the looser the path fits.
Corners: Specifies the corner appearance. A higher value results in more corners.
Noise: Determines the pixel area that is ignored while tracing.
Method: Specifies a method for tracing:
Abutting — This option creates paths that are cutout.
Overlapping — This option creates paths that are stacked.
Fills: Creates filled regions in the tracing result.
Strokes: Creates stroked paths in the tracing result.
Snap Curves To Lines: Determines if curved lines are to be replaced with straight lines.
Ignore White: Specifies if White filled areas are to be replaced with no fills.
1 Choose File > Open. In the Open dialog box, select the ai0503.ai file and click Open. This Illustrator file consists of two images already placed for you on separate layers for this exercise. You will only see one image, the bananas, as the Target layer’s visibility is turned off at this time.
2 Choose File > Save As. In the Save As dialog box, make sure that you are in the ai03lessons folder and name the file ai0503_work.ai, then click Save. When the Illustrator Options dialog box appears, click OK.
3 You will first work with a picture of bananas, converting it from a bitmap image to a vector image. Select the Zoom tool ( ) in the Tools panel and click once on the center of the page to enlarge the view so you can see the tracing results better.
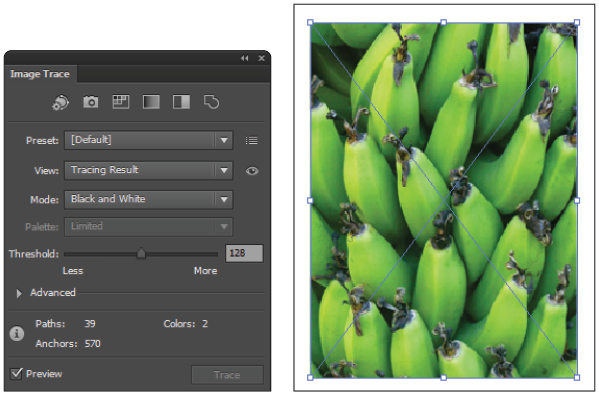
4 Using the Selection tool ( ), click on the picture, then choose Window > Image Trace. The Image Trace panel appears. Position the panel to the side of your image so you can view both the panel and image at the same time.
|
Click on the picture and open the Image Trace panel. |
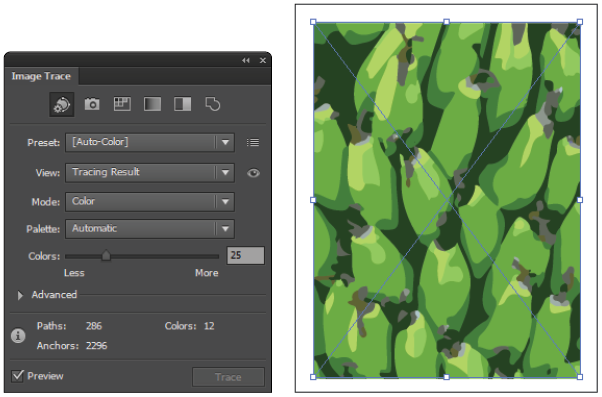
5 On the top of the panel are six preset options. Click on the Auto-Color button. The Auto-Color preset previews live on the artboard.
|
Click the Auto-Color preset and preview the results on the artboard. |
6 The default preset gets you started, but you may want to fine-tune the tracing results before expanding the final image. If you do not see the Advanced options, click the arrow to the left of Advanced in the Image Trace panel to expand the advanced options.
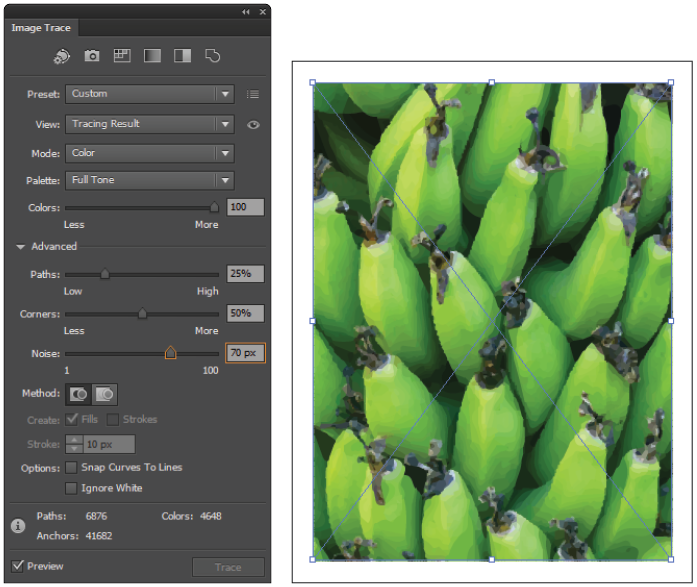
7 From the Palette drop-down menu, select Full Tone. In the Advanced option section, type 25% in the Paths, 50% in the Corners and 70 px in the Noise text fields, then press Enter (Windows) or Return (Mac OS). As you can see, these small adjustments produce a much better rendering of the original bitmap image.
|
Make some custom adjustments to enhance the image tracing results. |
 | To view your original image, click and hold the visibility icon located to the right of the View drop-down menu. Let go of the mouse button to turn off the preview and continue making adjustments. |
8 Once you are satisfied with the results, you can save your own preset to use again on other images. Click on the Preset panel menu and select Save as New Preset. In the Save Image Trace Preset dialog box, type Full Tone Image then click OK.
|
Save your own custom preset. |
9 In the Control panel, click the Expand button to finalize the trace and expand your image into a fully editable vector image. Try using the Selection and Direct Selection tools to experiment with the results.
|
Click Expand in the Control panel to complete the vector trace. |
10 Choose File > Save. Leave the file open for the next exercise.
Working with the new Image Trace Method option
One of the new features worth experimenting with in the Image Trace panel is the Method option. There are 2 methods to choose from:
- Abutting — This option creates cutout paths.
- Overlapping — This option creates stacked paths.
To understand the difference between these two methods, perform the following steps:
1 If the Layers panel is not visible, choose Windows > Layers or click the Layers button ( ) in the dock on the right side of the workspace. In the Layers panel, click the visibility icon ( ) to the left of the Bananas layer to hide it, then click the visibility icon to the left of the Target layer to show it.
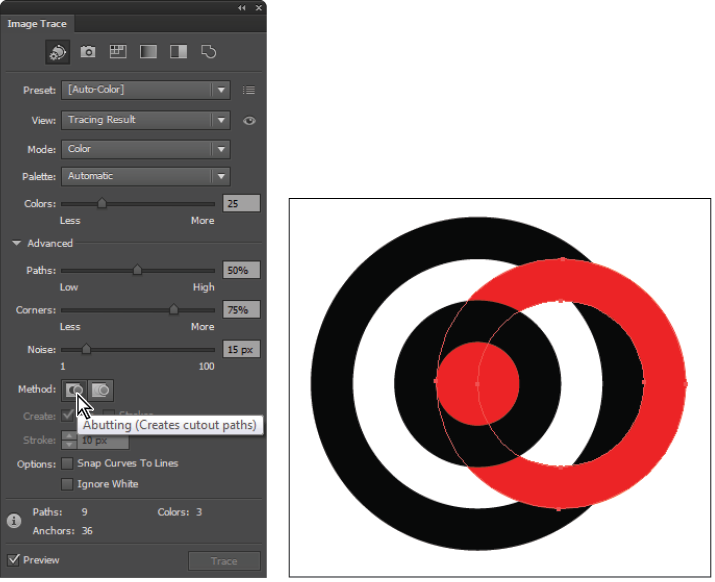
2 If the Image Trace panel is not visible, choose Windows > Image Trace. Using the Selection tool ( ), click on the picture of the target to select it. In the Method section in the Image Trace panel, click on the Abutting option. At the top of the panel, click on the Auto-Color preset button ( ), then click on the Expand button in the Control panel.
3 Click anywhere on the artboard to deselect the image. Select the Direct Selection tool ( ) from the Tools panel, then click and drag the outer red circle on the target slightly to the right. You will notice that by choosing the Abutting option, the paths are cut out in sections that you can move and edit easily.
|
Choose the Abutting method in the The results. |
4 Now let’s try the Overlapping method to see the difference. Choose Edit > Undo Move to reposition the red circle back into place, then choose Edit > Undo Expand Tracing to undo the tracing of the image and bring it back into its original bitmap state.
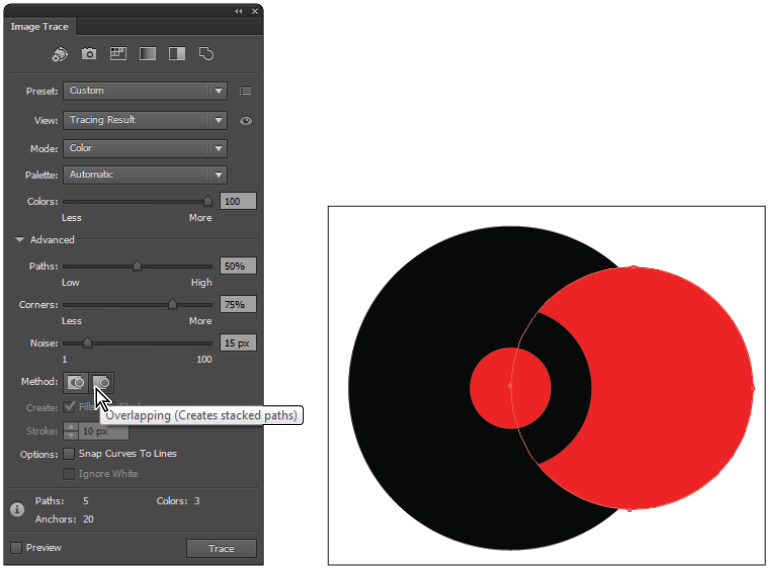
5 With the target still selected, click on the Auto-Color preset button ( ) in the Image Trace panel, then select the Overlapping button for the Method. Click on the Expand button in the Control panel.
6 Click anywhere on the artboard to deselect the image. Select the Direct Selection tool ( ) from the Tools panel, then click and drag the outer red circle on the target slightly to the right. By choosing the Overlapping method, the paths stack on top of each other.
|
Choose the Overlapping method in the The results. |
7 Choose File > Save, then File > Close.
There are many options to explore within the new Image Trace panel. Try placing your own bitmap image and experimenting with the various tracing results.
Both of these options can provide you with a traced image using Adobe Illustrator.
Other drawing tools
While the Pen tool is definitely the most versatile drawing tool in the application, there are several other drawing tools that exist to fulfill specific functions.
Continue to the next Illustrator Tutorial: Using the Line Segment and Arc tools in Illustrator >
