Illustrator tutorial: Working with the Drawing Tools in Illustrator
What you’ll learn in this Illustrator Tutorial:
|
This tutorial provides you with a foundation for working with Adobe Illustrator panels. It is the first lesson in the Adobe Illustrator CC Digital Classroom book. For more Adobe Illustrator training options, visit AGI’s Illustrator Classes. |
Adobe Illustrator Tutorial: Working with
the Drawing Tools in Illustrator
Adobe Illustrator includes a number of impressive drawing tools
that allow you to create a wide variety of artwork with speed
and precision.
Starting up
Before starting, make sure that your tools and panels are consistent by resetting your workspace. See “Resetting Adobe Illustrator CC Preferences” in the Starting up section of this book.
You will work with several files from the ai03lessons folder in this lesson. Make sure that you have loaded the CClessons folder onto your hard drive from the included DVD. See “Loading lesson files” in the Starting up section of this book.
Working with the Pen tool
The Pen tool is one of the most powerful tools in Illustrator and it allows you to create any line or shape that you need. The Pen tool creates anchor points that can be rounded, smooth, sharp, or angular. Using the Pen tool, you can create any line or shape that you can conceive. Using the Pen tool and mastering line construction is all about understanding the nature of anchor points and how to create and work with them.
 | There are two kinds of anchor points that you can create in Illustrator: corner points and smooth points. Corner points are usually seen on linear, hard-edged shapes such as polygons and squares, while smooth points are used to construct sinuous, curved lines. There are two mouse actions that are repeated over and over again when creating anchor points: click and release, which creates corner points; and click and drag, which creates smooth points. |
The Pen tool has a versatile feature that allows you to create new anchor points, add anchor points to existing paths, and remove anchor points from existing paths. The tool’s appearance changes based on what your cursor is hovering over on the artboard. Pay attention to what the tool cursor looks like, as it will assist you in using all the Pen tool’s functions.
Pen tool variation | Description |
| Only appears as you are in the process of creating a line; it signals that the next anchor point created will continue that line. |
| Indicates that the Pen tool will create a new line. |
| Indicates that the Pen tool can be used to convert the anchor point it is currently hovering over. This icon only appears when the Pen tool is hovering over the last anchor point that was created in a selected path. |
| Indicates that the Pen tool will pick up a path and continue from the end point you are hovering over. This icon only appears next to the Pen tool when it is hovering over the endpoint of a path that you are not currently creating. |
| Indicates that the Pen tool will connect the path that is currently being created to the end point of a different path. |
| Indicates that the Pen tool will close the path that you are currently creating. |
| Indicates that the Pen tool will remove the anchor point that it is currently hovering over. This icon only appears when the Pen tool is hovering over an anchor point on a selected path. |
| Indicates that the Pen tool will add an anchor point to the line segment that it is currently hovering over. This icon only appears when the Pen tool is hovering over a line segment on a selected path. |


Drawing straight lines
The first Pen tool skill you need to master is creating a straight line. To do this, you make corner anchor points with the Pen tool. Straight lines are automatically generated as a result.
1 In Illustrator, choose File > Open. When the Open dialog box appears, navigate to the ai03lessons folder and select the ai0501.ai file. Click OK. This is a practice file containing several different line templates that you will work through in the following exercises.
2 Choose File > Save As. In the Save As dialog box, navigate to the ai03lessons folder and type ai0501_work.ai into the File name text field; then click Save. In the Illustrator Options dialog box, click OK to accept the default settings.
3 In the Control panel at the top of the workspace, select None ( ) from the Fill color drop-down menu. If necessary, select the color black from the Stroke color drop-down menu and select 2 pt from the Stroke Weight drop-down menu.
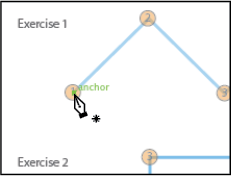
4 Select the Pen tool ( ) from the Tools panel and locate the template labeled Exercise 1 on the artboard. Click and release your left mouse button while hovering over label 1. This starts the line by creating the first anchor point.
|
Use the Pen tool to create the first anchor point. |
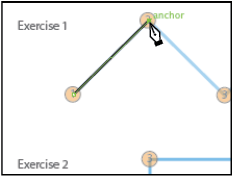
5 Move your cursor to the part of the line labeled 2, and click and release your mouse. The second point of the line is created. The Pen tool automatically draws a straight line between the two points.
|
Click to create the second anchor point. |
6 Continue to click and release to complete the line through labels 3, 4, 5, 6, and 7. Notice how the Pen tool automatically continues the line to include each new anchor point.
7 After you have set a final anchor point at label 7, press and hold Ctrl (Windows) or Command (Mac OS) and click on any empty area of the page. This deselects and ends the line. If you don’t deselect and end the line, the Pen tool continues to link the path to the next anchor that you create.
8 Position the cursor over label 1 of Exercise 2. Click and release the left mouse button to create the first anchor point of the new line.
9 Position the cursor over label 2. Hold down the Shift key, then click and release to create the second point of the line; the Pen tool automatically connects the two points with a straight line. Because you were holding the Shift key when the second point was created, Illustrator automatically draws a perfectly horizontal line.
10 Position the cursor over label 3. Again hold the Shift key and click and release the left mouse button to set a third anchor point. This time, the line created is a perfect vertical line.
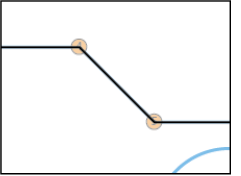
11 Continue holding down the Shift key while clicking at labels 4, 5, and 6. Doing this draws the line between points 4 and 5 at a perfect 135-degree angle, as the Shift key constrains the angle to 45-degree increments.
|
Pressing Shift while clicking allows you to create |
12 With a final anchor point at label 6, hold down the Ctrl key (Windows) or Command key (Mac OS) and click on the artboard to deselect and end the line.
13 Choose File > Save to save your work.
Drawing curved lines
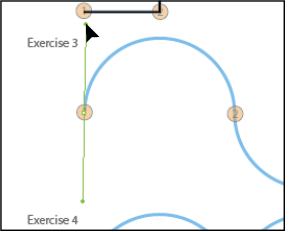
Straight lines can only take you so far; more organic and complex compositions require you to use curved lines to render objects. You will now complete Exercise 3.
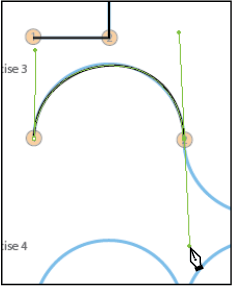
1 Position your cursor over label 1 at the beginning of the curved line. Click and, without releasing the mouse, drag your cursor up slightly above the hump of the line to create your first anchor point. As you drag your cursor up, it looks like you are dragging a line away from the point. You are, in fact, creating a direction handle for the anchor point.
|
Dragging while clicking with the Pen tool allows |
3 Choose the Selection tool ( ), and click and drag the top-center anchor of the bounding box upward, to stretch the triangle.
4 Elongate the triangle more by clicking on the lower-right corner of the bounding box, pulling down, and dragging the anchor to the left.
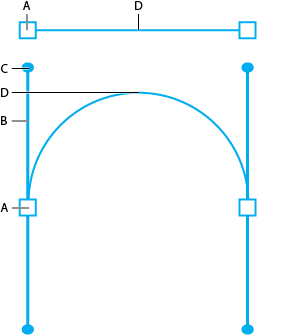
What are direction handles?
When you select or create a smooth point, you can see the direction handles of that point. Direction handles control the angle and length of curves. Direction handles comprise two parts: direction lines and the direction points at the ends of the lines. An anchor point can have zero, one, or two direction handles, depending on the kind of point it is. Direction handles serve as a kind of road map for the line, controlling how the lines approach and leave each anchor point. If the exiting handle is downward-facing, the line leaves the anchor point and goes down. Similarly, the line faces upward if the direction handle is pointing upward.
|
A. Anchor point. B. Direction Line. |
2 Place your cursor over label 2, located at the end of the first curve in Exercise 3. Click and drag straight down to create the second anchor point. Continue to drag the mouse until you form the curve in the template. As you drag your cursor down, you will notice that a curve is being formed between the two anchor points in real time. As long as you do not release the mouse button, you can reshape this line by dragging the mouse in different directions.
If you need to modify any of the previous points, choose Edit > Undo or use the keyboard shortcut, Ctrl+Z (Windows) or Command+Z (Mac OS). Do not worry if the curves do not follow the template perfectly, they can be adjusted later.
|
Dragging while creating the second anchor |
3 Place your cursor over label 3, located at the end of the second curve. Click and drag up to create the third anchor point of the line. Continue to drag the mouse until you form the curve displayed in the template. Again, as long as you do not release the mouse, you can reshape this path by changing the mouse direction.
4 Place your cursor over label 4, located at the end of the second curve. As in step 3, click and drag down to create the fourth and final anchor point of the line. Continue to drag the mouse until you form the curve displayed in the template.
5 As in the previous exercise, after you have created your final anchor point at label 4, hold down Ctrl (Windows) or Command (Mac OS) and click on the artboard to deactivate the path.
6 If necessary, use the Direct Select tool ( ) to reposition the handles and points so the curves follow the path more closely, then choose File > Save to save your work.
Drawing hinged curves
In the previous exercise, you created S-curves, lines curved in the opposite direction from the previous one. In this exercise, you will create hinged curves, lines that curve in the same direction; in this case, they will all curve up like a scallop. You will now complete Exercise 4.
1 Select the Pen tool ( ) from the Tools panel and position your cursor over label 1 at the beginning of the curved line in Exercise 4. As you did in the previous exercise, click and drag your cursor up slightly above the arch to create your first anchor point.
2 Place your cursor over label 2, located at the end of the first curve. Click and drag straight down to create the second anchor point. Continue to drag the mouse until you form the curve in the template.
3 Press and hold the Alt (Windows) or Option (Mac OS) key on the keyboard. This temporarily changes the Pen tool into the Convert Anchor Point tool ( ), which is also a separate tool in the Pen tool grouping. Among other things (covered later in this lesson), this tool is used to edit direction handles. Position the Convert Anchor Point tool over the direction handle for the exiting direction line, and click and drag this point so that it points upward. The two direction lines now form a V.
|
Move the direction handle to change the direction of the next path. |
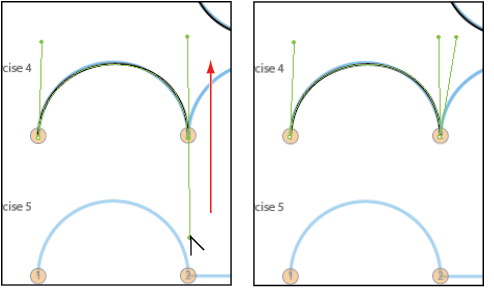
| Direction handles control the curvature of the lines in a path. Because the exiting direction handle created in step 3 is pointing down, the line will want to go down. To draw the hinged curve, you must change the angle of this direction handle so that it points upward. |
4 Place your cursor over label 3, located at the end of the second curve. Click and drag straight down to create the third anchor point. Continue to drag the mouse until you form the curve in the template.
5 Again, press and hold Alt (Windows) or Option (Mac OS) to temporarily switch the Pen tool to the Convert Anchor Point tool. Once again, position the Convert Anchor Point tool over the direction handle for the exiting direction line, and click and drag this point so that it points upward and the direction lines form a V.
6 Repeat step 4 for the final curve at label 4. After you have created this final anchor point, hold down the Ctrl (Windows) or Command (Mac OS) key and click on the artboard to deactivate the path.
7 Choose File > Save to save your work.
Drawing curved lines to straight lines
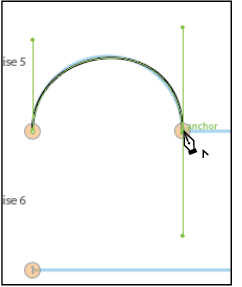
The following two exercises cover how to draw straight and curved lines together as part of the same path. You will now complete Exercise 5.
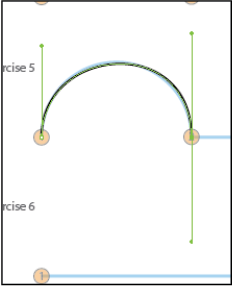
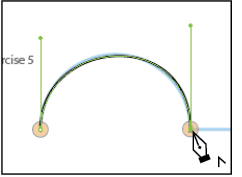
1 Position your cursor over label 1 at the beginning of the curved line in Exercise 5. Hold the Shift key, and click and drag your cursor up slightly above the arch to create your first anchor point. As you drag your cursor upward, your movement is constrained to a perfectly vertical line. Release the mouse before releasing the Shift key.
2 Place your cursor over label 2, located at the end of the first curve. Again, while holding the Shift key, click and drag straight down to create the second anchor point. Continue to drag the mouse until you form the curve in the template.
|
Create another curved path. |
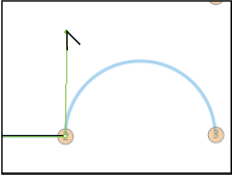
| Direction handles control the curvature of the lines in a path. Because the exiting direction handle created in step 2 is pointing down, the line will want to go down. If you drag the direction point so that the line points up as in the previous exercise, it will want to curve up. To form a straight line, however, you want to remove this direction handle entirely, thus converting the anchor point into a corner point. |
3 Position your cursor over the anchor point you created in step 2. The Pen tool cursor changes, giving you the ability to convert the anchor point you just created.
|
The Pen tool cursor changes, allowing |
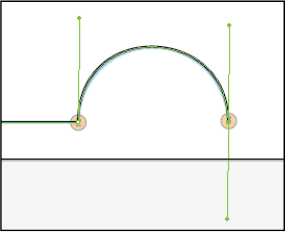
4 While hovering over the anchor point, click the mouse. This collapses the anchor’s outgoing direction handle, allowing you to create a straight line.
|
Collapse the direction handle. |
5 Place the cursor over label 3. Hold the Shift key on the keyboard, and click at label 3 to create a straight line to finish the path.
6 After you have created your final anchor point at label 3, hold down Ctrl (Windows) or Command (Mac OS) and click on the artboard to deselect and end the line.
7 Choose File > Save to save your work.
Drawing straight lines to curved lines
Now, you will work from the opposite direction and connect straight lines to curved lines. Practice with Exercise 6.
1 Locate the template labeled Exercise 6. Hold the Pen tool over the start of the line (labeled 1). The cursor changes ( ), indicating that you will start a new line. Click and release your left mouse button while hovering over label 1. This starts the line by creating the first anchor point.
2 Place the cursor over label 2. Hold the Shift key and click at label 2 to create a perfectly straight line between points 1 and 2 on the path.
3 Position your cursor over the anchor point you created in step 2. The Pen tool cursor changes ( ), indicating that you can change the direction of the direction handle.
4 While hovering over the anchor point, click and drag upward in the direction of the curve you want to draw. This creates a new direction handle.
|
Change the direction of the direction handle. |
5 Position the Pen tool over label 3. Click and drag down to create the curve displayed in the template.
|
Finish the path by creating a curve. |
6 After you have created your final anchor point at label 3, hold down the Ctrl (Windows) or Command (Mac OS) key and click on the artboard to deselect and end the line.
7 Choose File > Save, then choose File > Close.
Continue to the next Illustrator Tutorial: Tracing images in Illustrator CC >