InDesign tutorial: Working with Graphics in InDesign
What you’ll learn in this InDesign Tutorial:
|
This tutorial provides you with a foundation for working with Adobe InDesign panels. It is the first lesson in the Adobe InDesign CC Digital Classroom book. For more Adobe InDesign training options, visit AGI’s InDesign Classes. |
Adobe InDesign Tutorial: Working with graphics in InDesign
Graphics are an integral part of page design, and InDesign puts you in control of cropping, sizing, borders, and effects, thus controlling the appearance of images in your layout. You can place a wide variety of graphic types into your layouts, including PDF, TIFF, JPEG, and EPS. You can also place native Creative Suite files such as Photoshop (.psd), Illustrator (.ai), and even other InDesign (.indd) documents into your InDesign layout as graphics.
Placing graphics
Like text, graphics are also placed inside a frame when you import them into your layout. You can create the frame first, and then import the image or you can create the frame at the same time you import the image, depending upon how you prefer to design your documents.
1 Double-click page 4 in the Pages panel to display page 4 of the document, then choose Edit > Deselect All so that no objects are selected. If Deselect All is not available in the Edit menu, it means that no objects are selected.
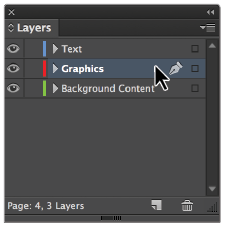
2 Click the Layers button in the panel docking area along the right side of the workspace to display the Layers panel, and then click the Graphics layer to make it active. Selecting this layer before placing a new image into the layout causes the image to be placed on this layer. You can put content on any layer, and create layers to help organize content in your InDesign documents.
|
Use layers to organize content in |
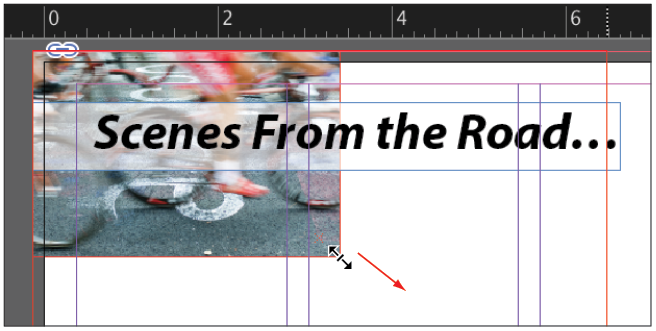
3 Choose File > Place. In the Place dialog box, navigate to the Links folder within the id01lessons folder and select the file cyclist.psd; then click Open. Because no frame has been selected, InDesign changes the cursor to represent that an image is ready to be placed in the document.
4 Move the cursor to the upper-left corner of the workspace where the red bleed guides intersect, outside of the page area. Click once to place the image at its full size.
5 If the upper-left corner of the image is not correctly positioned at the intersection of the bleed guides, use the Selection tool ( ) to click and drag the image to the correct position. Next you will resize the image to cover the top half of the layout and extend (bleed) off the edges of the layout.
6 To scale the image and also the frame in which it is contained, press and hold Shift+Ctrl (Windows) or Shift+Command (Mac OS). While continuing to press and hold these keys on your keyboard, use your mouse to click and hold the handle located in the lower-right corner of the picture frame, dragging it down and to the right until the image extends off the page. Align the right edge with the bleed guide lines located just outside the page area. Note that using the keyboard commands while scaling the image caused both the frame and image to scale proportionately.
|
Scaling the image and the frame proportionately. |
 | Depending upon the resolution of the original image, it is possible to scale the image too much and cause the image to become pixelated or bitmapped. If this occurs, the image will appear unclear when printed or converted to PDF. Most images can be scaled up to 20% without affecting their quality, but it is best to test the image in its final intended format by printing or creating a digital document such as PDF, depending upon your final destination. For more information about image quality and resolution, see the Adobe Photoshop CC Digital Classroom book, which is available in print or digital format. |
7 Next you will crop the image by reducing the height of the frame, keeping the image the same size, but reducing the parts of it that will be visible. Locate the center handle along the bottom edge of the picture frame. Click and drag up on this handle until the bottom edge of the frame snaps to the guide located horizontally along the middle of the page. The image remains the same size, but the bottom is cropped and will not print or display when converted to a digital document.
| Moving the handles of a frame using the Selection tool changes the size of the frame and adjusts how much of the image is displayed. If you move the handles while pressing and holding the Shift+Ctrl (Windows) or Shift+Command (Mac OS) modifier keys on the keyboard, you can scale the image and content together. |
Positioning graphics within a frame
You might need to crop or scale images that are placed in your layout. Here you will explore tools that help you position and scale the graphics in your documents.
1 Navigate to page 1 by using the page drop-down menu located in the lower-left corner of the document window, or by double-clicking Page 1 in the Pages panel.
2 To focus on the graphics, you’ll hide the Text layer. In the panel docking area along the right side of the workspace, click the Layers button to open the Layers panel, and then click the Visibility icon ( ) to hide the contents of the text layer.
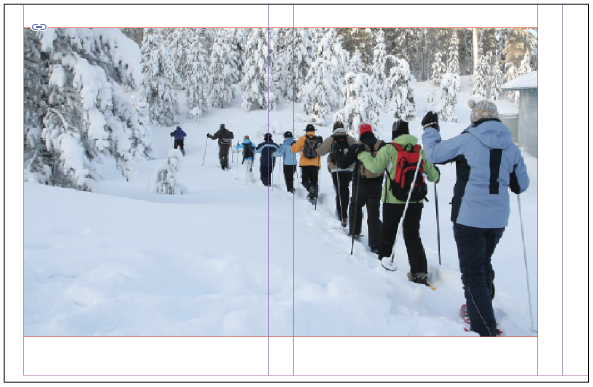
3 In the Tools panel, choose the Selection tool (), then click to select the graphic frame located in the bottom-left corner of page 1. The frame spans the left and center columns. Because the graphic frame is empty, an X is displayed inside the frame.
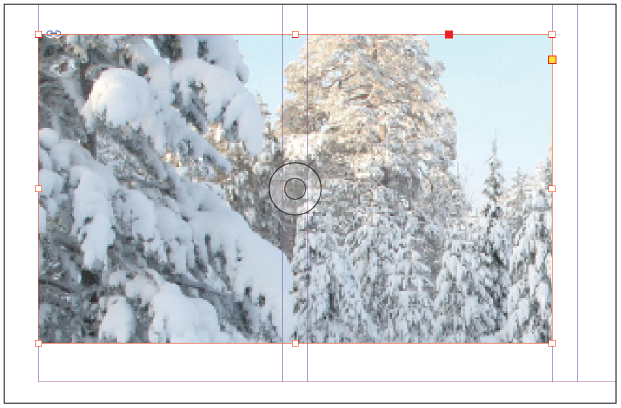
4 Choose File > Place. In the Place dialog box, navigate to the Links folder within the id01lessons folder and select the snowshoe.psd image. Confirm that Show Import Options is not selected, then click Open. The image is placed inside the selected frame at its original size (100 percent), and is larger than the frame. Next you will resize the image so it fits within the frame.
5 Position your cursor over the center of the snowshoe image but do not click. A semi-transparent circle appears in the center of the photo. This is the Content Grabber. Click the Content Grabber to select the photo within the frame. The edges of the image are displayed with a light-blue border, showing the size of the graphic. The color of the border varies when you use multiple layers in your documents. You’ll now reposition the document so you can see the entire size of the image.
|
The Content Grabber makes it easy to adjust a graphic within a frame without having to choose a |
6 If you can see the complete border of the image, you can skip to step 7. Otherwise, press and hold the spacebar on your keyboard to temporarily access the Hand tool ( ). Click and hold the document. The page magnification changes and a red frame appears when using the Hand tool. Reposition the red frame so the entire border of the image is visible, and then release the mouse. The zoom returns to its original level, focused on the portion of the page you identified. Release the spacebar. If necessary, use the magnification levels located in the Application bar to reduce the magnification in order to see the entire bounds of the graphic.
|
Press and hold the spacebar on your keyboard to access the |
7 With the content of the frame, the snowshoe image, still selected, press and hold the Shift key on your keyboard. Click the handle in the bottom-right corner of the image and drag the handle up and to the left, reducing the size of the image until its width is slightly larger than the width of the frame, then release the mouse button. Here you scaled the content of the image without modifying the frame. Pressing the Shift key maintained the proportions of the image while it was scaled.
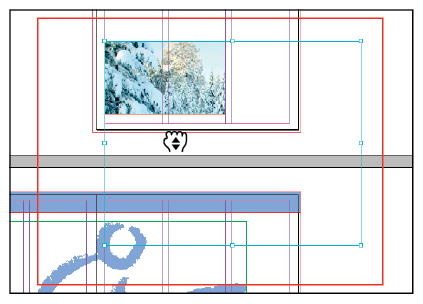
8 Move the cursor to the middle of the picture frame; notice that the cursor changes to a hand. While the cursor is a Hand icon ( ), click and drag to reposition the graphic within the frame so that the person in the light blue jacket is located along the right side of the picture frame.
| Clicking the Content Grabber selects the graphic inside the frame. The Hand icon indicates you can reposition the graphic. While the icon is identical to the Hand tool, it is used only to reposition graphics within a frame, while the Hand tool is accessed from the Tools panel and is used for adjusting the display within the document window. |
|
The cropped image should appear similar to this figure. |
9 To edit the frame instead of the content of the frame, double-click anywhere on the graphic. The frame becomes selected again.
10 Using your keyboard, press Ctrl+0 (Windows) or Command+0 (Mac OS) to fit page 1 within the document window.
11 If the Layers panel isn’t already open, click the Layers button, then click the Visibility icon ( ) in the Text layer so that objects on this layer are once again displayed.
12 Choose File > Save to save your work. Keep the document open for the next part of this lesson.
Applying text wrap
You can control the position of text relative to graphics and other objects. In some cases, you might want text to be placed on top of an image; in other cases, you might want text to wrap around the shape of an image or object. You’ll continue to work on the first page of the brochure, applying text wrap to an image.
1 Using the Selection tool (), click to select the snowshoe image at the bottom of the page. Click between the two columns of text, but be careful not to click the Content Grabber at the center of the image, since you will manipulate the frame attributes in this exercise, and not work with the content. Next you’ll enable text wrap on the image to force the text away from the image.
| If you have trouble selecting the image, press the Ctrl (Windows) or Command (Mac OS) key and then click again on the image to select it. This enables you to select an object beneath another object in a layout. In this case, the image is positioned below the text frames, so the key command makes it easier to select. |
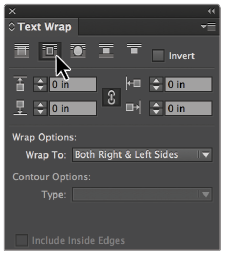
2 Choose Window > Text Wrap to open the Text Wrap panel.
3 Click the Wrap Around Bounding Box button ( ) at the top of the Text Wrap panel to apply the text wrap to the selected image. The text wrap forces the text to flow into the second column, making all the text visible.
|
The Wrap Around Bounding Box |
Continue to the next InDesign Tutorial: Understanding layers in InDesign >