Photoshop Elements Tutorial: Creating Web and Video Graphics in Photoshop Elements
What you’ll learn in this Photoshop Elements Tutorial:
- Preparing images for the Web
- Saving files for the Web
This tutorial provides you with a foundation for working with web images in Adobe Photoshop Elements. It is the thirteenth lesson in the Adobe Photoshop Elements 10 Digital Classroom book.
Photoshop Elements Tutorial: Creating Web and Video Graphics in Photoshop Elements
Starting up
Within the Photoshop Elements Organizer: You will work with several files from the Lessons folder in this lesson. Make sure that you have downloaded the Lessons folder onto your hard–drive. In order to access these files in the Organizer, you need to import them. See “Adding files and folders to the Organizer” located in Lesson 1.
Within the Photoshop Elements Editor: The Photoshop Elements Editor defaults to the last panel layout that you used. Before starting, make sure your tools and panels are consistent with the examples presented in these lessons by resetting the panels. Do this by choosing Window > Reset Panels or by pressing the Reset panels button ( ) in the Options bar.
The differences between print and the screen
Printing is only one of several places your work may be destined. Many people are now posting photos and artwork to their own blogs, web sites, and photo-sharing sites, such as Flickr. In addition, the affordability of video cameras and editing software, such as Premiere Elements and iMovie, has led to an explosion in the production of homemade video.
Resolution and color for the Web and video
Every digital image, whether it is created with a digital camera, a scanner, or from scratch in a program like Photoshop Elements, is composed of pixels. The word pixel is a conjunction of the words picture and element, and it is generally considered to be the smallest individual part, or unit, of a digital image. For additional information, please refer to Appendix C, “Understanding Digital Files.” There are two main standards for image resolution: 300 ppi is the standard used in the printing of high-quality magazines and books, and 72 ppi is the standard used on the Web and in video. Because these types of graphics are intended to be displayed on screens of varying sizes, the document’s print size is less relevant to understanding how it will appear than its pixel dimensions are. The pixel dimensions tell you exactly how many pixels of screen space your images will take up. For example, if your document’s width is 800 pixels and the viewer’s monitor or display resolution is set to 800 x 600, your graphic will take up the full width of the screen, but if the screen resolution had been set to 1600 pixels wide, it would only take up half of the screen width.
The greater the resolution of an image, the smaller each individual pixel in it is and the greater the detail the image can contain.
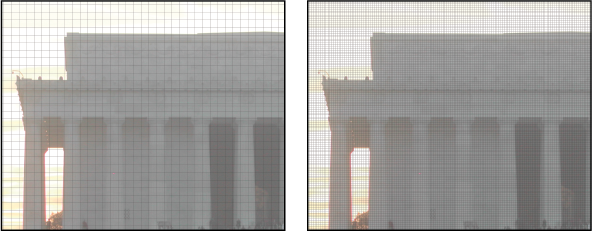
Of the images on the previous page, the image on the left is a grid of 72 pixels per inch while the one on the right contains 300 pixels per inch. The grid on the right contains more than four times as many pixels as the one on the left and can therefore hold more detail.

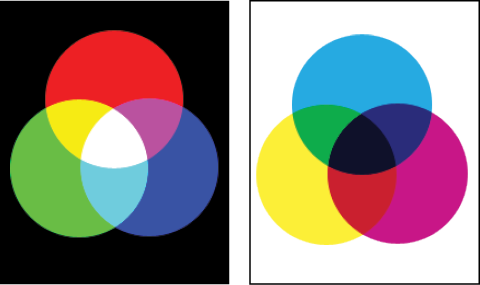
RGB model. CMYK model.
You can view a document’s pixel dimensions from the Image Size window, by choosing Image > Resize > Image Size.
The other major area where documents built for print differ from those built for the Web and video is in the color mode. Print documents use the CMYK (Cyan, Magenta, Yellow, and Black) color mode, while those built for the Web and video always use the color mode for mixing colors of light, RGB (Red, Green, and Blue).
RGB is an additive color model in which absolute values (value = 255) of each of the primary colors are combined to create white. CMYK is what is called a subtractive color model. In this model, its colors are subtracted (reduced to 0 percent) or withheld to create the color white.
Preparing images for the Web
The process of preparing images for the Web is called optimizing. In general, this process involves making sure the file uses the correct color mode and then compressing it to make it smaller so that it loads faster when viewed on the Web. The Photoshop Elements Save for Web dialog box allows you to preview your optimized file and test out various settings to achieve the best result.
Web image formats
GIF: An acronym for Graphic Interchange Format, this format is typically used on the Web to display logos, motifs, and other limited-tone imagery. The GIF format supports a maximum of 256 colors, as well as what is called 8-bit transparency, and it is the only one of the three formats mentioned here that supports built-in animation. Each individual frame of an animated GIF also supports a maximum of 256 different colors. The format uses what is known as LZW compression to compress an image without degrading its visual quality, except when it comes to the total number of colors in that image.

The two-color illustration seen here would be a good candidate for using the GIF format.
JPEG: An acronym for Joint Photographic Experts Group, the JPEG file format has found wide acceptance on the Web as the main format for displaying photographs and other continuous-tone imagery. The JPEG format supports a range of millions of colors, allowing for the accurate display of a wide range of artwork, but it lacks support for transparent pixels. An image with transparency must be matted against a solid color before it is converted to the JPEG format.
PNG: An acronym for Portable Network Graphic, the PNG file format was intended to blend the best aspects of both the GIF and JPEG formats while addressing the weaknesses inherent in each format. PNG files come in two different varieties: PNG-8 can support up to 256 colors like the GIF format, while PNG-24 can support millions of colors like the JPEG format. Both varieties of the PNG format use lossless compression to minimize an image’s file size while maintaining the image quality. Both varieties of PNG also support transparency, and as an improvement on GIF transparency, a PNG-24 file supports varying degrees of transparency.
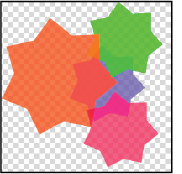
An image that has multiple degrees of transparency that you want to preserve would be a good candidate for the PNG-24 format.
There is one other image format that is supported for display in browsers without the use of a plug-in like Flash Player or Silverlight. WBMP was formerly the default image format for creating graphics to display on cell phones and other devices with limited color displays. It is rarely used.
Saving files for the Web
In this part of the lesson, you are going to open a Photoshop Elements document and use the program’s Save for Web & Devices function to optimize it for display on the Internet. While you want to keep your working files in the native Photoshop format, you always have to optimize your images before they can be displayed on the Web.
Creating a JPEG
In this part of the lesson, you will save your file as a JPEG image. The JPEG format offers a good balance between image size and quality, and is the standard for the kind of continuous-tone imagery that you have in the practice file.
1 In the Organizer, type Home into the Search text field; this isolates the file HomePage.psd. Right-click the image and choose Edit with Photoshop Elements from the contextual menu that appears.
This document is 800 x 600 pixels. This is one of the standard sizes for full-page web graphics and is based on the screen size of a traditional 15-inch computer monitor.
2 Choose File > Save for Web.
3 The Save for Web dialog box is set up to display a side-by-side view of your original artwork next to your optimized artwork. On the right side of the dialog box, you can set the optimization settings for the file you will create. Choose JPEG medium from the Preset drop-down menu. This produces a medium-quality file that should be easily visible over the Web.
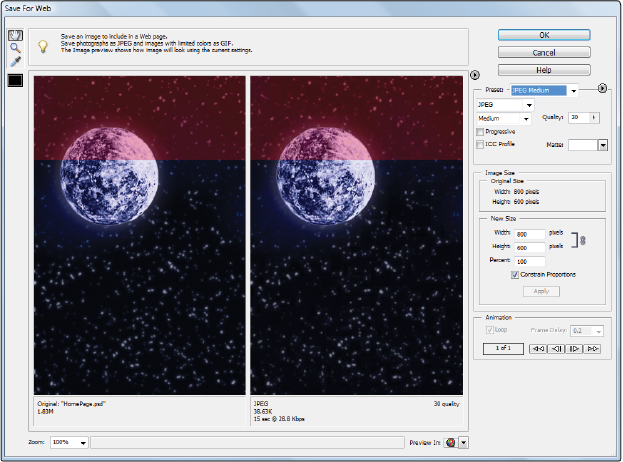
The Save for Web dialog box allows you to see the original image next to the optimized one that you will create.
The JPEG format uses what is called “lossy” compression. This means that it reduces the file size of your image by deleting any information that is not needed to display it at the specified quality settings. Once that information has been discarded, there is no way to get it back. This compression is what allows JPEG files to be small enough to be displayed on the Internet and over mobile devices.
JPEG options
In addition to your quality settings, the JPEG format has three other options that can affect the size and appearance of your optimized document.
Progressive: Click to select the check box in order to create a progressive JPEG file. A progressive JPEG downloads and displays in stages, from low quality to your final image.
ICC Profile: Click to select the check box to embed the ICC profile that you were using while you worked on this document. Color profiles are used to create color consistency across a range of display devices and applications.
Matte: This feature allows you to add a color matte or fringe to the edges of your image. Used with images that have transparent or soft, blurry edges, this effect allows you to avoid distinct, visible edges.
4 Press OK to open the Save Optimized As dialog box and navigate to the Lessons folder. Press Save to finish saving the file, then close the file. If a dialog box appears prompting you to save the changes to the original HomePage.psd, press No.
Continue to the next Photoshop Elements Tutorial: Creating a PNG in Photoshop Elements >