Photoshop Elements Tutorial: Fixing Common Photographic Problems in Photoshop Elements
What you’ll learn in this Photoshop Elements Tutorial:
|
This tutorial provides you with a foundation for working with fixing images in Adobe Photoshop Elements. It is the third lesson in the Adobe Photoshop Elements 10 Digital Classroom book. |
Photoshop Elements Tutorial: Fixing Common Photographic Problems in Photoshop Elements
In this lesson, you will explore how Photoshop Elements makes it easy for you to automatically correct and adjust most images in seconds. You’ll also explore more advanced tools that allow you to correct red eye, or the sky, in an image. Finally, you’ll discover how to rotate and crop an image.
Starting up
Within the Photoshop Elements Organizer: You will work with several files from the Lessons folder in this lesson. Make sure that you have downloaded the Lessons folder onto your hard–drive. In order to access these files in the Organizer, you need to import them. See “Adding files and folders to the Organizer” located in Lesson 1.
Within the Photoshop Elements Editor: The Photoshop Elements Editor defaults to the last panel layout that you used. Before starting, make sure your tools and panels are consistent with the examples presented in these lessons by resetting the panels. Do this by choosing Window > Reset Panels or by pressing the Reset panels button ( ) in the Options bar.
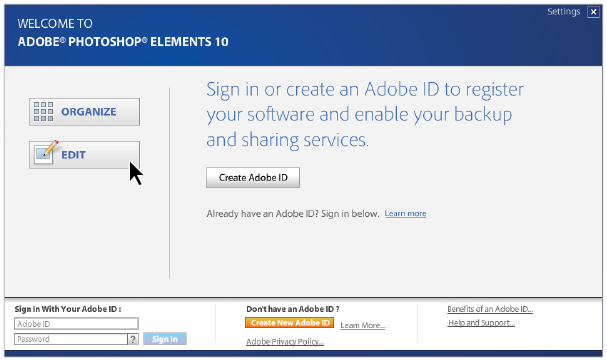
Welcome screen
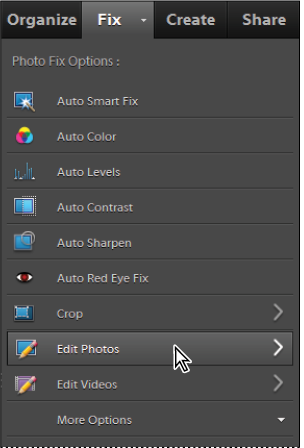
If you’re currently viewing the Welcome screen, press the Edit button ( ) to enter the Editor workspace. If you are currently in the Organizer, click the Fix tab in the upper-right corner of your screen and press the Edit Photos button or select an image and choose Edit > Edit with Photoshop Elements.
|
Choose the Editor from the Photoshop Elements Welcome screen. |
Understanding the Editor workspace
In Photoshop Elements 10, adjustments to your photos are made in the Editor. If you want to crop, straighten, or color correct your images, the Editor is where this happens. It is the one-stop shop for all your photo correction and retouching needs.
|
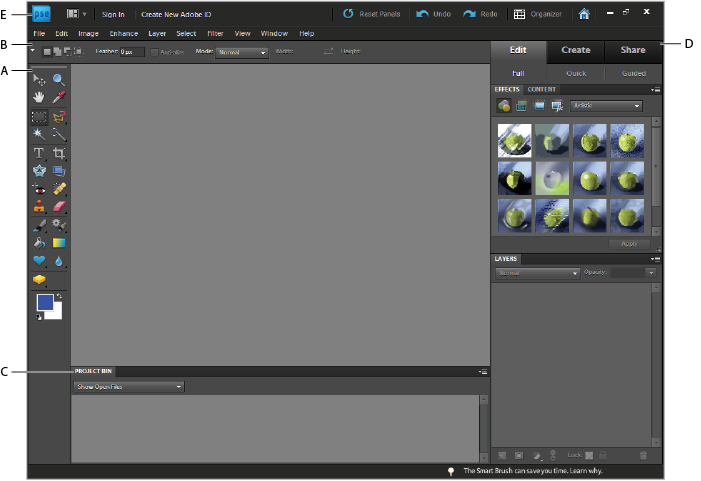
A. Toolbox. B. Options bar. C. Project Bin. D. Panels Bin. E. Menu Bar |
The default Editor interface is divided into five main areas: the Toolbox, the Options bar, the Project Bin, the Panel Bin, and the Menu Bar.
The Toolbox on the left side of the workspace stores all the tools you need to select, cut, paint, and correct your photos and can be viewed in a single or double column view by clicking and dragging the toolbox using the double line ( ) at the top of the Toolbox to undock it. Then you can click on the double arrow (
 ) at the top of the Toolbox to switch to double or single column view. When you are finished you can dock the Toolbox again by dragging it by the double line back to the side of the interface. The menu bar contains all the menus available in the Editor workspace, as well as other buttons that help you to work quickly in the Editor. The Options bar at the top of the workspace displays the options for the selected tool. The three tabs on the right side of the Options bar switch between the Edit, Create, and Share modes. Within the Edit tab is a drop-down that allows you to change between Full, Quick, and Guided Edit modes. The Project Bin displays the images that are currently open in the Editor. When you have multiple files open at once, the Project Bin provides a quick and efficient way to switch from one file to another. The Panel Bin on the right side of the workspace stores the Layers and Effects panels as well as any other active panels.
The Project Bin
Located at the bottom of the Editor, the Project Bin displays thumbnails of open photos. It’s useful for switching between multiple open photos in your workspace. Choose Window > Project Bin to toggle the display of the Project Bin on and off.
The Panel Bin
The Panel Bin in the Editor lets you store multiple panels in a single area. The Panel Bin provides fast access to your panels. By default, the Panel Bin appears on the right side of the workspace. Choose Window > Panel Bin to toggle the Panel Bin on and off.
The Toolbox
The Toolbox contains every single tool that is available in the Editor. There are almost 50 tools available in the Toolbox for you to choose from.
The Menu bar and Options bar
These areas of the workspace can’t be customized, but rather have a default appearance in the editor. They are staples of the workspace and as you will find, get used frequently when editing images in Photoshop Elements.
Editing modes: Full, Quick, and Guided
When the Edit tab is active, you’ll notice three buttons directly below the tab: Full, Quick, and Guided. You’ll take a look at all three of these modes during this lesson, as you explore how easy it is to fix common photo problems that can occur in your images.
|
When the Edit tab is active, there are three buttons available. You can choose between the Full, Quick, or Guided editing modes. |
Using Quick Fix
Quick Fix conveniently assembles many of the basic photo-fixing tools in Photoshop Elements. As you work in Quick Fix, you should limit the number of color and lighting controls that you apply to a photo. As a general rule, you use only one of the Auto controls on a photo. If that control doesn’t achieve the desired look, press the Reset button and try another one. You can also adjust your image using the slider controls, whether you’ve used an Auto control or not. In this exercise, you’ll duplicate and save one image as four different files, so that you can compare each of the auto fix features’ effects on the same image.
1 Press the Organizer button ( ) to view your photo library. If you are unable to see the filenames, choose View > Show File Names.
2 Locate and select fishing.jpg. Press the Fix tab at the right side of the Option bar and press the Edit Photos button in the Task pane.
|
Click the Fix tab in the Organizer, then press the Edit Photos button to open the image in the Editor. |
3 Once the image opens, choose File > Save As. Navigate to the Lessons folder, and uncheck the Save in Version Set with Original checkbox in the Save Options Organize: section. Type Color in the Name text field and make sure the Format is set to JPEG; then press Save. In the JPEG Options dialog box, leave all settings at their defaults, and press OK to accept the current JPEG settings.
4 Choose File > Save As again, and type Levels in the Name text field. Choose File > Save As two more times and name the files Contrast and then Smart Fix.
5 In the Editor, Smart Fix should be the current file. If it’s not, close any open files and choose File > Open, and navigate to the Lessons folder, and select Smart Fix.jpg; then press Open.
Using Auto Smart Fix
Auto Smart Fix is a very powerful feature for making quick corrections to your images. It analyzes a photo and makes corrections to common problems with contrast, color balance, and saturation. In this exercise, you will see how quickly you can clean up an image automatically using the Smart Fix feature.
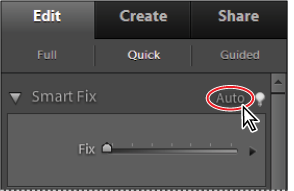
1 With the Edit tab active, click the Quick button below the Edit tab. This opens the Quick Fix panel in the Panel Bin. In the Smart Fix section, press the Auto button.
|
The Smart Fix Auto button in the Quick Fix mode. |
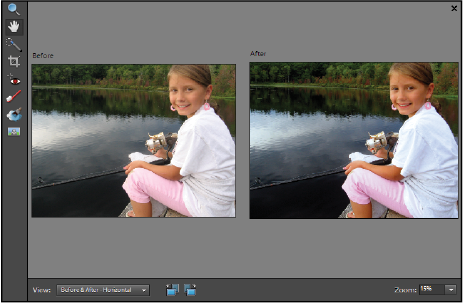
2 To view how this feature affects the image, you will need to see the before and after views. Beneath the image is the View drop-down menu. Choose Before & After - Horizontal from the drop-down menu, then press the Fit Screen button in the Options bar at the top of the screen. You can also zoom in on the images and use the Hand tool ( ) to move the viewing area of both images.
|
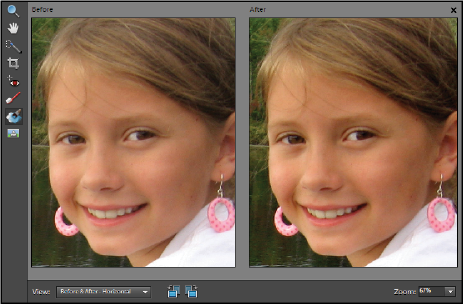
The before and after images. |
3 You may notice that the girl now has a more accurate skin tone. To better see the effects of this feature, you’ll increase the amount of the Smart Fix. Drag the Fix slider in the Smart Fix section all the way to the right. The colors of the tree become more vivid. Notice that the entire color range of the image is adjusted, along with the contrast of the image. The Smart Fix feature has modified the lightest points in the image to make them whiter, while making the darker points blacker.
4 Choose File > Save to save your edits. If the Save As dialog box opens, press Save. If Photoshop Elements asks you to replace the current image, press Yes. Press OK when the JPEG Options dialog box.
Auto Levels
Auto Levels adjusts the overall contrast of an image and may affect it’s color. Try this on images that lack contrast and possibly contain a color cast.
With Auto Levels, the darkest areas of the image become darker, while the lightest areas become lighter. In this exercise, you will see the effect that Auto Levels has on an image.
1 Choose File > Open, and select the Levels.jpg image from the Lessons folder. Press Open.
2 Use the keyboard shortcut Ctrl+0 (Windows) or Command+0 (Mac OS) to fit both previews on the screen.
3 In the Lighting section of the Panel Bin, press the Levels Auto button to initiate the automatic Levels command. You can already see how much darker some parts of the image have become.
4 At the bottom of the Lighting section of the Quick Fix panel are the following sliders: Shadows, Midtones, and Highlights. Drag the Midtone slider to the right to darken the midtones (neither the lightest nor darkest areas) of the photo.
5 Once a change is made, two buttons appear at the top of the Lighting section: the Cancel Current Quick Fix Operation button ( ) and the Commit Current Quick Fix Operation button (
 ). Once you are satisfied with the changes, press the Commit button.
|
Before and after using the Auto Levels command. |
 | There is no right or wrong way for your images to look in this exercise. Use this exercise to learn about each option. Feel free to experiment with these features. Many times, the changes are very subtle, and because different images have their own individual characteristics, it will be necessary to experiment with the different adjustments to get the best results. |
6 Choose File > Save to save your edits. When the Save As dialog box appears, make sure that the Save in Version Set with Original checkbox is unchecked, and press Save. If Photoshop Elements asks you to replace the current image, press Yes. Press OK when the JPEG Options dialog box appears.
Auto Contrast
Auto Levels and Auto Contrast have similar effects on an image. Often the effect is so similar that you can choose to use either tool in most situations. Auto Contrast adjusts the overall contrast of an image without affecting it’s color.
1 Choose File > Open and select Contrast.jpg from the Lessons folder.
2 Use the keyboard shortcut, Ctrl+0 (Windows) or Command+0 (Mac OS), or press the Fit Screen button in the Options bar to fit both previews on the screen.
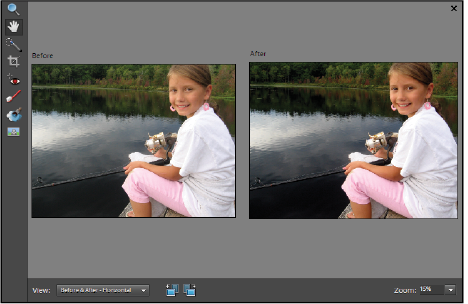
3 In the Lighting section of the Quick Fix panel, press the Contrast Auto button to initiate the Auto Contrast command. Notice how some parts of the image become much darker.
4 Drag the Highlights slider to the right, to about 25, darkening the highlights of the photo. Notice that the lost contours of the girl’s shirt reappear.
5 Once you are satisfied with your changes, press the Commit button ( ) at the top of the Lighting section.
|
Before and after using the Auto Contrast command. |
6 Choose File > Save to save your edits. When the Save As dialog box opens, make sure that the Save in Version Set with Original checkbox is unchecked, and press Save. If Photoshop Elements asks you to replace the current image, press Yes. Press OK when the JPEG Options dialog box appears.
Correcting color automatically
Auto Color analyzes a photo and can correct common problems in color balance caused by the surrounding lighting conditions. For example, many buildings use fluorescent lights. While they may look white, fluorescent lights actually have a slight green tint, and this can create a green color cast in your photos. Similarly, a blue color cast can be created when you use an indoor camera setting when taking pictures outside.
1 Choose File > Open and select Color.jpg from the Lessons folder.
2 Use the keyboard shortcut, Ctrl+0 (Windows) or Command+0 (Mac OS), or press the Fit Screen button in the Options bar to fit both previews on the screen.
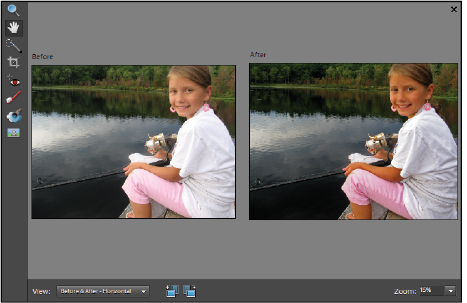
3 In the Color section of the Quick Fix panel, press the Color Auto button to initiate the Auto Color command. This is a fairly subtle change but the color in the trees has been enhanced.
In the Color Section are two sliders: Saturation and Hue. Saturation makes colors either more vivid or muted, depending on which way you drag the slider. Hue changes the existing colors.
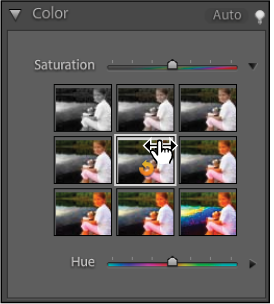
4 Click on the disclosure triangle ( ) directly to the right of the Saturation slider. This displays thumbnails of various saturation settings.
5 Click on different thumbnails to change the saturation level. Click on the thumbnail in the middle. This is a little too far, so click on the selected thumbnail and drag to the left to slightly reduce the amount of the saturation. When you are happy with the adjustment, click again with your mouse to confirm the adjustment.
|
Fine tuning the adjustment using the previews in the Saturation slider. |
6 Once you are satisfied with your changes, press the Commit button ( ) at the top of the Color section.
The Balance section within the Quick Fix panel allows you to further enhance the colors in an image. Temperature makes the colors warmer (red) or cooler (blue) and Tint makes the colors either more green or more magenta.
7 Drag the Temperature slider to the left to cool the photo. Once you are happy with the adjustment, press the Commit button ( ) at the top of the Balance section.
|
This image before and after using the Auto Color command and Temperature slider. |
8 Choose File > Save to save your edits. If the Save As dialog box opens, press Save. If Photoshop Elements asks you to replace the current image, press Yes. Press OK when the JPEG Options dialog box appears.
Comparing images in Full Edit View
You will now compare all four photos in Full Edit View to see what effect each command has on the image.
1 Press the Full button directly below the Edit tab.
2 Press the Arrange button ( ) and press the Tile All in Grid button (
 ), the second choice in the first row, to display each image in its own window.
3 Press the Arrange button again and choose Match Zoom and Location at the base of the list so that all photos are at the same magnification and position in their respective windows. This allows you to compare the images and see the differences in the different adjustments applied.
Use shortcuts to Zoom All
If you hold down the Shift key while you zoom using the Zoom tool ( ), it zooms in on all open images at the same time. If you hold the Shift+Alt (Windows) or Shift+Option (Mac OS) keys together while using the Zoom tool, it zooms out on all the open images at the same time.
Continue to the next Photoshop Elements Tutorial: Using the Navigator in Photoshop Elements >
