Photoshop tutorial: Hidden tools in Photoshop
What you’ll learn in this Photoshop Tutorial:
|
This tutorial provides you with a foundation for working with Adobe Photoshop hidden tools. It is the first lesson in the Adobe Photoshop CC Digital Classroom book. For more Adobe Photoshop training options, visit AGI’s Photoshop Classes. |
Adobe Photoshop Tutorial: Hidden tools in Photoshop
Some of the tools in the Tools panel display a small triangle at the bottom-right corner. This indicates that there are additional tools hidden under the tool.
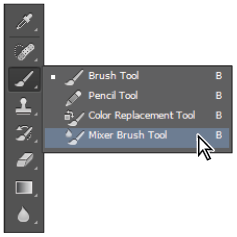
1 Click and hold the Brush tool to see the hidden Pencil, Color Replacement, and Mixer Brush tools. You can also access the hidden tools by right-clicking (Windows) or Ctrl+clicking (Mac OS).
|
Selecting a hidden tool. |
2 Select the Mixer Brush tool ( ) and release. The Color Mixer tool is now the visible tool, and the options in the Options bar have been changed.
The Mixer Brush simulates realistic painting techniques, such as mixing colors on the canvas, combining colors on a brush, or varying paint wetness across a stroke.
You will now change the foreground color by selecting Set the foreground color in the Tools panel.
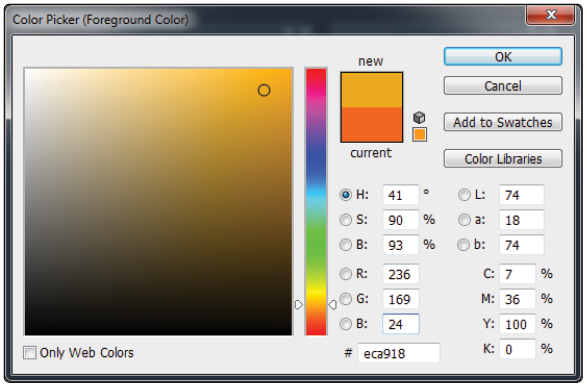
3 Click once on the foreground color at the bottom of the Tools panel; the Color Picker appears.
4 Position your cursor on the Color Slider (hue) to the right of the Color Pane and click and drag it up until shades of orange appear in the Color Pane.
5 Click once in the Color Pane to select an orange color. Any orange color will do for this exercise, but you can also type a value into the text fields for a more accurate selection. In this example, a color with the RGB value of R: 236, G: 169, B: 24 was selected.
|
Select an orange color from the Color Picker. |
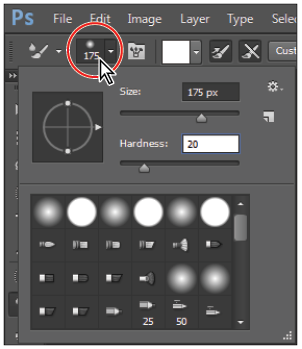
6 Click the Brush Preset picker button in the Options bar and set the following attributes for the Mixer Brush tool:
- Size: 175 px (This indicates the size of the brush; in this example, a very large brush is indicated.)
- Hardness: 20% (A value of 100% would be a hard-edged brush.)
Leave all other settings at their defaults.
|
Changing the Mixer Brush tool. |
There are many options for the Mixer Brush, but for this example, you will use a preset that will adjust all the settings to give you a smooth blended result in your image.
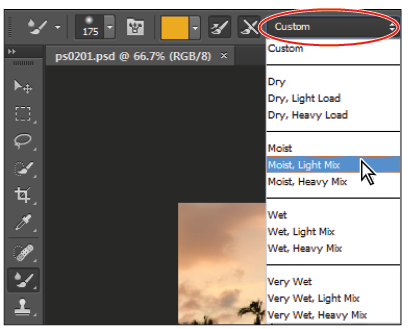
7 Click once on mixer brush combinations drop-down menu—this drop-down menu may have defaulted to Custom—and select the Moist, Light Mix preset.
|
Change the Useful mixer brush combination to Moist, Light Mix. |
8 Press Ctrl+0 (zero) (Windows) or Command+0 (zero) (Mac OS.) This is the keyboard shortcut for Fit on Screen, and it assures that you see the entire image area.
9 With the Mixer Brush tool still selected, start painting in the upper-left area of your image to create a shade of orange blending in from the corner. Repeat this for all four corners in the image. If you want to repaint, press Ctrl+Z (Windows) or Command+Z (Mac OS) to revert to the previous image and try again.
|
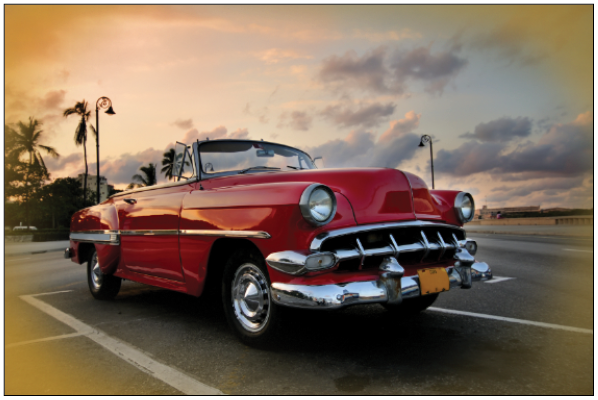
An orange tint is blended into the corners for an artistic effect. |
10 Choose File > Save, or use the keyboard shortcut Ctrl+S (Windows), or Command+S (Mac OS) to save your file.
Navigating the image area
To work most efficiently in Photoshop, you’ll want to know how to zoom (magnify) in and out of your image. Changing the zoom level allows you to select and paint accurately and helps you see details that you might otherwise have overlooked. The zoom function has a range from a single pixel up to a 3,200 percent enlargement, which gives you a lot of flexibility in terms of viewing your images.
You’ll start by using the View menu to reduce and enlarge the document view, and end by fitting the entire document on your screen.
1 Choose View > Zoom In to enlarge the display of ps0101_work.psd.
2 Press Ctrl+plus sign (Windows) or Command+plus sign (Mac OS) to zoom in again. This is the keyboard shortcut for the Zoom In command that you accessed previously from the View menu.
3 Press Ctrl+minus sign (Windows) or Command+minus sign (Mac OS) to zoom out. This is the keyboard shortcut for View > Zoom Out.
Now you will fit the entire image on the screen.
4 Choose View > Fit on Screen, or use the keyboard shortcut Ctrl+0 (zero) (Windows) or Command+0 (zero) (Mac OS), to fit the document to the screen.
5 You can also display artwork at the size it will print by choosing View > Print Size.
Using the Zoom tool
When you use the Zoom tool ( ), each click increases the view size to the next preset percentage, and centers the display of the image around the location in the image that you clicked. By holding the Alt (Windows) or Option (Mac OS) key down (with the Zoom tool selected), you can zoom out of an image, decreasing the percentage and making the image view smaller. The magnifying glass cursor is empty when the image has reached either its maximum magnification level of 3,200 percent or the minimum size of one pixel.
1 Choose View > Fit on Screen.
2 Select the Zoom tool, and click two times on the license plate to zoom in. You can also use key modifiers to change the behavior of the Zoom tool.
3 Press Alt (Windows) or Option (Mac OS) while clicking with the Zoom tool to zoom out.
You can accurately zoom into the exact region of an image by clicking and dragging a marquee around that area in your image. To do this, you must disable a new Zoom tool option.
4 Uncheck the Scrubby Zoom check box in the Zoom tool’s Option bar to disable this feature. The Scrubby Zoom feature allows you to click and drag to zoom immediately. In this example, you need a more predictable zoom area.
You can create curves from any new point by holding down the mouse button and dragging in the direction you want to form the curve. (Be sure not to release the mouse button first!) |
|
Disable the Scrubby Zoom in the Zoom tool’s Option bar. |
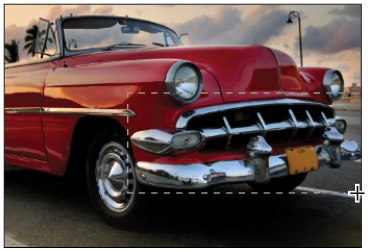
5 With the Zoom tool still selected, press and hold the mouse and click and drag from the top left corner of the car’s grill to the lower-right of the bumper. You are creating a rectangular marquee selection around the front of the car. Once you release the mouse, the area that was included in the marquee becomes enlarged to fill the document window.
|
Drag a marquee over the front of the car. |
6 Double-click the Zoom tool in the Tools panel to return to a 100 percent view.
Because the Zoom tool is used so often, it would be tiresome to continually have to change from the Zoom tool back to the tool you were using. Read on to see how you can activate the Zoom tool at any time without deselecting your current tool.
7 Select the Move tool ( ) at the very top of the Tools panel.
8 Press and hold Ctrl+spacebar (Windows) or Command+spacebar (Mac OS). (Note that on the Mac OS, you must press and hold the spacebar before the Command key, otherwise you trigger Spotlight.) The Move tool is temporarily converted into the Zoom In tool. While still pressing and holding Ctrl/Command+spacebar, click and drag over the front of the car again, then release. Note that although you have changed the zoom level, the Move tool is still active.
You can zoom out by pressing and holding Alt+spacebar (Windows) or Option+spacebar (Mac OS). |
9 Choose View > Fit on Screen.
Using the Hand tool
The Hand tool allows you to move or pan around the document. It is a lot like pushing a piece of paper around on your desk.
1 Select the Zoom tool ( ), then click and drag on an area surrounding the front of the car.
2 Select the Hand tool ( ), then click and drag to the right to push the picture to the right. Notice that when the Hand tool is active, three view buttons appear in the Options bar (at the top of the work area) that allow you to change your current view to Actual Pixels, Fit Screen, or Fill Screen.
3 Select the Zoom tool and hold the spacebar. Notice that the cursor turns into the Hand tool. Click and drag left to view the front of the car again. By pressing and holding the spacebar, you can access the Hand tool without deselecting the current tool.
4 Double-click the Hand tool in the Tools panel to fit the entire image on your screen. This is the same as using Ctrl+0 (zero) (Windows) or Command+0 (zero) (Mac OS).
Navigation Shortcuts | Windows | MAC OS |
Zoom In | Ctrl+plus sign or Ctrl+spacebar | Command+plus sign or Command+spacebar |
Zoom Out | Ctrl+minus sign or Alt+spacebar | Command+minus sign or Option+spacebar |
Turn Zoom In tool into Zoom Out tool | Alt | Option |
Fit on Screen | Ctrl+0 (zero) or double-click the Hand tool | Command+0 (zero) or double-click the Hand tool |
Hand tool (except when Type tool is selected) | Press spacebar | Press spacebar |
Tabbed windows
In Photoshop, you have control over how your windows appear in the workspace. You can work with floating image windows, or choose to tab your windows across the top of the workspace. In this section, you find out how to use the new tabbed workspace.
1 If the Mini Bridge is not visible, choose File > Browse in Mini Bridge. In the Navigation pod, double-click the image named ps0102.psd to open it in Photoshop.
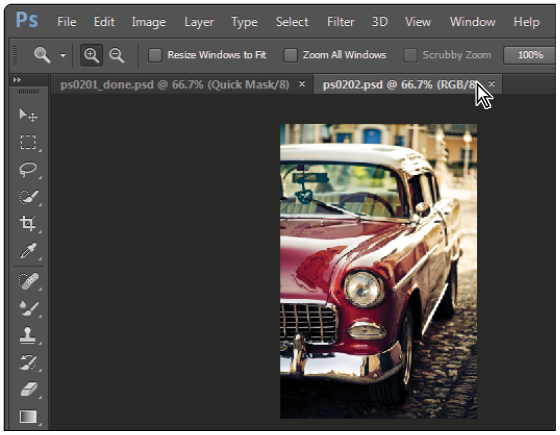
2 The image is displayed as a separate tab within Photoshop, allowing you to click the tab in order to switch between active images.
|
Multiple open images appear as tabs at the top of the screen. |
3 Click the ps0102.psd tab, click and drag the tab away from its tabbed position, and then release the mouse button. The image second window is now floating.
4 Click the title bar of the floating window and drag upward until your cursor is next to the tab of the other image. When you see a blue bar appear, release the mouse button. The image is now back to being a tabbed window. You can stop a window from tabbing accidentally by pressing and holding the Ctrl (Windows) or Command (Mac OS) key while dragging the floating window.
If you would prefer not to take advantage of the tabbed window feature, you can choose Edit > Preferences (Windows) or Photoshop > Preferences (Mac OS), then choose Interface. In the Options section, uncheck Open Documents as Tabs and click OK.
To quickly move all floating windows back to tabbed windows, choose Window > Arrange > Consolidate All to Tabs. |
Continue to the next Photoshop Tutorial: Maximizing productivity with screen modes in Photoshop >
