Photoshop Elements Tutorial: Sharing photos using online services in Photoshop Elements
What you’ll learn in this Photoshop Elements Tutorial:
|
This tutorial provides you with a foundation for working with online sharing in Adobe Photoshop Elements. It is the sixth lesson in the Adobe Photoshop Elements 10 Digital Classroom book. |
Photoshop Elements Tutorial: Sharing photos using online services in Photoshop Elements
Online services let you order prints, photo books, and other photo products on the Internet. There is no charge to join a service, but you need a valid e-mail address to receive correspondence, and a credit card number to place an order.
The online services available to you depend on your location. For example, online ordering services differ between North America and Asia. The options available change dynamically to show what’s available in your area, and updates when new services become available. As of this writing, Kodak and Shutterfly are the online print partners available in the Windows version of Photoshop Elements, and Kodak is the only print partner available in the Mac OS version of Photoshop Elements that you can order prints from directly within Photoshop Elements.
Ordering prints
Photoshop Elements allows you to order professionally printed photos and have them mailed to designated recipients. You should, however, make any desired changes to photos before ordering prints, as not all online services allow you to enhance photos.
1 Make sure that you are in the Create tab, and, in the Media Browser, select the photos you want to order by holding down the Control (Windows) or Command (Mac OS) key.
2 Choose File > Order Prints and choose the service you’d like to use to order your prints, or press the Photo Prints button in the Create panel and choose your desired service from the Create panel. Photoshop Elements 10 offers the choice between Shutterfly (Windows only) and Kodak (Mac and Windows). Both these services offer free accounts, but you must have an existing account to use these services from within Photoshop Elements 10.
|
You can order prints through online services. |

 | If this service is available in your area, you can also choose Photo Prints from the Create tab. If you have not signed up for Shutterfly or Kodak EasyShare, you will have to complete the form before you continue. If you choose not to join at this time, close the Order Prints window and proceed to the next exercise. |
3 Specify the size and number of each photo you want to order, and then click Next.
4 Select where to send the prints, then press Next.
5 Confirm your order details, and add more recipients if desired. Press Next.
6 Choose a shipping method and coupon information (if applicable), and then press Next.
7 Enter your credit card information. Then press Place Order to order your prints.
Ordering a printed photo book
With Photoshop Elements, you can order a professionally printed photo book and have it delivered to designated recipients or you can print a photo book on the printer attached to your computer. Your photo book can contain various numbers of photos on each page of the photo book. You should, however, make any desired changes to photos before ordering a photo book, as some online services do not allow you to enhance photos.
1 In the Media Browser, select the photos you want to use. Photo projects (in PSE format) can also be used to order photo books.
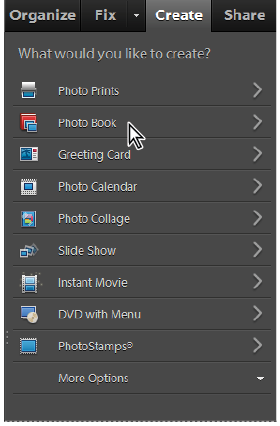
2 In the Create tab, choose Photo Book. The Elements Editor launches and the Photo Book dialog appears. Choose a size from the pane in the left column. Note that some sizes belong to a specific service (Shutterfly or Kodak) however all the sizes can be printed locally on your desktop printer. Choose a theme to be applied to your photo book, and the Preview pane updates to reflect the selected theme. Enable the Autofill with Selected images checkbox to use the images selected in the Media Browser to populate the photo book. If desired, enter a number of pages for your photo book as well. Click OK.
|
Choose Photo Book from the Create tab. |
3 Photoshop Elements generates the photo book and displays the pages in the Task pane.
| Kodak printed photo books have a cover that is designed to show a single centered photo on the title page. For best results, make sure your title page (or first page) has a single centered photo. |
4 Use the page navigation buttons at the bottom of the main window to navigate and view pages in the book.
5 Click on the drop-down menu in the Project bin and choose Show Files selected in Organizer to display the original photos that you selected in the Organizer. Drag and drop any of the images from the Project Bin onto a placeholder in the layout to replace an existing image.
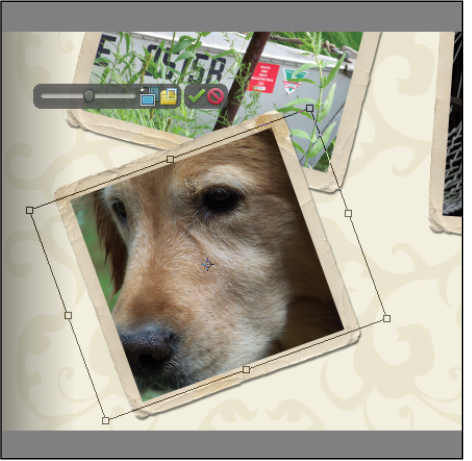
6 Change the cropping and scaling of an individual photo by double-clicking on an image and adjusting the slider to change the scaling percentage of the selected image and click and drag on the image to reposition the image within the placeholder frame. Click the green checkmark icon ( ) to commit the change. Simply click once on the image and drag to reposition the entire image and the frame.
|
Adjusting the scaling and positioning of an image within the placeholder frame. |
7 Under the Create tab, click on the Layouts, Artwork, and Text buttons to customize the book.
8 Press Order to complete the photo book. A dialog is displayed indicating that this process could take between 5 and 20 minutes to complete. Conversely, click the Done button to complete the photo book and save to the Organizer.
|
Customize your photo book with various layout options. |

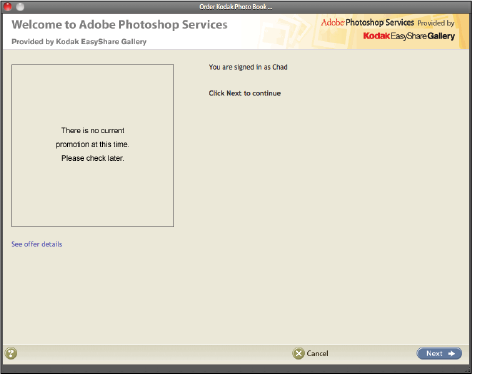
9 When the Adobe Photoshop Services browser opens, log in to your Kodak or Shutterfly account using your username and password by clicking the Sign In link. If you do not have a username and password, you can create one from this screen.
|
Order photo books from the Adobe Photoshop Services browser. |
| If you are already a member, click the Sign In link in the upper-right corner of the dialog box, type your e-mail address and password, and press Next. |
10 Specify the cover material and quantity, and then press Next.
11 Type in your location information, and then press Next.
12 Confirm your order details, and add more recipients if desired. Press Next.
13 Choose a shipping method and coupon information (if applicable), and then press Next.
14 Type in your credit card information. Press Place Order to order your photo book.
15 Return to the Editor and press the Done button to close and save your photo book.
| When getting photo projects ready for photo books, think about how the images will appear in printed format. Also, consider how books are structured when deciding which photos should go on each page. And for best results, you should always preview your projects before ordering books to make sure photos are optimally placed, cropped, and framed. |
Sharing Photos on Facebook
Facebook and other social media services have become popular with people of all ages. Photoshop Elements facilitates the sharing of photos on these services with its built-in integration to services such as Facebook, Flickr, and SmugMug. In this lesson, you’ll share an image on Facebook but the process is similar for the other services.
1 In the Organizer, select an image that you’d like to post to your Facebook account.
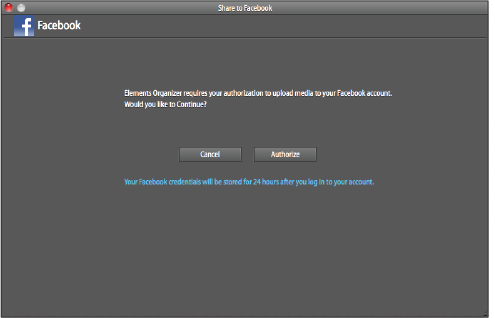
2 In the Share tab, click the Share to Facebook button. The Share to Facebook window appears asking you to authorize the sharing of images to your account. Click the Authorize button.
|
The Share to Facebook window requires you to authorize the connection to your Facebook account. |
A web browser opens asking your permission to allow Photoshop Elements to connect to your Facebook account. Click the Allow button to allow Photoshop Elements to post photos to your Facebook account.
3 Return to the Elements Organizer and click the Complete Authorization button. Now the Share to Facebook window displays the image(s) that you selected in the Organizer and provides options for uploading the photo.
|
Use the Print Photos dialog box to customize how prints will appear on the page. |
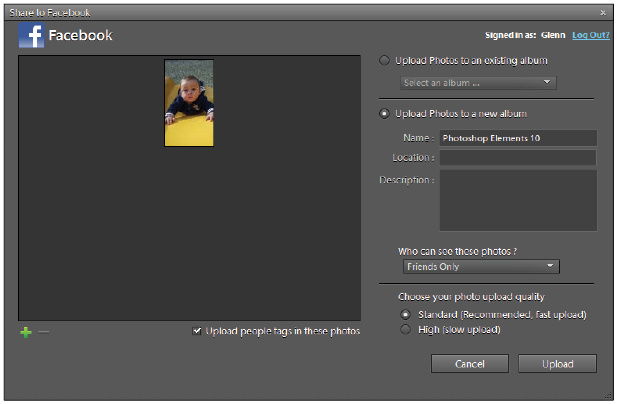
4 If you have an existing album on your Facebook page, you can upload directly to it. Otherwise click the Upload Photos to a new Album radio button and enter a Name, Location, and Description for the album and choose who is allowed to view the photo(s).
5 Select either standard or high quality photo upload using the radio buttons. Use the check box to choose if you wish to include people tags in your uploaded photos.
6 Press the Upload button to upload this image to your Facebook account or press the cancel button to cancel the operation.
Printing photos
Photoshop Elements enables you to print your photos in many different and convenient, ways. As you’ve seen, you can have your photos professionally printed by online providers, or you can print your photos at your convenience with your home printer. You can print individual photos, thumbnails of each photo (called a contact sheet), or a page of one or more photos printed at various sizes (called a picture package). If you are so inclined, you can even flip the image to print T-shirt transfers.
Additionally, you can print the projects you’ve created in Photoshop Elements, like photo albums, cards, and calendars. Some of these projects can even be ordered from online print services. Let’s first take a look at the Print Photos interface.
Printing photos in the Organizer
When you’re in the Organizer, the Print Photos dialog box is divided into three sections: one shows a list of photos you’re printing, another shows a print preview, and the third allows you to set the options for your print job. When you change a print option, Photoshop Elements automatically updates the preview. If you’re printing multiple pages of photos, the pages appear as thumbnails in the dialog box. You can use the Navigation buttons to move back and forth between these pages.
1 Select photos in the Media Browser.
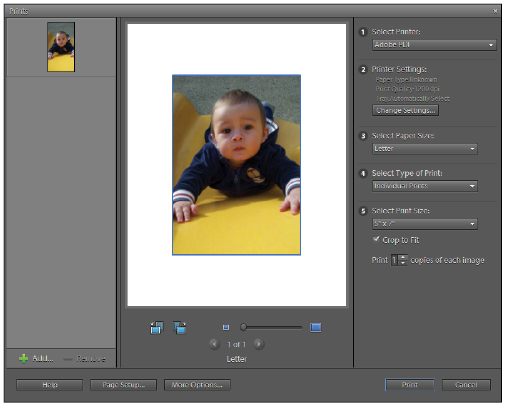
2 Choose File > Print or press the Photo Print button in the Create tab of the Task Pane, then press the Print with Local Printer button. Depending on your operating system, a dialog box may appear indicating that this process will be done in the Elements Editor. Click OK. The Elements Editor opens with the Print dialog active.
3 Choose a paper size from the Select Paper Size drop-down menu.
4 Choose Individual Prints from the Select Type of Print drop-down menu.
5 Choose a print size from the Select a Print Size drop-down menu.
6 Type a number in the Print x copies of each image section.
7 Select Crop To Fit if you want to fit the individual image to your desired print layout. The image is scaled and cropped to reflect the aspect ratio of the print layout. Otherwise you can click on each image in the layout and use the Rotate buttons and the Scale slider at the bottom of the layout to adjust how each image appears.
|
Use the Print Photos dialog box to customize how prints will appear on the page. |
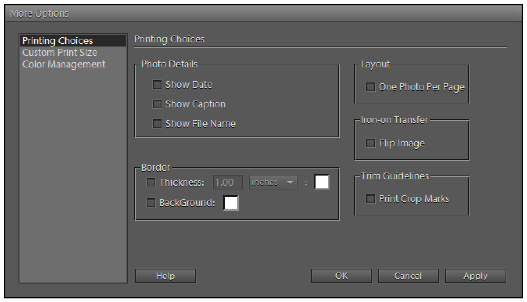
8 Click More Options to choose from, or change, these additional settings:
- Photo Details allows you to show the Date, Caption, and Filename on the final print.
- Border allows you to define the border’s thickness by entering a value in the Border text field.
- Iron-on Transfer (inverts image) is used for printing T-shirt transfers.
- Trim Guidelines prints guidelines on all edges of the photo to facilitate trimming.
- In the Custom Print Size section, define a custom size for output.
- In the Color Management section, you can choose a printer profile from the Print Space drop-down menu. If you have an ICC profile for your printer and paper combination, you can choose it from the menu. See “About color management” on the next page.
|
Press More Options to set additional parameters for your print job. |
9 Press OK.
About color management
Color management helps you to achieve consistent color among digital cameras, scanners, computer monitors, and printers. Each of these devices reproduces a different range of colors, called a color gamut. As you move an image from your digital camera to your monitor, and finally to a printer, the image colors shift. This shift occurs because every device has a different color gamut and thus reproduces the colors differently.
Color management translates the image colors so that each device can reproduce them in the same way, and the colors you see on your monitor will be close to the colors in your printed image. All colors may not match exactly, because the printer may not reproduce the same range of colors as the monitor.
Managing color with profiles
Profiles describe the color spaces of the input device and the document. Using the profiles’ descriptions, the color management system identifies the document’s actual colors. The monitor’s profile tells the color management system how to translate the numeric values into the monitor’s color space. Using the output device’s profile, the color management system translates the document’s numeric values into the color values of the output device, so the actual colors are printed.
Profiling devices
For color management to work, you must profile your devices or use an ICC profile created by the device’s manufacturer.
Capture devices
Profiling can be useful for capture devices such as digital cameras or scanners. You may want to profile a scanner or digital camera, if you want to accurately reproduce the colors in scanned transparencies or digital captures, and reduce your color correction workload in Photoshop Elements.
Monitors
Calibrating and profiling your monitor is important. If you are using a laptop or other LCD monitor, you can use the profile provided by the manufacturer. If you own a colorimeter and corresponding software to create profiles, you can use those profiles in Photoshop Elements. Keep in mind that in order for monitor profiling to work accurately, the lighting environment where you use your monitor must stay consistent.
Printers
Profiling your inkjet printer will generally give you better results, although you can make excellent prints without a printer profile by using the controls in your printer driver. Many printer manufacturers provide ICC printer profiles on their web sites. You need a separate profile for each printer, ink, and type of paper. You can also have profiles made for your favorite combination of ink and paper.
When you work on a photo and save it, Photoshop Elements can embed (tag) an ICC profile that reflects the colors on your computer monitor or the device that produced it. Embedding profiles with an image makes its color portable, so that different devices can translate its color values. For example, if you send the photo to your inkjet printer, the color management system reads the embedded profile and translates the color data using the printer’s profile. Your printer can then use the translated color data to accurately translate its color into the selected media.
Adding photos using the Print Photos dialog box
You can add photos to a print job from within the Print Photos dialog box.
1 In the Print Photos dialog box, press the Add button ( ).
).
2 In the Add Photos dialog box, choose one of the following:
- Photos Currently in Browser shows photos currently visible in the Photo Browser.
- Entire Catalog shows all photos in your catalog.
- Album shows photos from a specific album. Choose an album from the drop-down menu.
- Keyword Tag shows photos with a specific tag. Choose a tag from the drop-down menu.
- Only Show Photos with Ratings shows only those photos marked with a ratings tag.
- Also Show Hidden Media shows only those photos marked with the Hidden tag.
3 Click to select one or more photos. You can also click Select All, then press Add Selected Photos.
|
Use the Add Photos dialog box to view and add photos from other sources. |
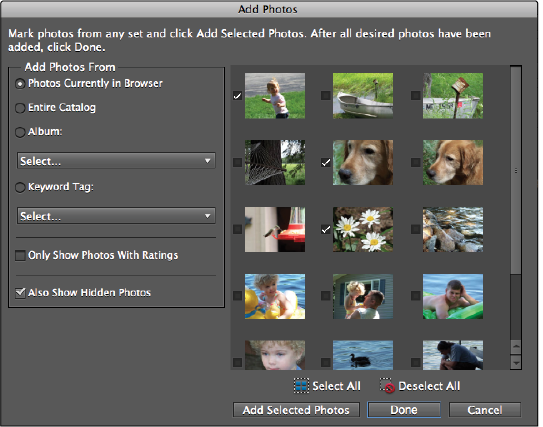
4 Press Done to close the Add Photos dialog.
5 Press Print or Cancel.
Printing a contact sheet
With a contact sheet, you can conveniently preview photos by displaying a series of thumbnail images on one page.
1 In the Media Browser, click to select several photos, and click the Photo Prints button in the Create tab, then click the Print Contact Sheet button. The prints window is displayed.
2 Choose a printer from the Select Printer drop-down menu. You can also press the Change Settings button to set your print options, and choose a page size from the Paper Size drop-down menu.
3 From the Select Type of Print drop-down menu, choose Contact Sheet. All photos listed on the left side of the dialog box are automatically shown in preview.
4 To remove a photo, select it on the left side and press the Remove button.
5 For Columns, specify the number of columns (between 1 and 9) in the layout. The image size and number of rows adjust, based on your choice. If the images don’t fit on a single page, more pages are added to accommodate them.
6 If multiple pages are created, use the Navigation buttons below the layout preview to move through the pages.
7 To adjust the rotation and cropping of the thumbnail images, select the image and use the Rotation buttons and Scaling slider below the layout preview.
8 To add text below each thumbnail, click the Show Print Options checkbox and select any of the following:
- Date includes the date embedded in the image.
- Caption includes the caption text embedded in the file’s metadata.
- Filename includes the image’s filename.
- Page Numbers prints page numbers at the bottom of each page, if multiple pages are required.
To print using color management, click More Options, and choose a profile from the Print Space menu. See “About color management” found earlier in this lesson.
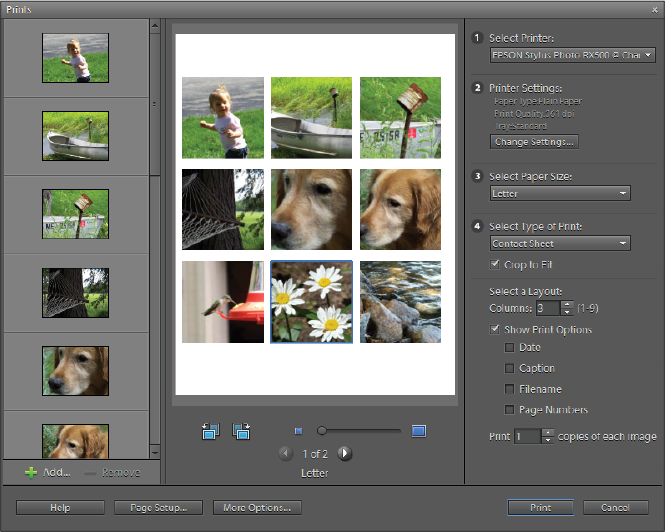
Generating a contact sheet using the Prints window.
9 Press Print to print your contact sheet, or press Cancel to exit the dialog box without printing.
Printing a picture package
The Picture Package feature enables you to place multiple copies of your photos on a single page, in the same way that commercial portrait studios do. Photoshop Elements offers you a number of size and placement options to customize your picture package.
1 In the Media Browser, click the Photo Prints button in the Create tab, then press the Print Picture Package button.
2 Choose a printer from the Select Printer drop-down menu. You can also press the Change Settings button to set your print options, and choose a page size from the Select Paper Size drop-down menu.
3 From the Select Type of Print drop-down menu, choose Picture Package. The first photo listed on the left side of the dialog box is automatically previewed.
4 Choose a layout from the Select a Layout drop-down menu.
5 Choose a border from the Select a Frame drop-down menu if desired. One border will be used for the entire picture package.
6 Click the Fill Page With First Photo checkbox to print images on separate pages. When you choose this option, you can use the Navigation buttons below the preview to view each page.
7 Click the Crop To Fit checkbox to crop photos so that they fit the layout size or use the Rotate buttons and Scale slider at the bottom of the Layout to adjust the orientation of the images.
8 You also have the option to replace a photo in the layout by dragging an image from the list on the left over an image in the layout preview, and then releasing the mouse button.
| You can click the Add button and use the Add Photos dialog box to add photos to your picture package. |
9 To print using color management, click More Options and choose a profile from the Print Space drop-down menu. See “About color management” later in this lesson.
|
Print packages are also created from the Print Photos dialog box. |
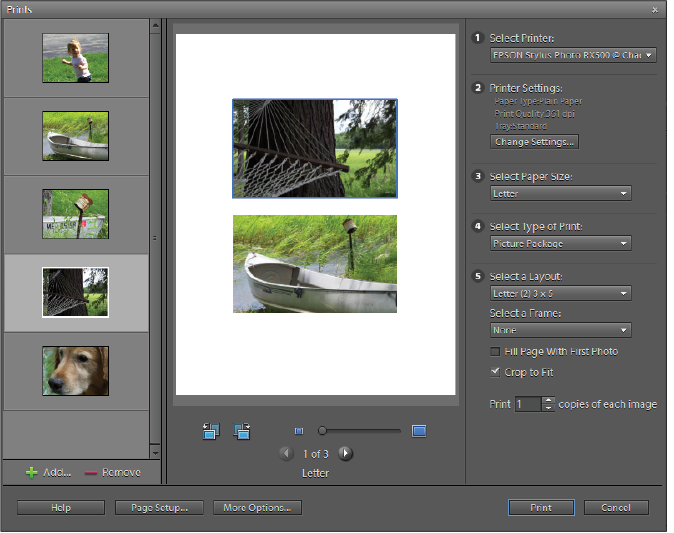
10 Press Print to print your picture package or press Cancel to exit the window without printing.
Continue to the next Photoshop Elements Tutorial: Setting page and printer options in Photoshop Elements >