Photoshop Elements Tutorial: Sharing Your Photos in Photoshop Elements
What you’ll learn in this Photoshop Elements Tutorial:
|
This tutorial provides you with a foundation for working with sharing in Adobe Photoshop Elements. It is the sixth lesson in the Adobe Photoshop Elements 10 Digital Classroom book. |
Photoshop Elements Tutorial: Sharing Your Photos in Photoshop Elements
Photoshop Elements makes it easy for you to share and print your images. You can post photos online, or e-mail them to family and friends, have photos professionally printed by online providers, or print them at your convenience on your home printer.
Starting up
Within the Photoshop Elements Organizer: You will work with several files from the Lessons folder in this lesson. Make sure that you have downloaded the Lessons folder onto your hard–drive. In order to access these files in the Organizer, you need to import them. See “Adding files and folders to the Organizer” located in Lesson 1.
Within the Photoshop Elements Editor: The Photoshop Elements Editor defaults to the last panel layout that you used. Before starting, make sure your tools and panels are consistent with the examples presented in these lessons by resetting the panel locations. Do this by choosing Window > Reset Panels or by pressing the Reset panels button ( ) in the Options bar.
Welcome screen
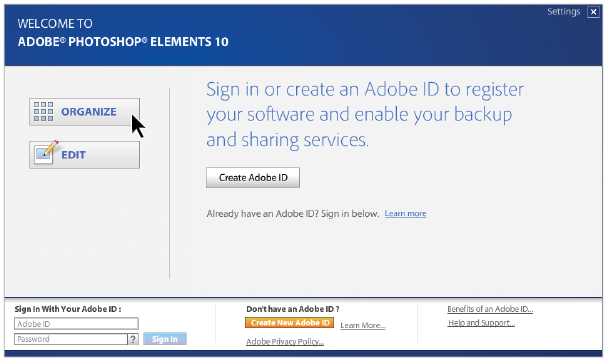
If you’re currently viewing the welcome screen, press the Organize button ( ) to enter the Organizer workspace.
|
The Photoshop Elements welcome screen. |
Sharing photos
After you’ve imported, organized, and edited photos on your desktop, you’ll want to share them with family and friends. With Photoshop Elements, you can share photos with others through an interactive online album, via Facebook, Flickr, SmugMug, or through e-mail that you send. You can also print photos on your own printer, order professionally printed photos, or put your photos on a CD or DVD. In this exercise, you’ll learn a variety of ways to share photos from the Organizer.
 | In the Editor, you can also share photos that you’ve edited or have open in the Project Bin. |
Creating an online album
The Online Album Wizard provides step-by-step guidance for adding, deleting, and arranging photos, choosing a layout template, and sharing your files. Later in this exercise, you will be prompted to sign in with your Adobe ID. If you wish, you can sign in now by pressing the Sign In option at the top of the Organizer or Editor workspace, or even from the Welcome Screen. If you do not have an Adobe ID, press the Join Now button and create one in order to proceed with the exercise. An Adobe ID is free and only takes a few minutes to set up.
| The Online Album Wizard lets you arrange photos. It does not allow you to edit them. |
1 You’ll be sharing photos from the Photos to Share folder within the Lessons folder. These images were already imported into the Organizer when you added the Lessons folder in Lesson 1, see “Adding files and folders to the Organizer,” if you skipped this step. Type share into the search text field at the upper-left of the Organizer workspace to isolate the sixteen images for this lesson.
2 In the Organizer, click to select 10 photos that you’d like to include in your online album. You can use the Ctrl key (Windows) or Command key (Mac OS) to select multiple items.
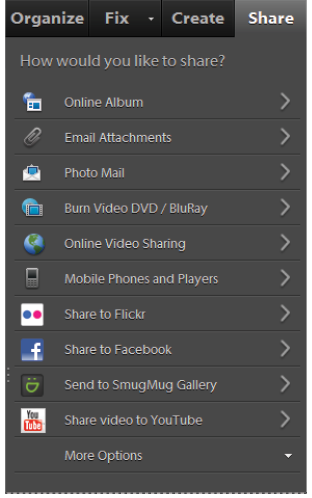
3 Click the Share tab to select the way you want to share photos.
|
Click the Share tab to choose how you want to share photos. |
4 Click Online Album to open the Online Album Wizard in the Organizer and click the Create New Album radio button.
5 Under Share To, specify one of the following sharing options for your online album:
- Photoshop.com allows you to share your albums online.
- Export to Hard Disk allows you to save the files locally on your hard drive.
6 Choose Photoshop.com and press Next.
7 If you work with album categories, choose the appropriate category from the drop-down menu.
|
Use the Online Album Wizard to customize your online album. |
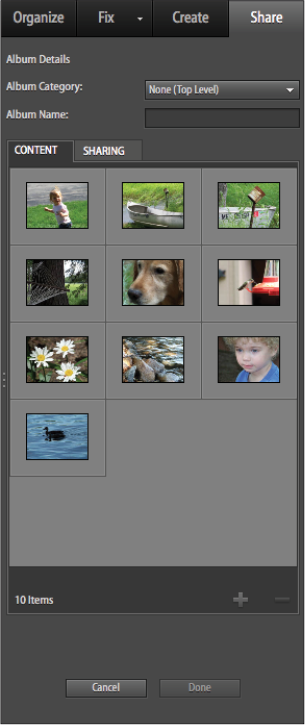
8 Type Summertime in the Album Name text field.
9 Select two more photos in the Organizer and then press the Add items selected in Media Browser button ( ). You can also drag photos from the Organizer into the Items area.
10 Select one of the photos you just added to the Items area and then press the Remove selected items button ( ) to remove it from the album.
11 Drag the thumbnails to arrange them in the order that you want them to appear. When you place your cursor over a thumbnail you will see a hand icon ( ). As you drag the thumbnail, the other thumbnails shift slightly to indicate the placement of the one you are dragging.
12 Press the Sharing tab at the top of the panel. Photoshop Elements builds an album preview for you.
|
Photoshop Elements builds an album preview for you. |
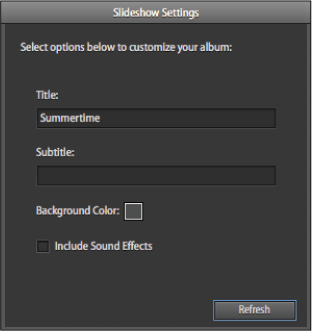
13 Double-click the different templates available at the top of the screen. As you choose different templates, a Slideshow Settings window may appear in the main slideshow window providing options for the selected template. Enter a Title and Subtitle of your choice. If available, click the Include Sound Effects checkbox if you’d like sound effects played in your slideshow. You can also change the background color from this window.
14 When you are finished entering information into the Slideshow Settings window, you can press the Show/Hide Slideshow settings button ( ) located above the template thumbnails to hide the window.
|
The Slideshow Settings window. |
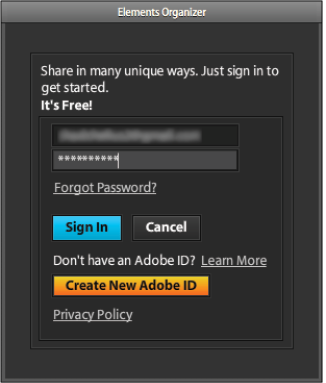
15 Click the Share to Photoshop.com checkbox. If you haven’t already signed in with your Adobe ID, you will be prompted to sign in at this time. If you do not have an Adobe ID, you will need to press the Create New Adobe ID button and create one in order to proceed with the exercise. As you go through the steps, Elements may provide a URL for you. Jot this down so you can recall it later.
|
Sign in with your Adobe ID. |
Sharing options for online albums
The options in the Sharing tab allow you to control whether your new online album is public or private and also lets you control whether viewers are allowed to download photos, or order prints from your images. Photoshop Elements also lets you automatically send e-mail to people in your contact list to notify them that a new album has been shared on Photoshop.com.
|
Choose your sharing options in the Online Album Wizard. |
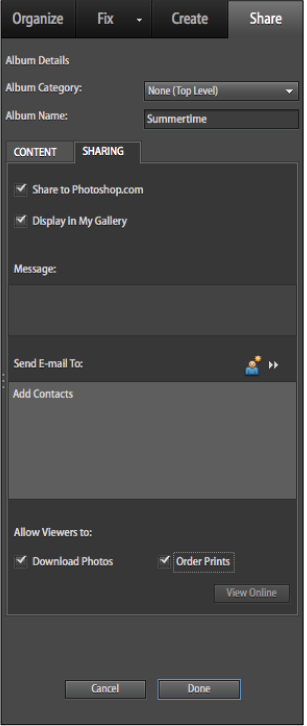
In the Online Album Wizard, you can set the following sharing options:
- Clicking the Display in My Gallery checkbox makes your online album viewable by other Photoshop.com members.
- The Message text field allows you to add a descriptive message to your online album.
- Select the people who can view your gallery in the Send E-mail To box. You can also press the Edit Recipients in Contact Book button (
 ) if you want to add another name and e-mail address to the list.
1 Under Allow Viewers to, select any of the following options:
- Download Photos allows recipients to download photos from your online album.
- Order Prints allows recipients to order photos from printing services connected with Adobe.
2 Make sure that you’ve chosen an e-mail address or you’ve checked the Display in My Gallery checkbox, then press Done.
Photoshop Elements shares creates an album based on the name that you specified and uploads your images to photoshop.com using the Backup/Synchronization feature. To check the status of the upload, click on the Organize tab and then click on the Backup/Synchronization status icon (
 ) next to the Summertime album. On the Mac OS, the button is located at the bottom of the Organizer Window. If using a Mac OS computer, click the button and select View Backup/Synchronization Status to open the window.
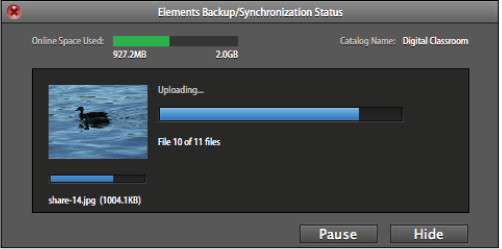
Photoshop Elements uploads your album to Photoshop.com.
Stop sharing an online album
If at any time you’d like to stop sharing your online album, you can do so easily:
1 Click the Organize tab, and in the Albums panel, click once to highlight the album you are sharing.
2 Press the Stop Sharing button ( ) to the right of the album name.
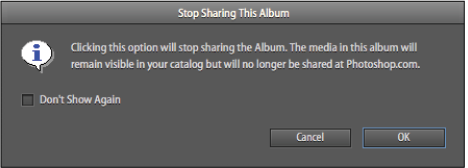
3 In the Stop Share Album dialog box, press OK.
|
You can stop sharing an album at any time. |
4 Begin sharing the album again by clicking on the Share Album icon ( ) next to the Summertime album.
Viewing an online album
When Photoshop Elements has completed uploading (synchronizing) your images, you can view the online album in a browser to see the results.
1 In the Organizer, click on the Organize tab.
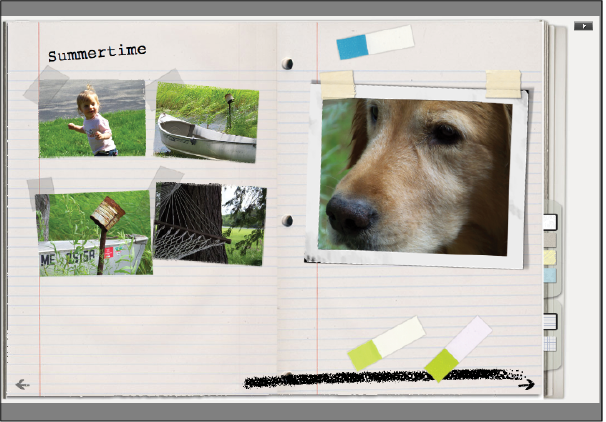
2 Right-click on the Summertime album and choose View Summertime Album Online. Your online album opens in your default web browser. Click the slideshow button to play the slideshow using the template that you applied in the Elements Organizer.
|
Your online album after uploading to Photoshop.com. |

Sharing photos via e-mail
Photoshop Elements makes it easy to share photos via e-mail. You can either attach individual photos to an e-mail using your e-mail client, or use Photo Mail to embed a photo in an e-mail.
Attaching a photo to an e-mail
This feature allows you to send photos as individual e-mail attachments. You can specify the size of the photo, and also convert images to JPEG format if necessary.
Before sending your files, it’s best to do the following:
- Set your e-mail preferences. You can change the image size and compression settings so that photos download quickly without significant loss of detail. You can also choose to save files to a folder on your hard drive to facilitate manually attaching them to e-mail.
- Set up your contact book. You can address e-mail messages ahead of time, and keep track of those you’ve shared photos with. Keep in mind, however, that you can always address the e-mail from inside your e-mail client. You can choose Edit > Contact Book to add contacts.
After this setup is complete and you’ve created an e-mail, all that’s left to do is to send it and share your photos with friends and family.
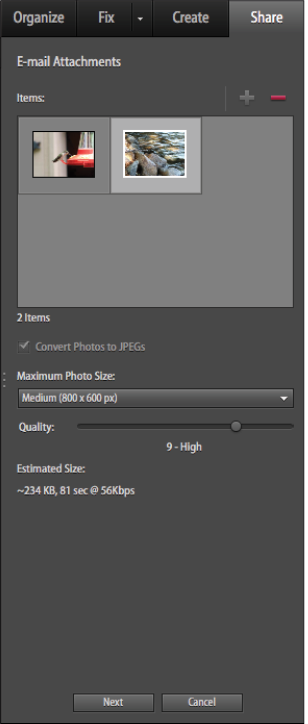
1 Select a photo in the Photo Browser, click the Share tab, and then press the E-mail Attachments button.
If this is the first time you’re e-mailing a photo, Photoshop Elements asks you to confirm the e-mail client you want to use.
2 To add more photos to the e-mail, select them in the Photo Browser, then press the Add button ( ). Please keep in mind that your internet service provider may limit the size of e-mail attachments. This limit varies but is usually somewhere between 5-10 MB.
| You can also remove items by selecting them in the list, and then pressing the Remove button ( |
 ).
).3 Select an option from the Maximum Photo Size drop-down menu, and use the Quality slider to adjust image clarity. Images that are smaller in physical size and lower in quality will have a smaller file size. Since your Internet Service Provider may have a limit on the size of file attachments in e-mail, these are very important options to pay attention to.
|
Define the size and quality of an e-mail attachment. |
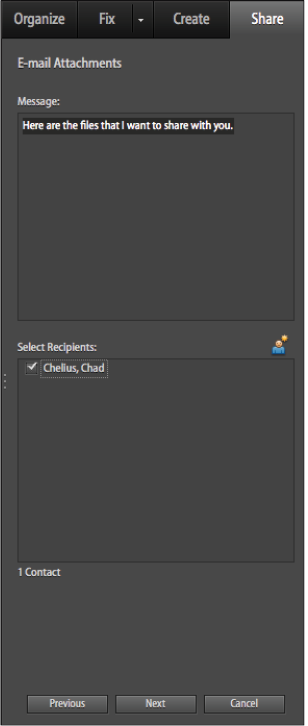
4 Press Next. Enter a descriptive or personalized message in the Message text field.
5 Select e-mail recipients (from your contacts) by clicking names in the Select Recipients section.
| You can also choose not to select any recipients at this time, and instead enter the addresses when the e-mail message appears. |
|
Add a message to your e-mail and send it to your selected recipients. |
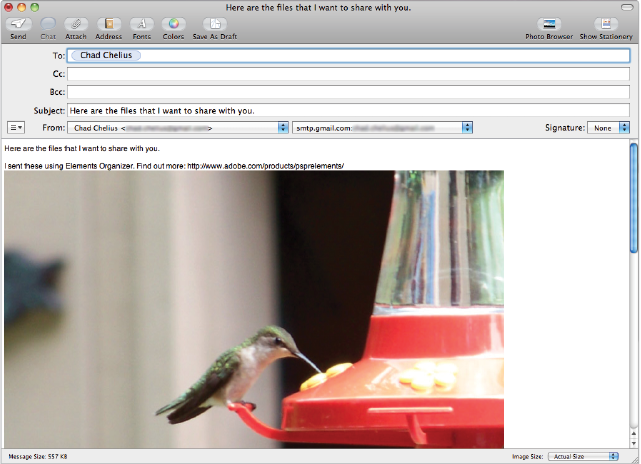
7 Press Next. The e-mail application specified in the Sharing Preferences opens. If Photoshop Elements doesn’t support your preferred e-mail client, use it instead to attach the file manually. When you are finished with the e-mail, return to Photoshop Elements.
| If you are using the Adobe E-mail service as your e-mail client, before you can send an e-mail you will be asked to verify the e-mail address you want to use. This verification process needs to be completed only once. |
|
Your e-mail is created with attachments and message included. |
Sending a photo using Photo Mail
Photo Mail provides you with a wizard that helps you to embed your photos in the body of an e-mail message, complete with your choice of custom layouts, called stationery. You can choose from a variety of stationery themes, backgrounds, frames, and borders, among other options. Photo Mail is a feature available only in the Windows version of Photoshop Elements. If you are running Photoshop Elements on the Mac OS, skip to the next section.
After you select your stationery, Photoshop Elements automatically converts all images to the JPEG format and generates the e-mail.
| You can send Photo Mail through Microsoft Outlook, Windows Mail, or Adobe E-mail Service. |
To send a photo using Photo Mail, follow these steps:
1 Select a photo in the Photo Browser, press Share, then press Photo Mail.
2 If this is the first time you’re e-mailing a photo, confirm your choice of e-mail client and then press Next. You can also choose your preferred e-mail client by choosing Edit > Preferences > Sharing.
3 Click the Include Caption checkbox if you’d like to include any captions that you’ve added to your photos in the final email. You can also drag the image thumbnails to change the order that the photos appear in the final email. Press Next.
4 Type a message in the Message text field that you’d like to appear in the sent e-mail and then select the Edit Recipients In Contact Book button ( ), enter new recipients in the list and press OK. The recipient appears in the Select Recipients list. Click the Next button.
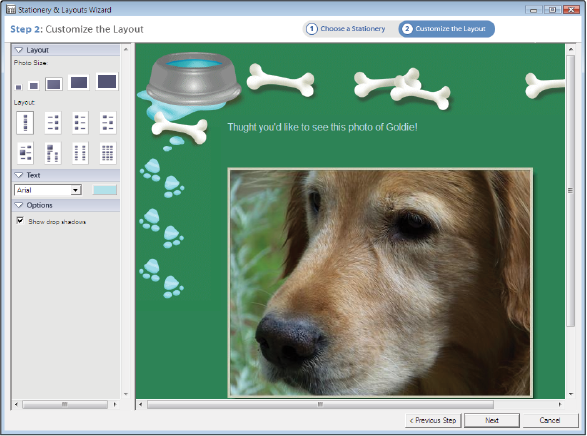
5 In the Stationery & Layouts Wizard, choose a stationery style. There are multiple categories from which to choose. Then press Next Step, and fine-tune the layout by experimenting with the options available on the left side of the wizard.
|
Choose a stationery to customize your Photo Mail layout. |
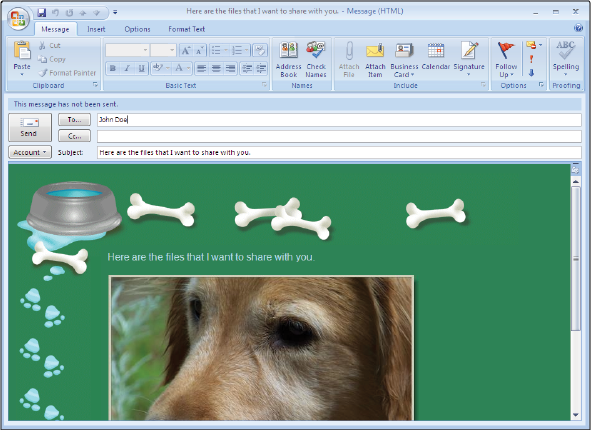
6 Press Next. Photoshop Elements opens your default e-mail application, and allows you to send Photo Mail. When you are finished with the e-mail, return to Photoshop Elements.
|
Your Photo Mail is created with the stationery you specified. |
Setting up Adobe E-mail Service
If you use a web-based e-mail client such as Google’s Gmail or Yahoo Mail, you can also use the Adobe E-mail Service to send Photo Mail directly to recipients. The Adobe E-mail Service is available in the Windows version of Photoshop elements only, if you are running Photoshop Elements on the Mac OS, skip to the next section. The first time you use Adobe E-mail Service, you must register and provide e-mail verification.
| You must have a valid e-mail address and an Internet connection to use the Adobe E-mail Service. |
To send Photo Mail using Adobe E-mail Service, follow these steps:
1 Choose Edit > Preferences > Sharing, and select Adobe E-mail Service from the E-mail Client drop-down menu.
|
Use Adobe E-mail Service to send Photo Mail directly to recipients. |
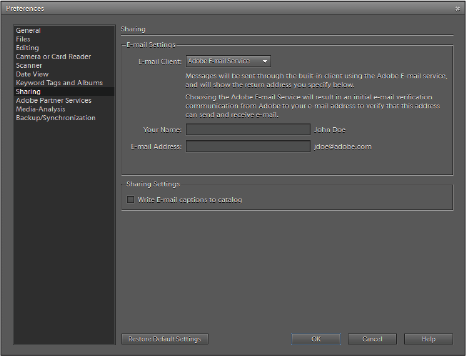
2 Type your name and e-mail address in the designated text fields. Press OK, if you are prompted to do so.
3 The first time you use Adobe E-mail Service, a verification e-mail is sent to the address you just specified. In the body of the e-mail, there is a Sender Verification code. When you are prompted to enter the code, copy and paste it from the e-mail into the dialog box, and then press OK.
4 As soon as your e-mail is verified, press OK.
Now, whenever you’re connected to the Internet, you can send e-mail directly from Photoshop Elements.
Continue to the next Photoshop Elements Tutorial: Sharing photos using online services in Photoshop Elements >