Premiere Pro tutorial: Making the Cut in Premiere Pro
What you’ll learn in this Premiere Pro Tutorial:
|
This tutorial provides you with a foundation for working with cuts in Adobe Premiere Pro. It is the third lesson in the Adobe Premiere Pro CS5 Digital Classroom book. For more Adobe Premiere Pro training options, visit AGI’s Premiere Pro Classes. |
Adobe Premiere Pro Tutorial: Making the Cut in Premiere Pro
Video editing changes the arrangement and duration of video and audio clips to craft a narrative. An editor arranges footage to create a coherent story paced to appeal to the audience. Now that you have learned to organize your project, in this lesson you will discover how to edit clips on the Timeline.
Starting up
In this lesson, you will work with the project files from the pr03lessons folder. Make sure that you have loaded the prlessons folder onto your hard drive from the supplied DVD. The Starting Up section at the start of this book provides detailed information about loading lesson files, resetting your workspace, locating missing media, and opening the files in CS5.5. If you have not already done so, please review these instructions before starting this lesson.
The cuts-only editing methodology
In traditional film and video, continuity editing makes use of very few transitions, and the straight cut is the preferred method of getting from one scene or shot to another. When working with a cuts-only editing approach, the editor attempts to find a match cut, in which different scenes, people, or objects share a similar visual relationship. This relationship can be based on screen position, similar movement or color value, or a wide variety of other criteria. This type of cut forms the basis of the continuity editing style, the goal of which is to create a seamless and non-jarring change.
A-roll vs. B-roll
The terms A-roll and B-roll describe the primary and secondary footage shot and used in video and film productions. In an edit, B-roll is used to add or enhance the meaning of the main footage or to cover the removal of unwanted or error-ridden material. For example, in a documentary production, the A-roll would contain interview footage and the B-roll would contain exteriors, establishing shots, or footage that describes or illustrates the topics described in the documentary. In dramatic work, the B-roll might contain additional angles on the main subject or secondary subjects present in a scene.
Cut-ins and Cut-aways
Cut-ins and cut-aways are instantaneous shifts in the framing of a shot. Both techniques are related to the primary focus or action of a scene and can be used to enhance the meaning or alleviate the tedium of long scenes. Cut-ins and cut-aways are often used to show an event occurring alongside the main action of the scene. A Cut-in is a cut that shifts from the main subject (A-roll) to an event occurring inside the same scene. For example, if your main scene involves two people shaking hands, a possible cut-in might be a close-up of the handshake.
A Cut-away is a cut away from the main action to other simultaneous events. For example, in the scene of the two people shaking hands, a possible cut-away might show other people entering the room. Cut-ins and cut-aways rarely add dramatic content, but usually control the pacing of longer scenes, introduce new elements to the main scene, or emphasize elements already present.
Cutting on action
Cutting on action is a standard practice of continuity editing that refers to a technique in which you cut from one shot to another that matches or anticipates the action of the first shot. In other words, a subject begins an action in one shot and seems to complete or continue it in the next, creating a visual join or bridge that prevents the viewer from noticing the cut itself. For example, a shot of someone beginning to bow can be cut to a shot of the same subject continuing the action from a different angle. A shot of a person looking up in response to a knock on a door can be cut to a shot of another person walking through a door.
In this lesson, you will use A-Roll and B-Roll footage to create a faux newscast. This footage is from a short film project named Riding Hood, about a group of folkloric creatures roaming the streets of New York City. In the scene used for this lesson, the police are investigating an attack on a pedestrian in Central Park, and a reporter from a local news network has just arrived to cover the story. You will have A-roll of the news reporter to be intercut with B-roll footage of comments from onlookers and establishing shot of the area. To complete this edit, you will trim clips in the Monitor and Timeline, add extra tracks to the Timeline to hold your clips, and learn to specify the destination track for inserted footage.
All of the media used in this section of the lesson can be found in the Werewolves of Central Park folder in the Media Library. The Reporter at Crime Scene.mpeg file can be found in the A-Roll sub-folder while the remainder of the footage used can be found in the B-Roll sub-folder.
Trimming clips in the Source Monitor
The Source Monitor is one of the most important tools you can use to preview and trim clips in preparation for the Timeline. You can preview all footage used in Premiere Pro using the Source monitor, except for the content of Sequences, which you can preview in the Program Monitor. To preview footage, you can double-click a footage item or drag it to the Source Monitor panel.
Every clip in the project panel and on the Timeline has an In Point, an Out Point and a duration. When a clip is imported into Premiere Pro, its In and Out points are automatically set to the physical beginning and end of the clip, allowing it to run for its full duration. However, many times you might want to use a portion of a clip in your project. In such situations, you can trim the clip by setting new In and Out points using the Source monitor.
1 From the Premiere Pro welcome screen, click the Open Project button, or with Premiere Pro already open, chose File > Open Project. Navigate to the pr03lessons folder that you copied to your hard drive and locate the pr0301.prproj file. Double-click the file to open it.
This project contains a sequence named Central Park Coverage that already has a single clip on the Timeline. The project panel is already organized with a video bin that contains two sub-bins named A Roll and B Roll, each of which contains its respective video footage.
2 Choose File > Save As. In the Save Project dialog box that appears, confirm that you are still in the pr03lessons folder, rename your file to pr0301-working, and then click the Save button.
3 In the Project panel, click the reveal triangle to the left of the B Roll folder to show the four B-roll clips that you can use in this project.
If you cannot see the full clips names, click on the dividing line between the Name and Label column headings in the Project Panel and drag it to the right. Expand the Name field until the names of all the video clips in the B Roll folder are visible.
 | Expanding the Name field might place the Label field offscreen. |
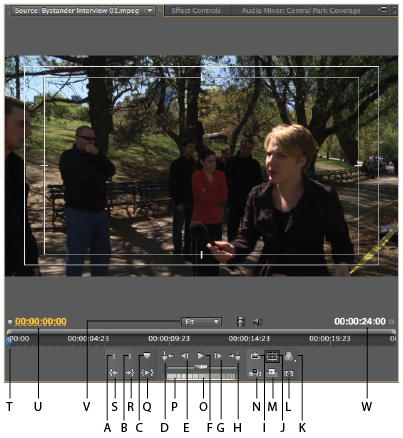
4 Double-click the clip named Bystander Interview 01.mpeg to open it in the Source Monitor.
| You must double-click the video icon to the left of the clip’s name to open a clip in the Source Monitor, rather than the name itself. |
This clip is 24 seconds in duration and involves the reporter interviewing a panicky bystander.
|
A. Set In Point. B. Set Out Point. C. Set Un-numbered Marker. |
| In Premiere Pro CS 5.5 the Overlay Edit command has been renamed Overwrite. |
5 Click the Play-Stop Toggle button at the bottom of the Source Monitor to preview the file.
Notice the handles (extra footage) around the bystander’s ranting. This clip actually begins before the bystander is even on-screen and ends after the most interesting parts of his ranting have completed. We highly recommend that you shoot and capture footage with this extra padding so you do not accidentally finish with a clip that starts or ends right on the action or dialog you want to use.
Your first task is to remove this extra footage and trim the clip, as explained in the next step.
| You can click the Play-Stop Toggle button at any time to stop the Monitor preview. |
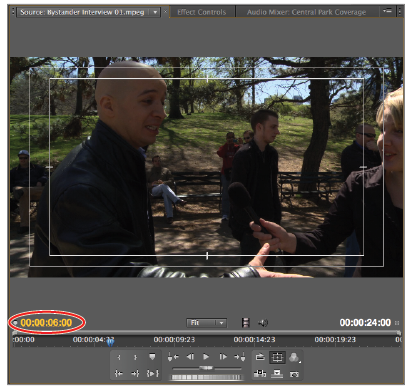
6 At around the 6-second mark, the interviewee starts moving around and gesticulating frantically. Make this the beginning of the clip to exclude all previous footage from the Timeline.
Click the current time field in the Source Monitor, change the value to 600, and press the Enter (Windows) or Return (Mac OS) key on your keyboard to move the playhead to the 6-second mark (00;00;06;00) on the Timeline.
|
When entering a time code location into the current time field, you |
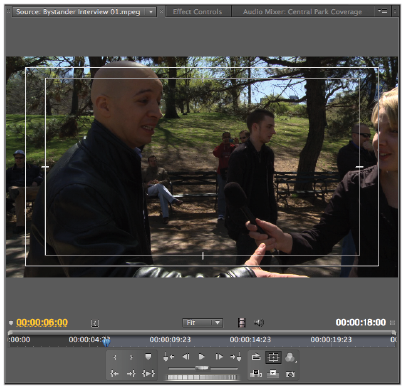
7 Click the Set In Point button located at the bottom of the Source Monitor to set the In Point at the beginning of the clip and match the current position of the playhead.
|
Notice that the clip’s duration has changed and the area between the playhead |
| The keyboard shortcut to set the In Point to the current position of the playhead is the I key. |
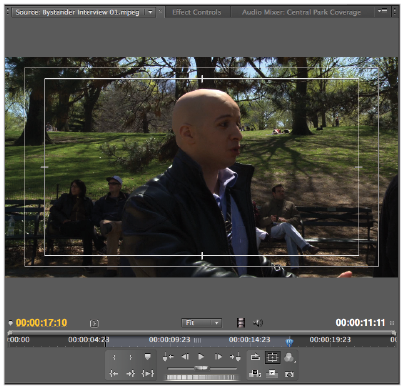
8 Click the current time field in the Source Monitor, change the value to 1710, and press the Enter (Windows) or Return (Mac OS) key on your keyboard to move the playhead to the 17-second and 10-frame mark (00;00;17;10) on the Timeline.
9 Click the Set Out Point button located next to the Set In Point button at the bottom of the Source Monitor to set the new end of the clip to match the current position of the playhead.
|
Notice that only the area between the current In and Out Points |
10 Click the Play In to Out button located on the row of buttons right below the ones you used to set the In and Out Points. This will play only the video located between your current In and Out Points.
The trimming you just completed is rough, so you will refine this edit later in the lesson after adding it to the Timeline. You can use the Source Monitor to perform rough edits, and polish the clip after you add it to the Timeline to see how it integrates with the clips adjacent to it.
| You can use the Transport controls, located in the center of the Source and Program Monitors and similar to the buttons you find on most media players, to play, pause, and move forward or backwards through video clips. Use the Play In to Out button to play the video located between the In and Out points only; use the Play button in the Transport controls to play the entire duration of the clip. |
11 Choose File > Save or press Control + S (Windows) or Command + S (Mac OS) to save these changes to your project. Do not close this file; you will need it in the next part of the lesson.
Continue to the next Premiere Pro Tutorial: Using multiple video tracks in Premiere Pro >