Photoshop Tutorial: Taking advantage of Smart Filters in Photoshop CS6
What you’ll learn in this Photoshop Tutorial:
|
This tutorial provides you with a foundation for working with Adobe Photoshop smart filters. It is the eleventh lesson in the Adobe Photoshop CS6 Digital Classroom book. For more Adobe Photoshop training options, visit AGI’s Photoshop Classes. |
Photoshop Tutorial: Taking advantage of Smart Filters in Photoshop CS6
The filters you applied in the last section were destructive, meaning that any changes you made using these filters affected your original image data. As you discovered in Lesson 10, “Getting Smart in Photoshop,” Smart Filters are a non-destructive way to apply filters to an image. In this lesson, you will practice applying filters using the Smart Filter feature.
Applying a Smart Filter
1 Select the monster3 layer in the Layers panel.
2 Choose Filter > Convert for Smart Filters. A warning dialog box may appear, advising you that the layer will be made into a Smart Object. Press OK.
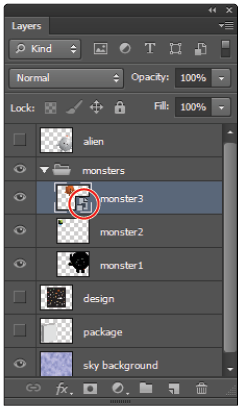
A Smart Object icon appears in the lower-right corner of the monster 3 layer thumbnail. This indicates that this layer is now converted for use with Smart Filters. Next, you will apply some filters in the Filter Gallery, and then update and change the way the filters are applied to the image.
|
The Smart Object icon on the layer thumbnail. |
3 Make sure that the monster3 layer is still selected, and then choose Filter > Filter Gallery. Make sure you do not select the Filter Gallery listed first in the Filter menu.
Note that the last filters you used are applied to the layer by default, although these can be changed.
4 Click on the Craquelure filter effect in the list of filter effects in the lower-right side of the Filter Gallery dialog box.
5 In the filter categories section, expand the Artistic category and select Plastic Wrap. The Plastic Wrap filter replaces the Craquelure filter.
6 Click on the Fresco filter effect and then select the Sponge filter effect from the Artistic category. The Sponge effect replaces the Fresco effect.
7 Using the sliders, in the filter effects options, change the Brush size to 0, the Definition to 6 and the Smoothness to 2. Press OK.
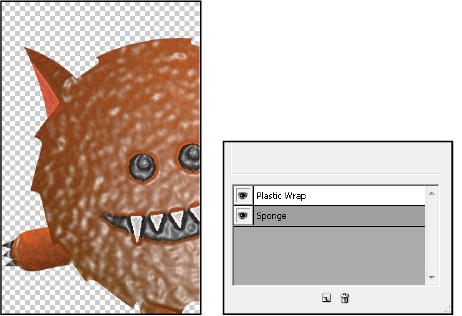
A thumbnail appears underneath your monster3 layer named Smart Filters.
|
The image now has texture applied. Two filters have been applied. |
You have just applied filters from the Filter Gallery to the monster3 layer, much the same way you applied filters to the monster1 and monster2 layers. The difference is that you converted monster3 to a smart object before applying the filters. This offers you the opportunity to make changes, or even delete the filters at a later time.
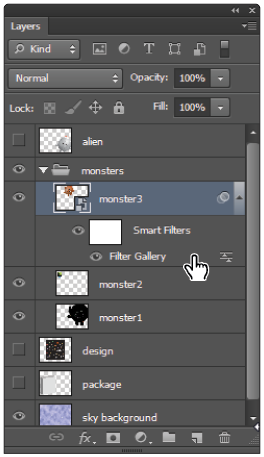
8 In the Layers panel, double-click on Filter Gallery located underneath the monster3 layer. The Filter Gallery dialog box opens again.
|
Editing a Smart Filter. |
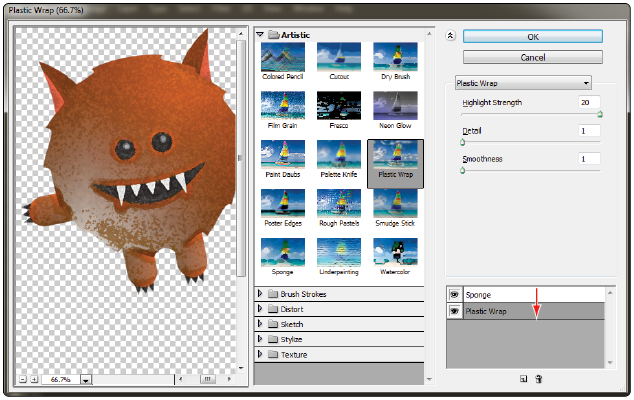
9 In the filter effects area, select Plastic Wrap from the list of applied filters.
10 Using the sliders in the Plastic Wrap effect options, change the Highlight Strength to 20, the Detail to 1 and the Smoothness to 1.
11 In the filter effects area of the Filter Gallery, drag Plastic Wrap below Sponge. This changes the filter order, and creates a different effect. Press OK.
|
Changing the order of the filters. |
12 Choose File > Save.
Smart Filter options
Next, you will explore additional filter options. You’ll start by fading the filters and by editing the Smart Filter Blending Options. You will then discover how to disable a filter and how to take advantage of the Filter effects mask thumbnail.
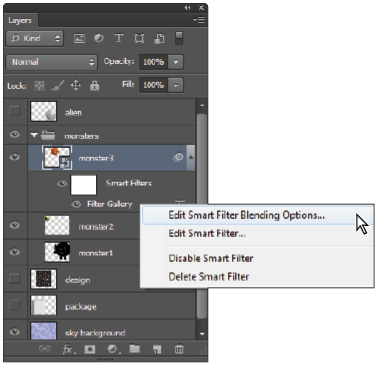
1 In the Layers panel, right-click (Windows) or Ctrl+click (Mac OS) on Filter Gallery, located under the monster3 layer Smart Filter. Select Edit Smart Filter Blending Options from the contextual menu.
|
Editing the Blending options. |
Like the Fade option used earlier in this lesson, the Smart Filter blending options allow you to control the intensity of a filter. However, this method is non-destructive. You can change the Fade settings multiple times and not impact the original image. You can also access the Blending Options at any time, unlike the Fade dialog box, which had to be accessed immediately after applying a filter to a regular (non-smart) layer.
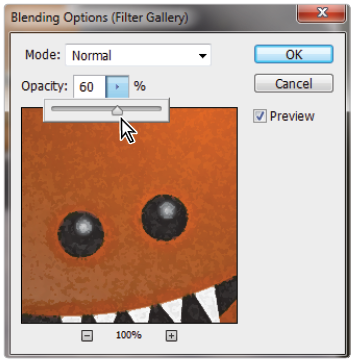
2 In the Blending Options dialog box, click and drag the opacity slider to the left, lowering the opacity to 60 percent. Click the Preview checkbox on, and then off, to see the change that has been applied to the image, then press OK.
|
Editing the Blending options. |
Smart Filter Blending Options with the specified opacity.
3 Choose File > Save.
Enabling and disabling effects
Because you used a Smart Filter, you can turn the filter on or off.
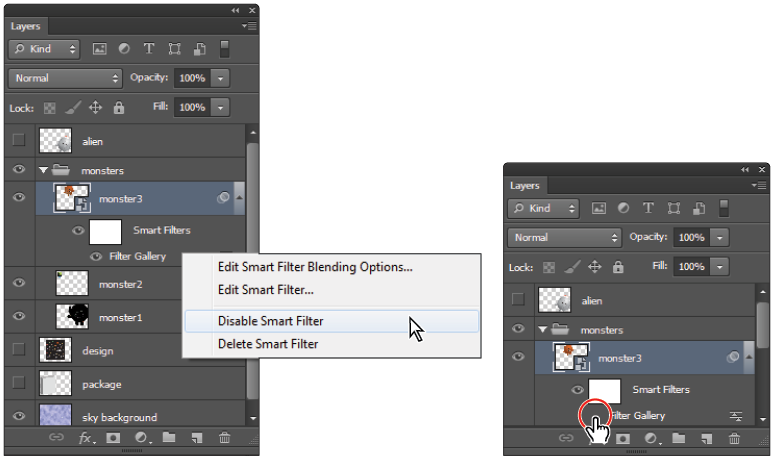
1 In the Layers panel, right-click (Windows) or Ctrl+click (Mac OS) on Filter Gallery under Smart Filters in the monster3 layer, and choose Disable Smart Filter to hide the filter’s effect.
2 You can also turn off the visibility of the filter by clicking the Visibility icon ( ) to the left of the filter name in the Layers panel; click again on the Visibility icon to make the filter visible.
3 Right-click again on the Filter Gallery filter and choose Enable Smart Filter to turn the filter back on.
|
Selecting Disable Smart Filter. The visibility of the Smart Filter turned off. |
Using a filter effects mask
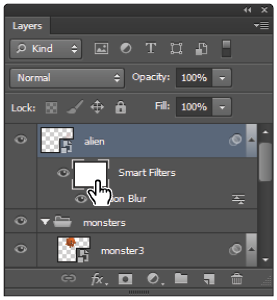
When you apply a filter to a layer that has been converted for Smart Filters, a mask, called the Filter effects mask thumbnail, is created. This provides the ability to selectively modify a filter effect. The thumbnail appears on the smart object layer as a white box labeled Smart Filters. You can click on the mask to activate it, and then paint with shades of black or white to hide or show the filter’s effect on the layer. You’ll now convert a layer for Smart Filters, apply a few filters, reduce the opacity of those filter effects, and then mask the effects to appear on only portions of the image.
1 To give you more room to work in the Layers panel, click the triangle next to the monsters layer group to collapse the monster layers into the folder.
2 Click the Visibility icon next to the alien layer to show the alien image, and then click on the alien layer to select it.
3 Select Filter > Convert for Smart Filters; if a warning dialog box appears, press OK.
You will now apply a motion blur to this layer. It may appear drastic at first, but you will customize the application of the filter using the Filter effects mask thumbnail.
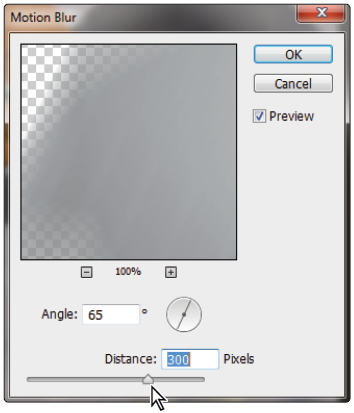
4 Choose Filter > Blur > Motion Blur. The Motion Blur dialog box appears. Type 65 into the Angle text field, and then use the slider to set the distance for approximately 300 pixels. Press OK.
|
Apply the motion blur filter to the alien layer. |
5 Click on the white thumbnail that appears to the left of Smart Filters in the Layers panel. This is the Filter effects mask thumbnail.
|
Click on the Filter effects mask thumbnail. |
6 Select the Gradient tool from the Tools panel and press D to reset the foreground and background colors back to the default of black and white.
7 With the Gradient tool selected, review the settings in the Options bar to make sure that Linear gradient is selected, the Blending mode is Normal, and the Opacity is 100%.
|
Verify the Gradient tool settings. |
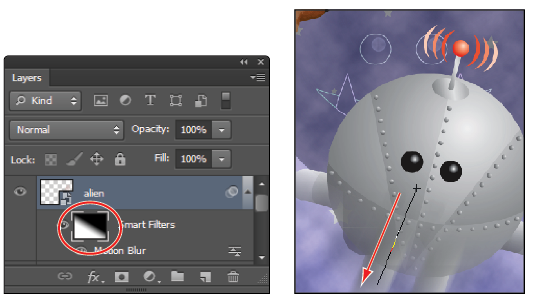
8 Click and drag across the alien image. Notice that the motion blur filter now fades into the original image. Click and drag multiple times to see the different results you achieve by selecting new start and end points.
Notice how the dark to light gradient on the Filter effects mask affects the application of the filter. Where it is dark, the filter is less visible. Where it is light, the filter is more visible.
9 When you are finished experimenting, press X on the keyboard to switch the Foreground and Background colors so that black is the Foreground. With the Gradient tool active, click beneath the eyes and drag downward toward the alien’s feet and then release. The motion blur is now only occurring at the bottom of the alien.
|
Selecting the Smart Filters mask thumbnail. Click and drag with the Gradient tool. |
You will now use painting tools to control the mask more precisely.
10 Select the Brush tool ( ).
).
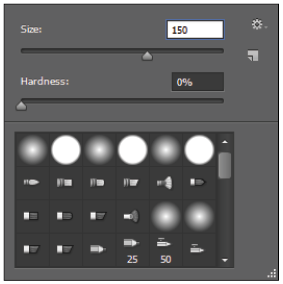
11 With the Brush tool selected, right-click (Window) or Ctrl+click (Mac OS) anywhere in your image area to open the Brush Preset picker. Type 150 into the Size text field and 0 (zero) into the Hardness text field. Press Enter (Windows) or Return (Mac OS) to close the Brush Preset Picker.
|
Access the Brush Preset picker contextually. |
12 Press D on the keyboard to make sure you are at the default colors of black and white.
13 Press X on the keyboard to switch the foreground and background colors. Your foreground color should be black.
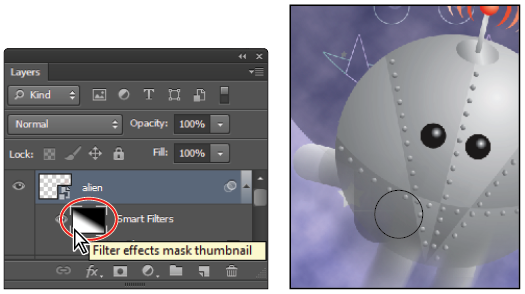
14 Using the Brush tool, paint directly on the image at the bottom of the alien’s body, notice that as you paint on a region affected by the filter, that the filter is not applied. Continue experimenting with painting out the filter effect on the alien’s body, leaving the effect on the legs.
|
Paint black while the Filter effects The filter is not applied in those regions. |
15 Press X to switch to white as a foreground color. Paint over some of the areas where the filter effect is not occurring. Notice that the effect is again revealed.
Experiment with this technique, pressing X to switch between painting the effect and covering it up, also experiment with changing the Brush tool’s opacity (in the Options bar) to create more subtle effects.
16 Choose File > Save. Keep this file open for the next part of this lesson.
Continue to the next Photoshop Tutorial: Using the Vanishing Point filter in Photoshop CS6 >
