Photoshop Elements Tutorial: Using the Clone Stamp tool in Photoshop Elements
What you’ll learn in this Photoshop Elements Tutorial:
|
This tutorial provides you with a foundation for working with the clone stamp tool in Adobe Photoshop Elements. It is the eighth lesson in the Adobe Photoshop Elements 10 Digital Classroom book. |
Photoshop Elements Tutorial: Using the Clone Stamp tool in Photoshop Elements
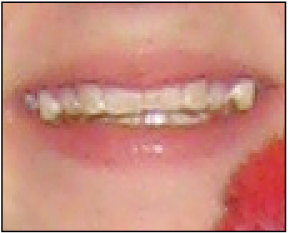
The healing tools are very good when you need the soft retouching effect that they provide. The main difference between the Healing Brush and Clone Stamp tools is that when cloning with the Healing Brush, the tool attempts to match the tonality of the underlying area with what you are cloning, so you may see the cloned area’s tonality adjust. The Clone Stamp clones exact information. In other words, what you see is what you get. Sometimes you need a little more precision, like when removing the girl’s tooth from her lip. In this exercise, you will use the Clone Stamp tool to replace the girl’s tooth with the surrounding lip.
1 Select the Clone Stamp tool ( ) from the Toolbox. Look at the settings in the Options bar at the top to make sure the Mode is set to Normal and the Opacity is at 100 percent.
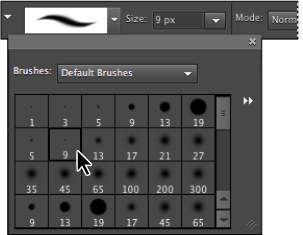
2 From the Show selected brush presets drop-down menu in the upper-left corner of the Options bar, choose the brush named Soft Round 9 pixels. The brush names appear when you hold your curser over a brush option.
 | You can also soften or harden the edges of your brush by repeatedly pressing Shift+[ (left bracket) or Shift+] (right bracket). |
|
Choose a soft, small brush. |
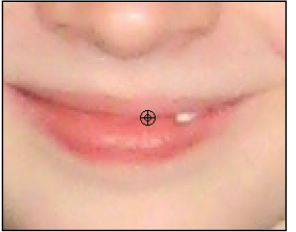
3 Position the cursor over a portion of the lip that is relatively close to the tooth. You are going to clone this section of lip, so you want the color to be approximately the same. Hold down the Alt (Windows) or Option (Mac OS) key and click to set this as your clone source.
|
Alt/Option+click to set a clone source close to the area you will retouch. |
4 Start clicking and releasing over the area of the tooth. If the clone source does not match, immediately press Ctrl+Z (Windows) or Command+Z (Mac OS) to undo the retouch, and Alt+click (Windows) or Command+click (Mac OS) on a source that will work better. With the Clone Stamp tool, you can get the best results from choosing a clone source, then dabbing on the area you want to retouch, then clicking to define a source (again), perhaps closer to the next area you plan to retouch. A good Clone Stamp user is frequently clicking away. Keep in mind that you can reduce the opacity of the Clone Stamp tool using the Opacity text field in the Options bar.
5 Press Ctrl+S, or choose File > Save, to save this file. Keep it open for the next part of this lesson.
Cloning an area with the Clone Stamp tool
In the last exercise, you retouched using the Clone Stamp tool. In this next part of the lesson, you will replace a tooth that is missing with another, existing tooth. You will also find out how to clone from one layer to another.
1 Press Ctrl+0 (Windows) or Command+0 (Mac OS) to fit the image into the window.
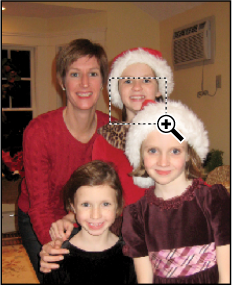
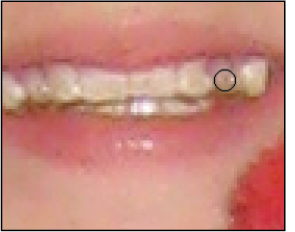
2 Select the Zoom tool ( ), and click and drag over the mouth of the girl who, in the image, appears to the right of the mother. You are now zoomed in and can see that she is missing a tooth on the right side of her mouth.
|
Click and drag to zoom into the mouth. |
3 Select the Clone Stamp tool (), keep the brush size at 9 px, and make sure you are back to 100 percent opacity in the Options bar, if you changed that in the last part of this lesson. Click the checkbox next to Sample All Layers in the Options bar. This will allow you to sample pixel information from one layer and apply it to another if you need to.
4 Alt+click (Windows) or Option+click (Mac OS) the canine tooth on the left side of the girl’s mouth.
|
Alt+click to set the left canine tooth as a clone source. |

5 If you do not see the Layers panel, choose Window > Layers.
6 In the Layers panel, Alt+click (Windows) or Option+click (Mac OS) the Create a new layer button ( ). By Alt/Option+clicking the Create a new layer button, you cause Photoshop Elements to open a New Layer dialog box, thereby allowing you to name the layer.
7 Type new tooth in the Name text field in the New Layer dialog box, and press OK.
8 Position the cursor over the right side of the mouth where the tooth is missing. You will be cloning the existing canine tooth into the empty area on the right side. Do not worry if it is not placed exactly in the right position, as you will be flipping the tooth and repositioning it in Step 9. Click and drag to start cloning the left canine tooth into the position where the right canine tooth would exist.
|
The tooth has been cloned, but is not yet flipped or positioned correctly. |
9 When you are finished re-creating the tooth, choose the Move tool ( ), make sure the options Auto Select Layer and Show Bounding Box are unchecked in the Options bar, then press Ctrl+T (Windows) or Command+T (Mac OS), or choose Image > Transform > Free Transform. The transform handles appear.
10 Flip the tooth horizontally by right-clicking (Windows) or Ctrl+clicking (Mac OS) on the tooth and choosing Flip Layer Horizontal to flip the tooth. If necessary, hover the cursor outside of one of the corner handles, click and drag to rotate the tooth, and then press the Enter key to confirm the transformation.
11 Make sure that the Move tool is activated and, using the arrow keys on your keyboard, reposition the tooth. Choose File > Save to save the file and File > Close to close it.
| If you have a hard time clicking and dragging the tooth, you may have Auto-select on in the Options bar. Click the checkbox to the left of Auto-select, and then reselect the tooth layer in the Layers panel and click and drag it into position. |
|
The replacement tooth after it has been flipped and repositioned. |