HTML Tutorial: Fundamentals of HTML, XHTML, and CSS
What you’ll learn in this HTML Tutorial:
|
This tutorial provides you with a foundation for working with HTML fundamentals. It is the first lesson in the Web Design with HTML and CSS Digital Classroom Bookbook. For more Web Design with HTML and CSS training options, visit AGI’s HTML Classes. |
HTML TUTORIAL: FUNDAMENTALS OF HTML, XHTML, AND CSS
In this lesson, you’ll discover the fundamentals of HTML, XHTML, and CSS. Together, these form the structure and style of your web pages.
Starting up
This tutorial is an excerpt from the Web Design Digital Classroom and uses lessons that are included with this book. You can follow along using your own files if you have not purchased a copy of this book.
We used the text editor Coda on the Mac to create the markup in this lesson, but you can use the text editor of your choosing and achieve the same results. Other popular text editors for the Mac include: BBedit, TextWrangler, and Textmate. For Windows, Microsoft Visual Web Developer Express, Microsoft WebMatrix, and Sublime Text Editor are good options. For more details see the sidebar on the next page.
Web languages
In this lesson, you will discover two languages: HTML and CSS. Although they have different syntax and rules, they are highly dependent on each other. By the end of this lesson, you will understand how to create simple HTML pages, add images, create hyperlinks from one page to another, and add simple styling to pages using CSS.
This lesson covers a lot of ground, and many of the core principles introduced in this lesson are reinforced throughout the remaining chapters.
Web page structure is based on HTML
Hypertext Markup Language (HTML) documents use the .html or .htm extension. This extension allows a web browser or device, such as a smartphone, to understand that HTML content is on the page, and the content of the page is then rendered by the browser or device according to the rules of HTML.
Markup tags are used to define the content on an HTML page. Markup tags are contained between greater than (<) and less than (>) symbols, and they are placed at the start and end of an object or text that is used in an HTML page. Here is an example of two heading 1 tags for text. The tags are not seen by the viewer of the web page, but every web browser knows that the text between the tags is a heading 1.
<h1>New Smoothie Recipe!</h1>
In this example, the <h1> is the opening tag and the </h1> is the closing tag. So this entire line of code is an element. More specifically, it is referred to as the heading 1 element.
HTML and XHTML are closely related. There is a list of rules defined by the World Wide Web Consortium, or W3C that specify the perimeters of HTML and XHTML.
An overview of text editors
The following is a brief list of popular text editors for both Mac OS and Windows computers. These editors offer capabilities such as automatic code completion, code coloring, and code checking.
BBedit and TextWrangler (Mac) These text editors are similar and are developed by the same company. TextWrangler is free and has fewer features than BBedit.http://www.barebones.com
Coda (Mac) is a text editor that also provides site management, browser preview, and built-in web publishing. http://www.panic.com/coda
TextMate (Mac) Along with being a text editor, its functionality can be extended by bundles that extend the capabilities of TextMate; for example, there are bundles that make adding JavaScript to your web pages much easier. http://macromates.com
Sublime Text Editor is a Windows-based text editor that supports many of the features of TextMate such as bundles and snippets. http://www.sublimetext.com/
Microsoft Visual Web Developer Express (Windows) provides a full featured text editor for web coding that supports HTML, CSS, and functionality for .NET programming. It also provides a basic visual layout environment for website design and development. http://www.microsoft.com/express/Web
Microsoft WebMatrix A code editing tool that also allows you to code, test, and deploy websites. http://www.microsoft.com/web/webmatrix
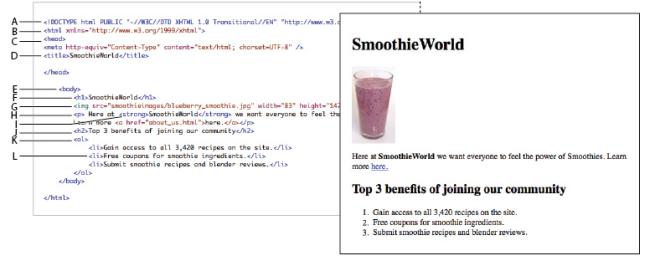
HTML code as rendered in the browser
To help you understand the relationship between the HTML code and what you see in your web browser, the following illustration will show you the connection between the two.
Image  |
A. Doctype. This line instructs the browser to interpret all the code that follows according to a unique set of rules. B. HTML element. This element nests all the following elements and tells the browser to expect an HTML document. C. Head element. This section includes information about the page, but nothing is rendered on the page itself. D. Title element. Any content inside the title tags show up at the top of the browser. This is what is used when a user bookmarks a page in the browser. E. Body element. All content within the body can be rendered in the browser’s main window. F. Heading 1 element. The first of six heading elements. Content that is a heading 1 is rendered very large and bold. G. Image element. Links to a graphic file and displays it on the page. H. Paragraph element. By default, the browser adds space before and after this element which often contains multiple lines of text. I. Strong element. Formats the enclosed content as bold by default. J. Heading 2 element. Compare the size of second largest heading to the first one. K. Ordered list element. Defines the enclosed list items as numbered. L. List element. Multiple list items will automatically be numbered by the browser. |
The details of XHTML syntax
There is little fundamental difference between HTML 4.0 and XHTML 1.0 — the two standards previously released by the W3C (World Wide Web Consortium). As XHTML was defined, it was created so that pages written in XHTML also work in browsers that render current HTML. The tags and attributes of XHTML and HTML remained the same, but the syntax of XHTML code is more strict.The most significant differences between XHTML and HTML are as follows:
• In XHTML, all tags must be lowercase.
• XHTML requires all tags to be closed — meaning that there must be a tag at the start and end of the element being tagged — such as a headline, paragraph, or image.
Image  | All tags in XHTML must close, even special tags that technically don’t require an open and close tag. For example, the <br> tag, which creates a line break, uses a special self-closing syntax. A tag that self-closes looks like this (with a space and a forward slash): <br /> |
• XHTML requires proper nesting of tags. In the following example, the <em> tag to emphasize text opens within the <h1> headline tag. As such, it must be closed before the <h1> is closed.
<h1>Smoothies are <em>great!</em></h1>
We’ve used XHTML-compliant code throughout this book as we provide HTML5 examples, which helps make your designs compatible with modern browsers and mobile devices.
Doctype lets the web browser know what to expect
The start of every web page should include a Doctype declaration. Declaring the doctype tells the web browser a little bit of information about what it is going to see on the page. Because there are different specifications for XHTML and HTML, the web browser knows which language it’s about to see and render. Because a browser renders the page starting at the top line and then moves down, placing your doctype on the first line makes a lot of sense. While it’s not required, it’s good form to always use doctype at the start of your HTML pages. The doctype for HTML 4.0.1 looks like this:
<!DOCTYPE HTML PUBLIC "-//W3C//DTD HTML 4.01 Transitional//EN" " www.w3.org/TR/html401/loose.dtd ">
When a web browser sees a Doctype declaration, the browser expects that everything on the page that follows will use that language. If the page adheres to the specifications perfectly, it is considered valid.
The W3C and page validation
The W3C is the World Wide Web consortium — a non-profit group that helps guide the evolution of the Web. The W3C provides guidelines and rules for specifications including HTML and XHTML. One way to determine the validity of the HTML or XHTML code you generate is to use W3C’s free online validation service.
Image  | You will need access to the Internet for this exercise. If you do not have Internet access, you may read through the exercise to understand the validation process. |
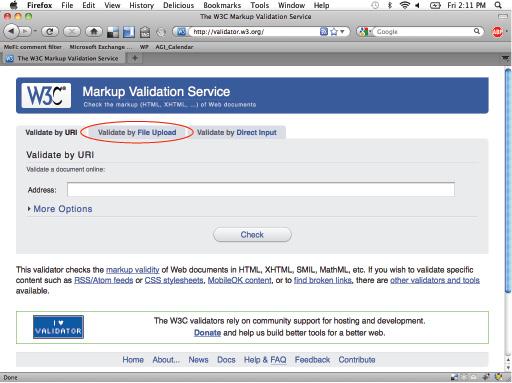
1 Open your web browser and navigate to http://validator.w3.org.
2 Click the Validate by File Upload tab.
Image  |
The W3C validator allows you to check your HTML code for errors. |
3 Click Browse (depending on your browser, this may also read “Choose File”), and navigate to your HTML5_02lessons folder, and select the w3_noncompliant.html file. Click the Check button to validate the code.
4 The W3C site returns several errors. Scroll down the page and you can see in-depth information on the errors. Don’t worry about the errors at this point. You will now upload a nearly identical file without errors.
5 Click the Browse button, navigate to your HTML5_02lessons folder, and select the w3_compliant.html file. The File Upload window appears. Press Open or Check, depending on how your browser labels the button.
6 Click the Revalidate button. You now see a Congratulations message that the page has been checked and found to be compliant as XHTML 1.0 Strict.
Image  | You can validate web pages that you’ve already placed online. Do this by using the Validate by URL option. You can also paste HTML code directly into the validator by choosing the Validate by Direct Input option. |
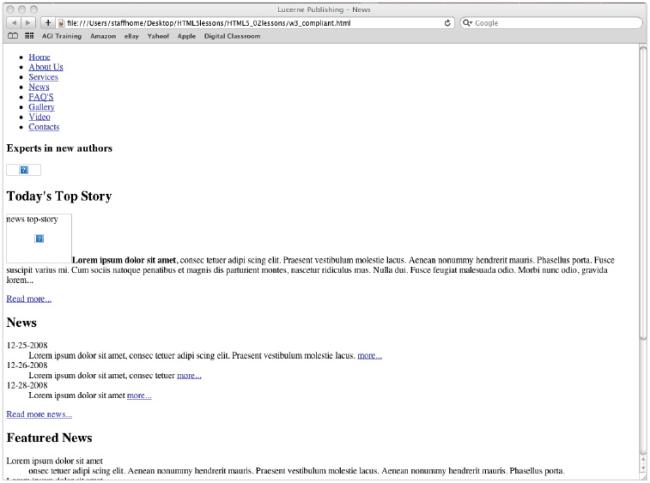
7 In your web browser, choose File > Open, navigate to the HTML5_02lessons folder, and select the same w3_compliant.html document that you just confirmed was valid. If you are using Internet Explorer, navigate to the HTML5_02lessons folder on your computer and drag and drop the w3_compliant.html document into your browser window.
Image  |
A “valid” page can have links to images that don’t exist and may have a poor visual design. |
Because we know that the page uses valid XHTML, we know that whatever problems there are with the page, they are not due to improper XHTML code. We know that there are no missing tags or misspelled tags. This can be useful for troubleshooting, allowing you to quickly identify any syntax problems.
Other benefits of standards-based design
W3C page validation is the most tangible aspect of standards-based web design, but there are also other benefits to creating well-structured pages, including:
Less code: Using HTML and CSS allows you to create similar pages with fewer lines of code — less work for you and faster download times for the viewer.
Ease of maintenance: Less code means a website that is easier to maintain. This helps you, the author of a page, as well as any members of a team working on maintaining or revising a website.
Accessibility: Web documents marked up semantically, meaning those that use the best HTML tag for the job, can be easier to navigate by users with visual impairments and the information they contain is more likely to be found by a visitor to the site.
Search engine optimization: Web pages with clear and logically named sections, both within the code and also within page content, are easier for search engines to index and categorize because content that is organized and well-labeled is easier for search engines to evaluate content and relevance of content on the page.
Device compatibility: Websites that separate the structure from the style are more easily repurposed for mobile devices and other browsers. CSS also allows for alternative style sheets that optimize the appearance based on the device being used to view the page.
Continue to the next HTML Tutorial: HTML structure >